Power Server Blume Integration
Prerequisites
Set up the organization on OAI and PS platforms, ensuring that modalities, study sets, procedure codes, and healthcare services are accurately created and configured.
Create Organization in OmegaAI and PowerServer
Creating Healthcare Resources in PowerServer
Create Organization in OmegaAI and Powerserver
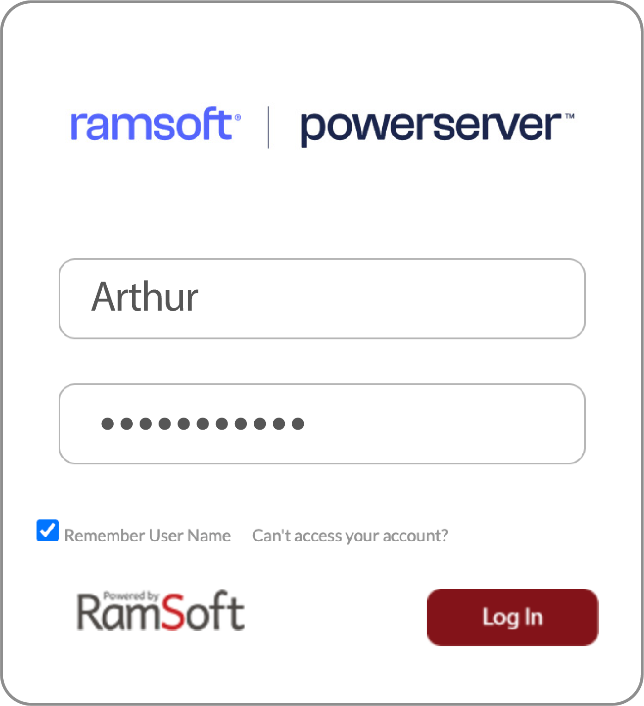
PowerServer Login
-
Go to the PowerServer login page.
-
Enter your username and password.
-
Click on the Login button.
Health Care Creation Note:
-
If applicable, complete multi-factor authentication.
-
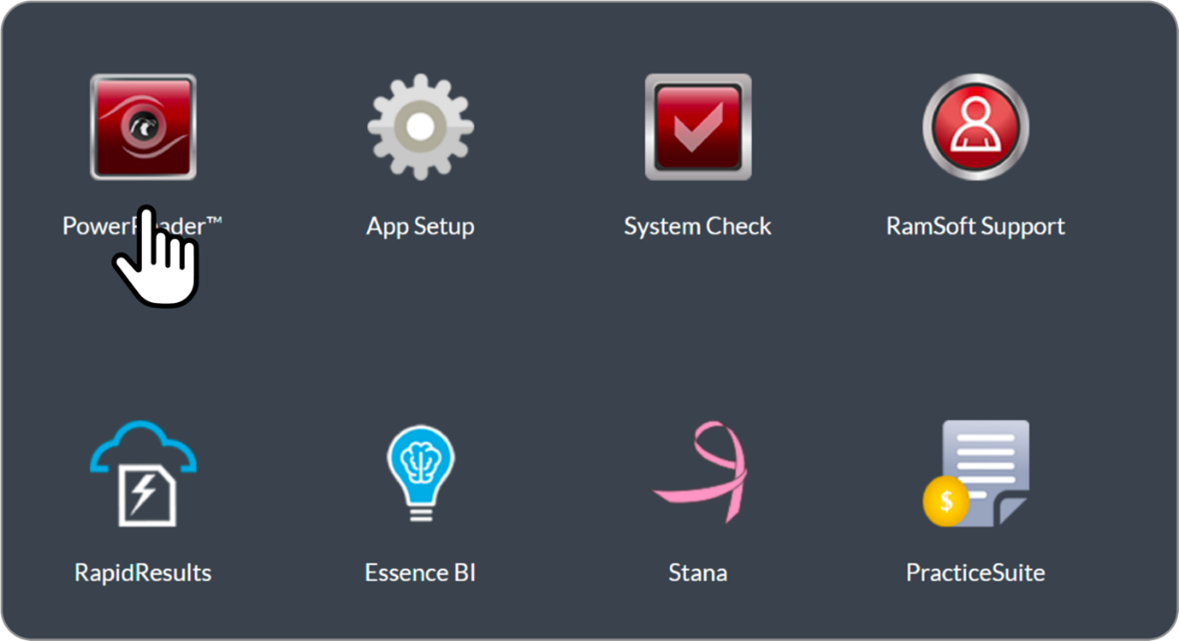
After logging in, a tile of the application window appears.
-
Single-click on Power Reader.
-
Click on the Power Reader icon and install the RamSoft app launcher for the first time. For the next login Double-click on the icon.
-
Log in to OmegaAI with administrative privileges.
Navigation Steps.
-
Access the "Admin" or "Setup" option of PowerServer.
-
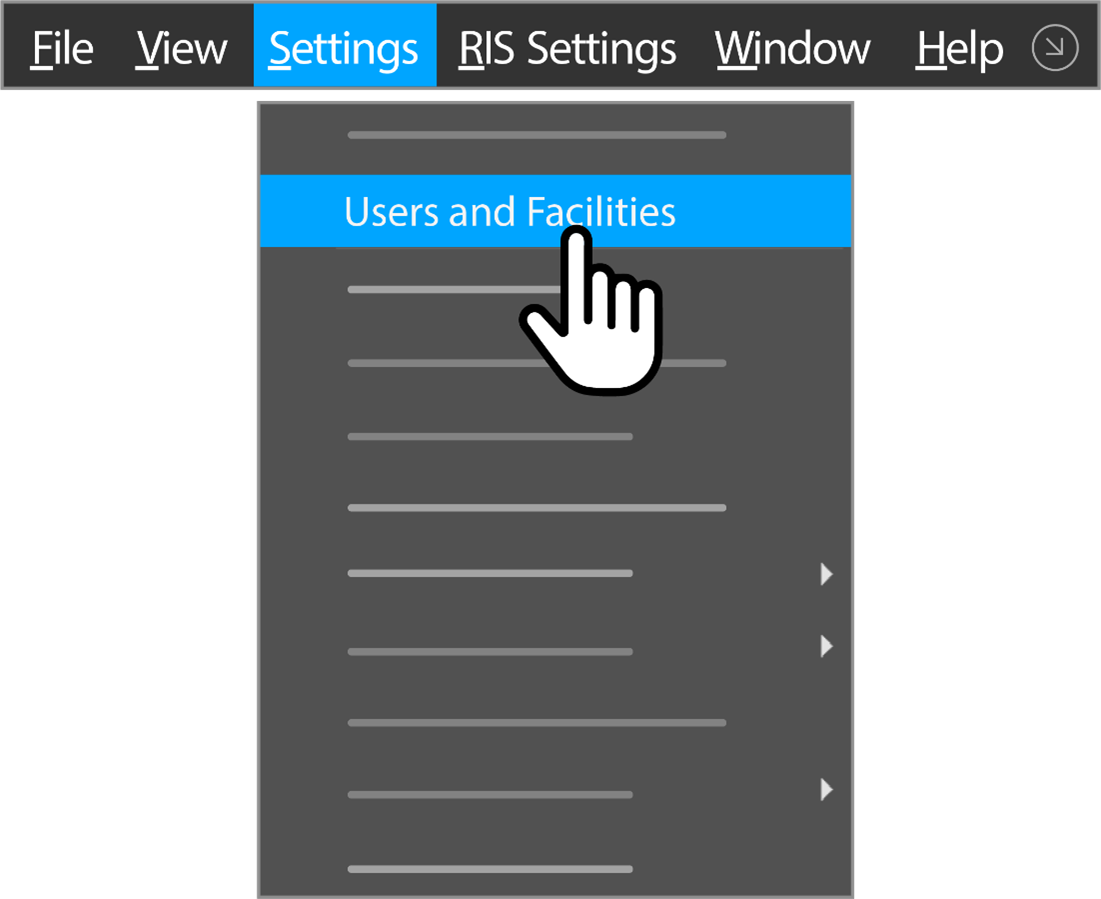
Go to "Settings".
-
Click on User and Facilities
- Click on Location.
- Enter the location details.
- Click on Resource.
-
Fill in the resource details (resource name, modality, default duration, working hours).
-
The parameters used in PowerServer to create a healthcare resource should be the same in the OAI while creating a healthcare resource for synchronization.
-
Assign the resource to specific workflows or user groups.
-
Click Close to create the resource.
Creating Healthcare Resources in OmegaAI
Notes: Healthcare Resource Creation
-
Patient ID Issuer:
- The issuer of the patient ID used in PowerServer 6.0 must exist under the Master Organization in OmegaAI (OAI) for the customer.
-
Custom Appointment Priority:
Creating Healthcare Resource in Powerserver
-
Patient appointment requests from Blume will be sent to PowerServer 6.0 with a custom priority labeled "SCHEDULED STATUS."
-
This priority must be manually added in PowerServer 6.0 by navigating to: Settings > Server Settings > Priority
- Use a PowerReader account with administrator role access to complete this configuration.
-
Facilities and Resources Synchronization:
-
Facilities and resources must be manually synchronized during the onboarding process.
-
This step is essential to enable proper data assignment propagation between PowerServer 6.0 and OmegaAI.
-
Steps to Create a New Healthcare Resource and Sync Between OmegaAI and PowerServer
In OmegaAI:
-
Log in to OmegaAI with your admin credentials.
-
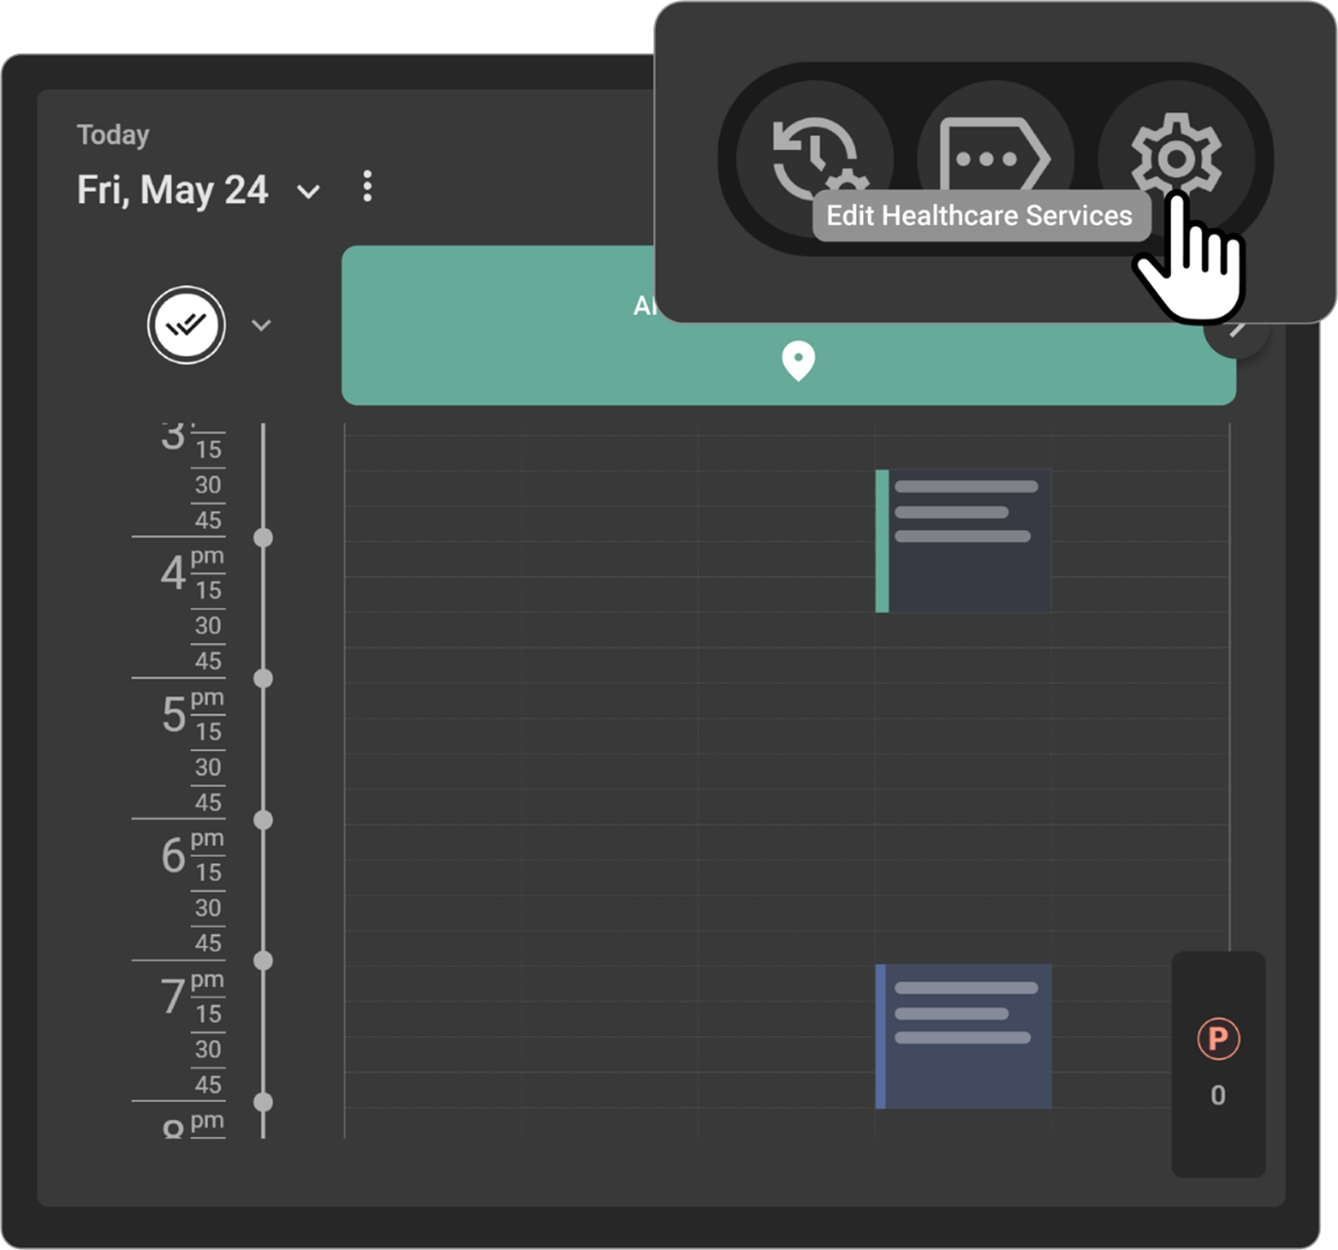
Navigate to Scheduler on the right-hand side.
-
Click on Edit Healthcare Services.
-
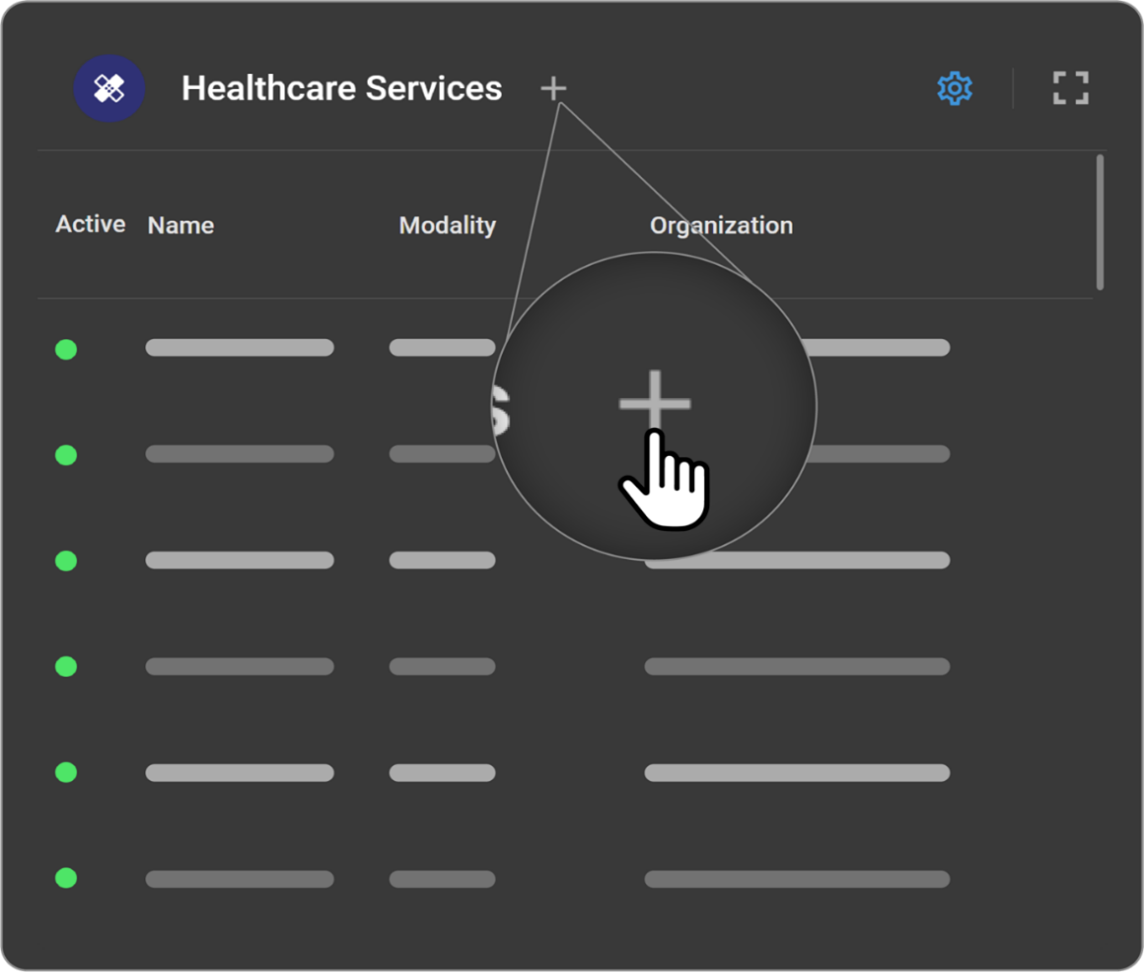
Click the + icon beside the Healthcare Services header to create a new healthcare resource.
-
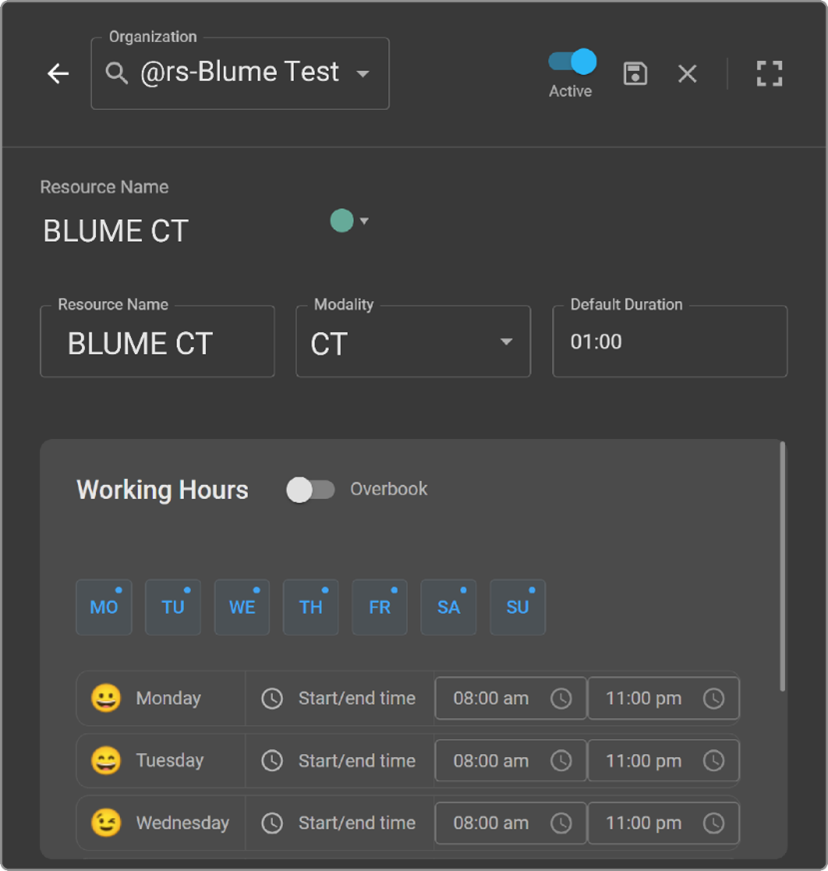
In the Organization Search field, enter your organization.
-
Use the Active Toggle Button to enable or disable the resource.
-
Beside Resource Name, choose a color code for your resource.
-
Under the Resource Name field, enter the desired resource name.
-
Select the appropriate Modality from the dropdown list.
-
Set the Duration (default is 1 hour, format: HH:MM).
-
Customize the Working Hours as needed.
-
Enable the Overbooking Toggle Button if required.
-
Specify the Days of the Week along with their start and end times for the resource.
-
Click Save beside the Active Toggle Button to save your resource.
In PowerServer:
-
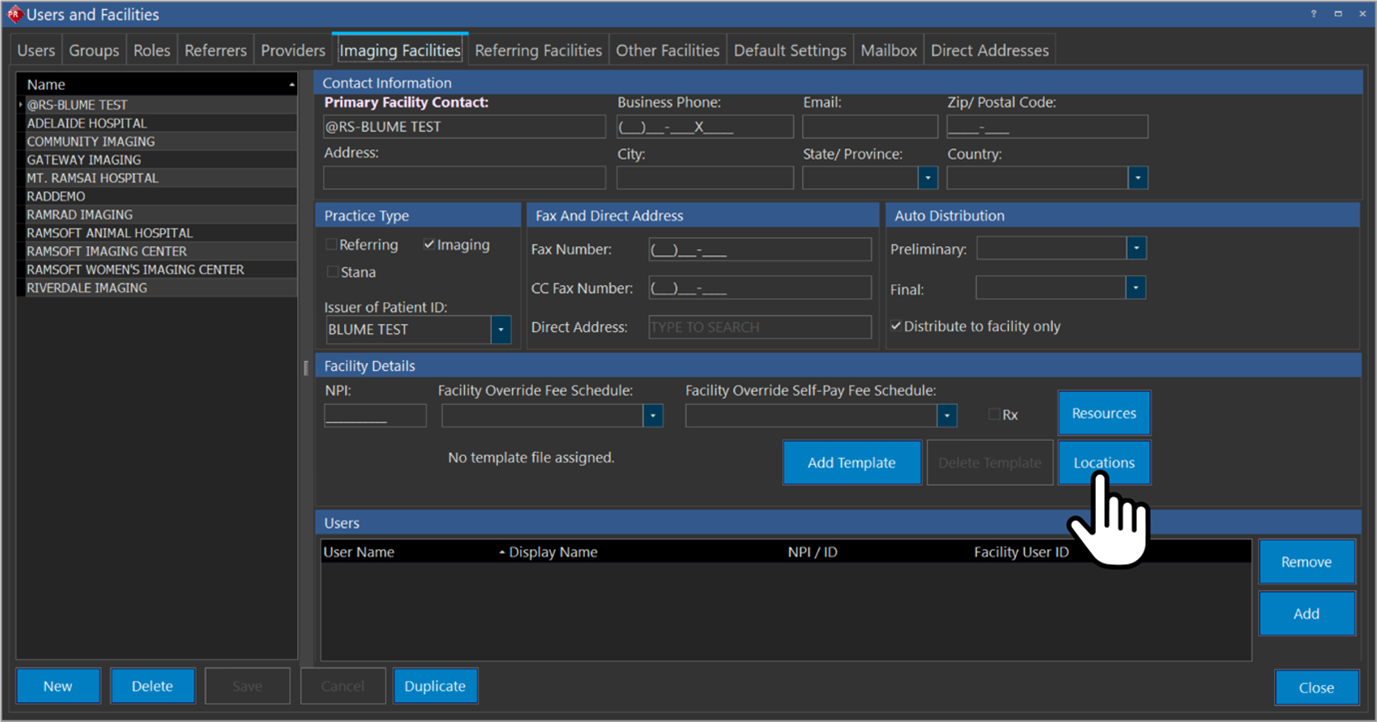
Navigate to Settings -> Users & Facilities in PowerServer.
-
Go to Imaging Facilities and click Location (found at the lower right side below the Resource button).
-
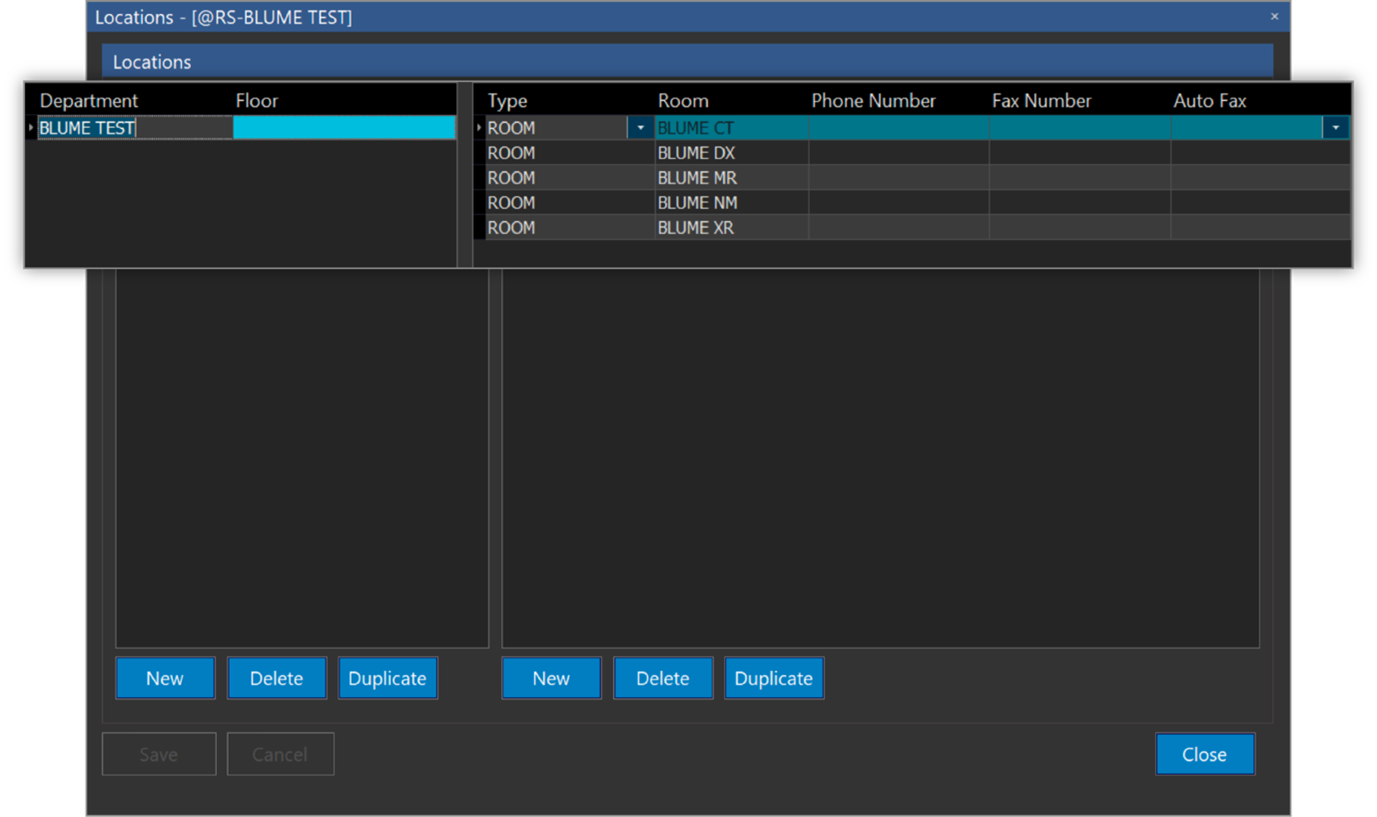
Click Location to create rooms for the resources.
-
Use the New button to create a new department/floor or room.
-
Save and close.
-
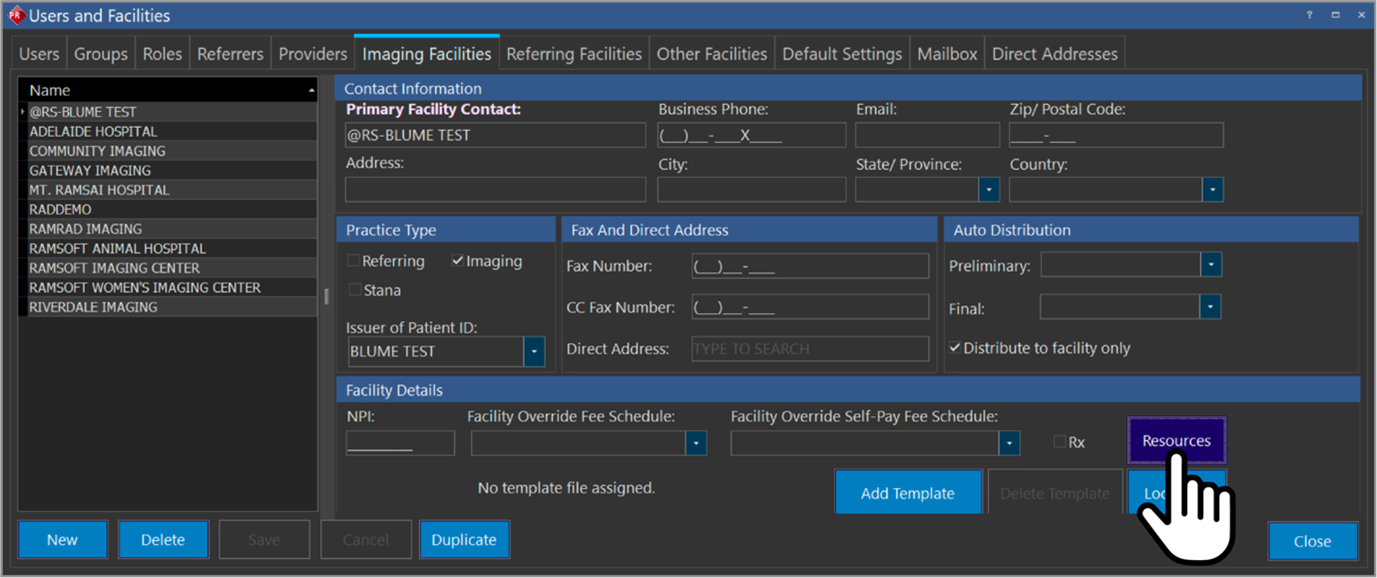
To create a new healthcare resource:
-
Navigate to Settings > Users & Facilities > Imaging Facilities > Resource Button.
-
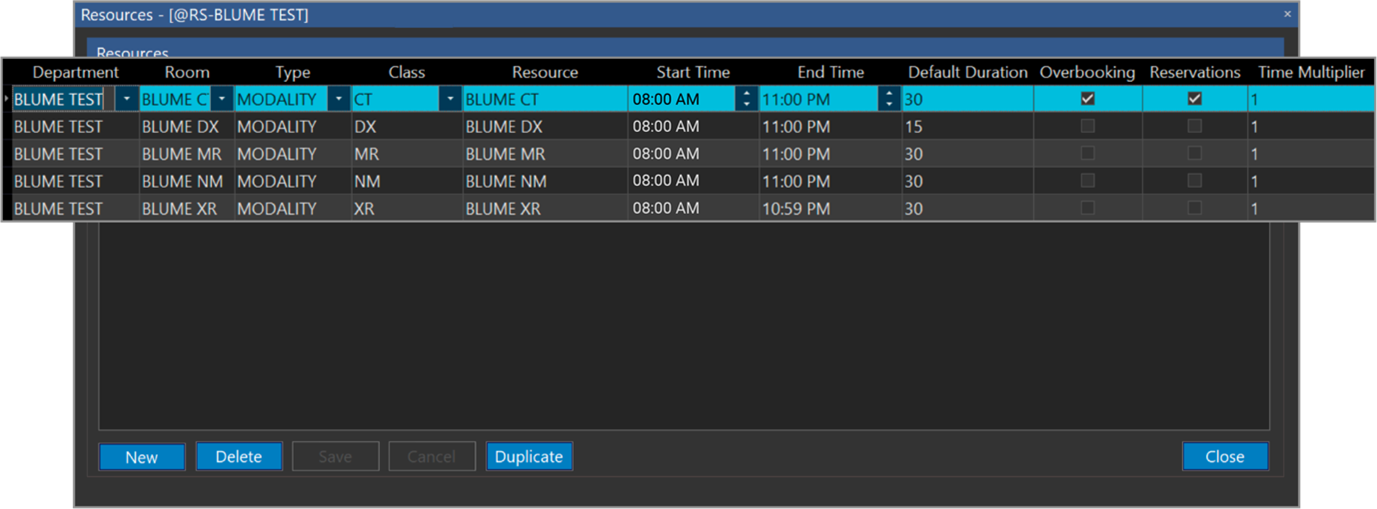
Click the New Button to add a resource.
-
-
Enter the following details carefully:
-
Department
-
Select the Room Name from the drop down (as created earlier)
-
Type
-
Modality
-
Class
-
Ensure the Resource Name matches exactly with the entry in OmegaAI.
-
-
Enter the same Start and End Times as in OmegaAI.
-
Ensure the Default Duration matches the value in OmegaAI.
-
Click Save & Close once all details are filled in.
Syncing the Resource:
-
Navigate to the Scheduler in PowerServer.
-
Click the Refresh Data Button in the toolbar.
-
The new healthcare resource created in OmegaAI should now be visible in the PowerServer Scheduler.
Navigation Steps:
- Log In:
- Access OmegaAI using an account with administrative privileges.
- Navigate to Resources:
-
From the dashboard, click on the Scheduler icon.
-
Go to Settings -> Resources.
-
Edit Healthcare Services:
- Click Edit Healthcare Services.
- Click on "Create New Resource."
5.Enter Resource Details:
- Provide the required information, such as resource name, modality, default duration, working hours, etc.
6.Assign the resource to specific departments or users if required.
- Save and Verify: save the new resource entry and verify its accuracy in the system.
Enabling Form Visibility on PowerServer
1. Purpose
This configuration ensures that forms and uploaded documents submitted from Blume or OmegaAI (OAI) are visible in PowerServer.
If this setup is not completed, users will still be able to submit forms in Blume or OAI, but the submitted data will not appear under the patient record in PowerServer.
2. Procedure
Step 1: Access Mirth Connect Manager
- Log in to Mirth Connect Manager.
- Locate the channel named:
Outbound FHIRJSON to HL7 XML – ORU R01 FHIRJSON to HL7 XML to 6.0 - From the left-hand panel, select Transformer to open the configuration view.
Step 2: Enable the Required Document Types
- In the Transformer section, find the parameter allowedOutputDocumentTypes.
- By default, only two document types are enabled:
- 56444-3
- 55188-7
- To ensure all relevant forms and documents from Blume or OAI can be transferred to PowerServer:
- Verify that all required document type codes are listed.
- Add any missing document type codes according to your organization’s configuration needs.
- Once updated, click Save to apply the changes.
Important:
If the required document type codes are not included, submitted forms or documents will not appear in PowerServer, even though the patient successfully completes and submits them in Blume.
Step 3: Save and Apply Configuration
- After saving, redeploy or restart the channel to activate the new configuration.
- Confirm that the channel status displays as Active and running without errors.
3. Verification
After completing the configuration:
- Add or update a patient record in PowerServer.
- Schedule an appointment for the same patient.
- Confirm that the patient receives a Form Notification in Blume.
- Access the form through Blume, fill it out, and submit it.
- Return to PowerServer and verify that:
- The submitted form appears under the patient’s record.
- The Mirth Connect Manager shows successful message processing without channel errors.
Tip:
You can review message logs in Mirth Connect Manager to ensure form data is transmitting correctly from Blume or OAI to PowerServer.
4. Result
Once the configuration is completed:
- All forms and uploaded documents submitted through Blume or OmegaAI will automatically appear under the correct patient record in PowerServer.
- This setup enables seamless synchronization between PowerServer and the connected systems.
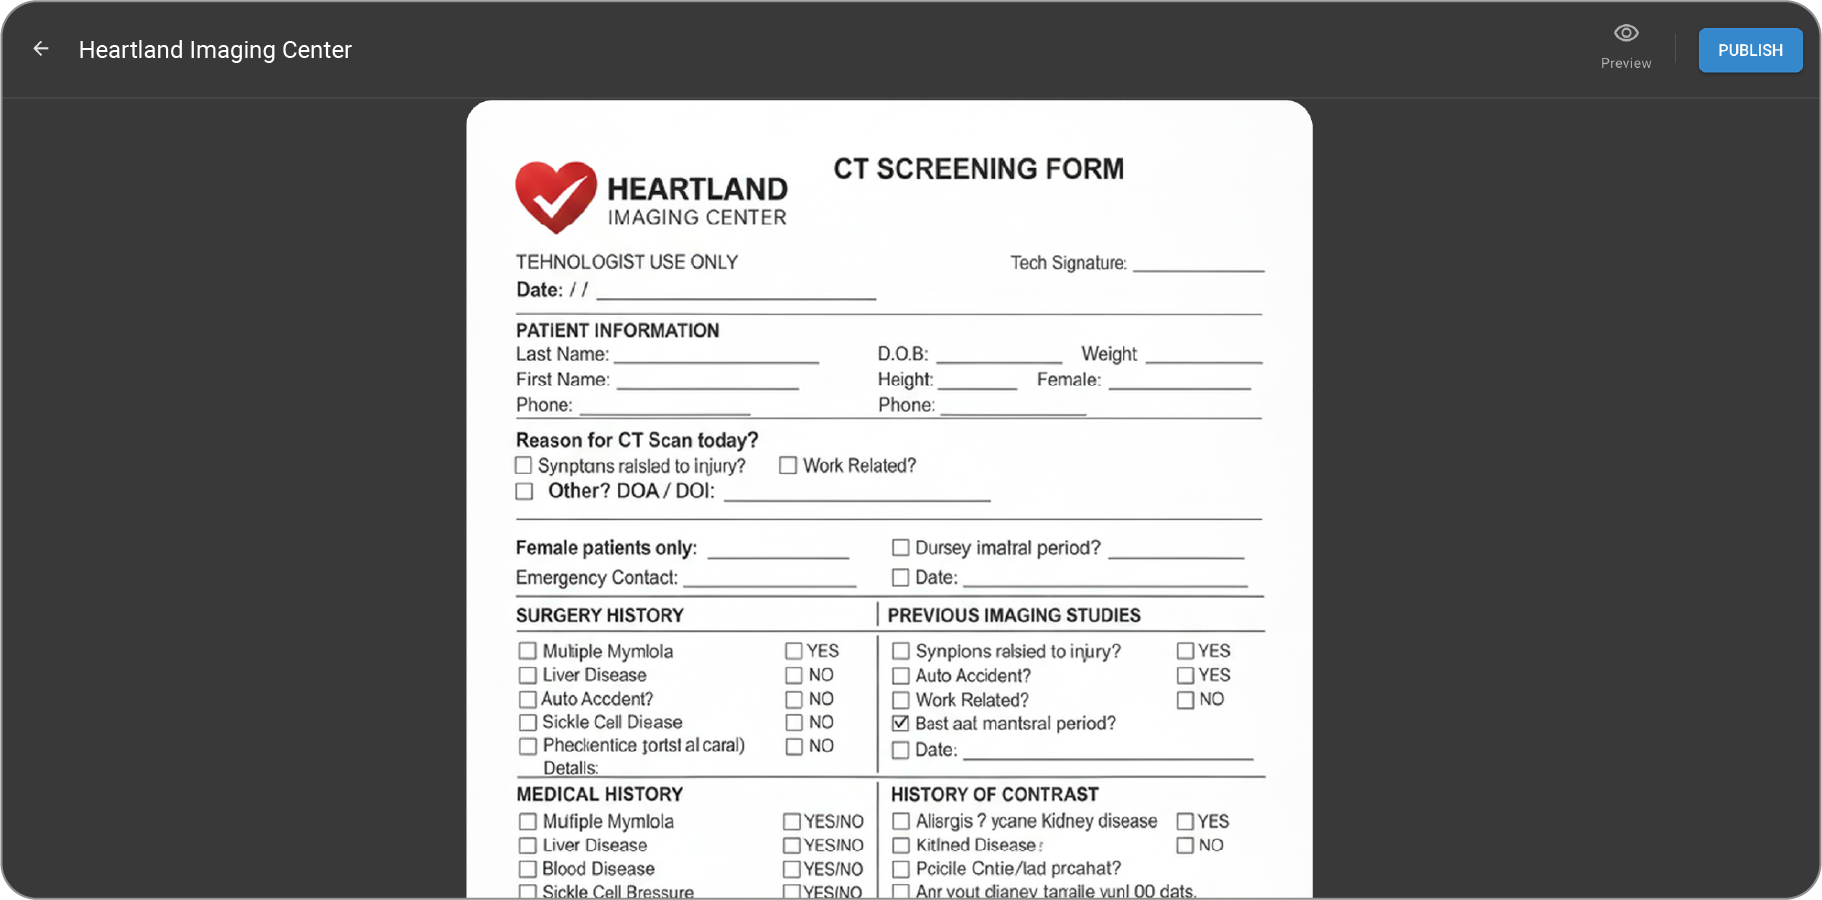
Form Configuration in OmegaAI
Creating a New Blume Form
-
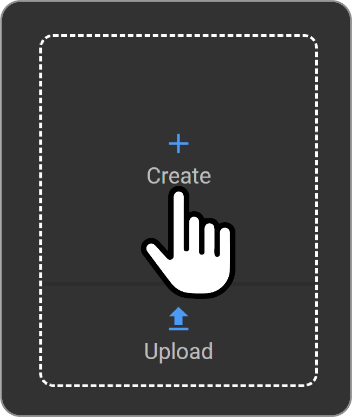
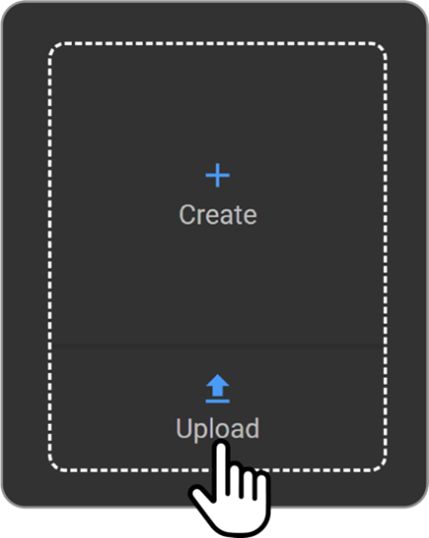
Start Form Creation:
-
Click the 'Create' icon or upload a fillable PDF form.
-
This action opens the form editor.
-
Supported form types: 1. Normal Form 2. PDF Form
-
-
Add Questions:
-
In the form editor, click the 'Add Question' button.
-
Choose from various question types:
-
Short Answer
-
Multiple Choice
-
Checkboxes
-
-
-
Configure Question Settings:
-
Customize settings for each question:
-
Mark as mandatory (if required).
-
Add subcategories.
-
Define answer options.
-
-
Ensure all necessary information is collected.
-
-
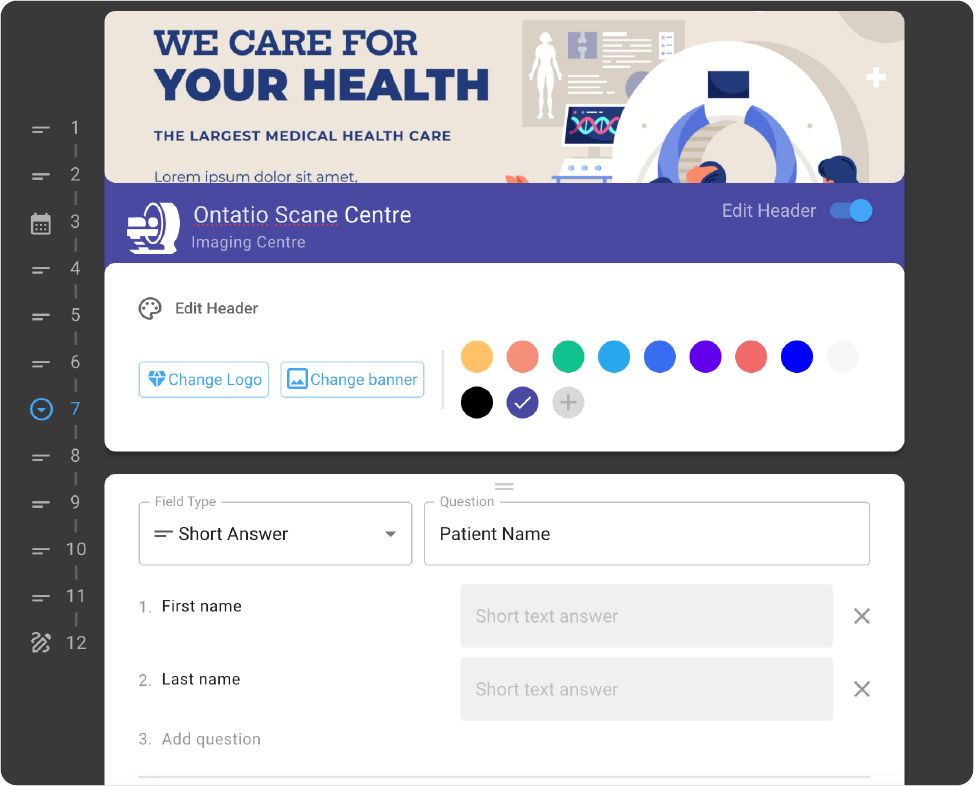
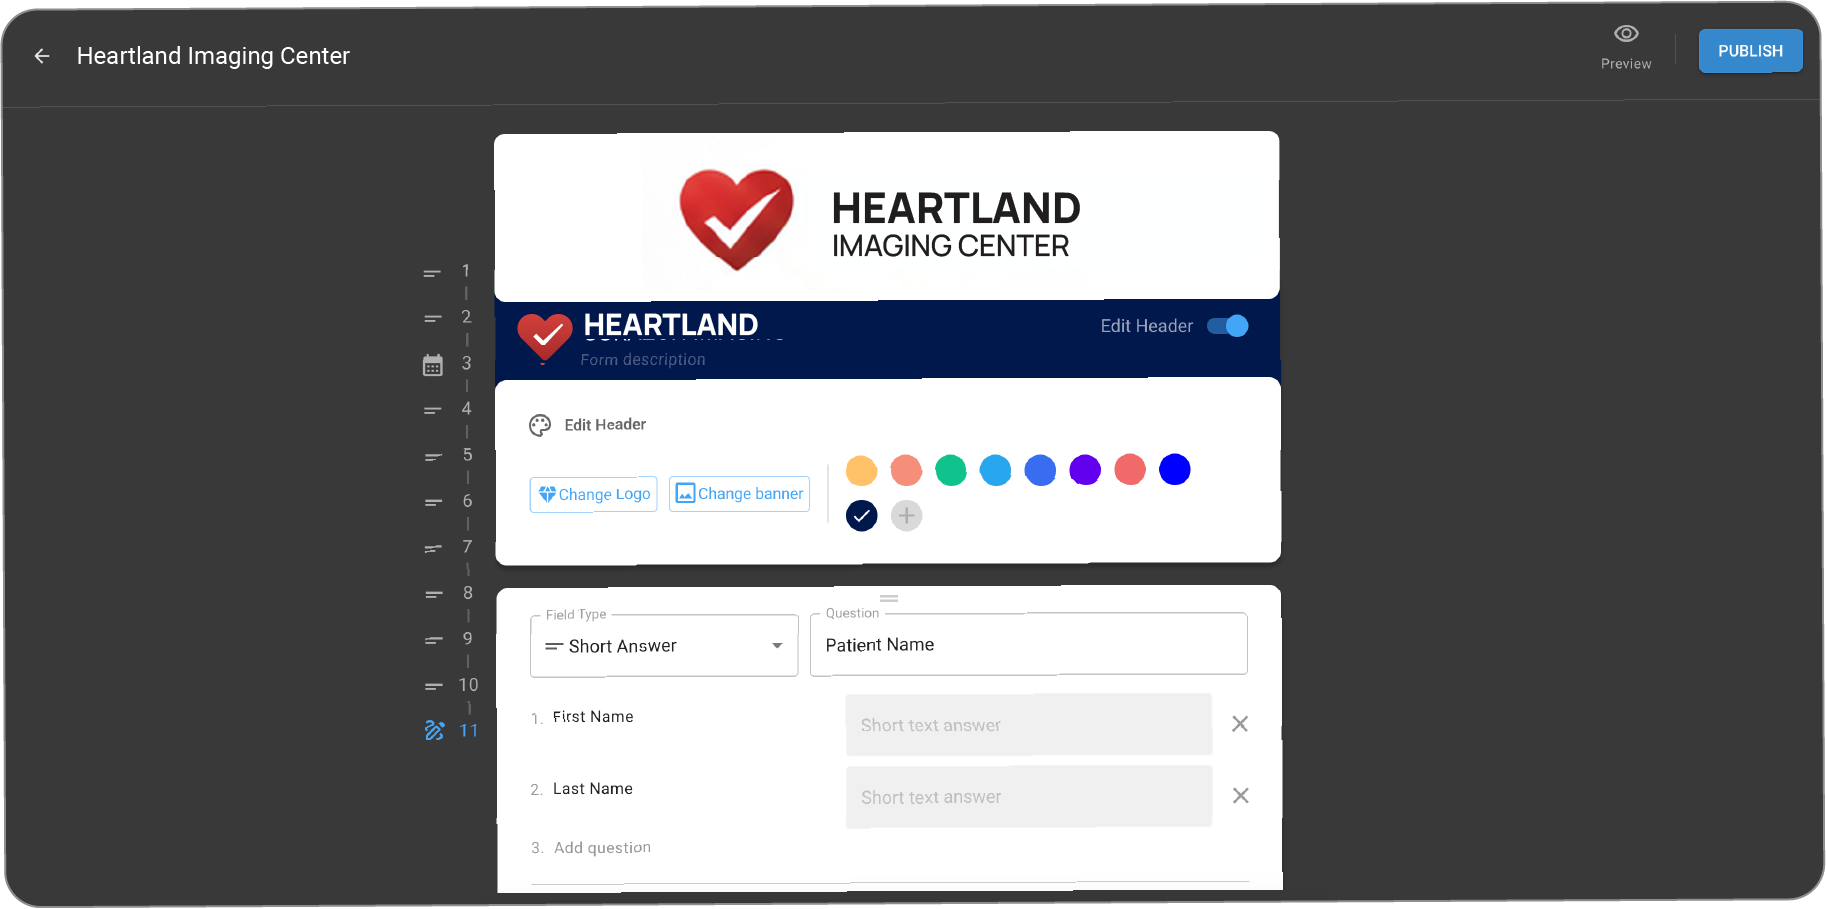
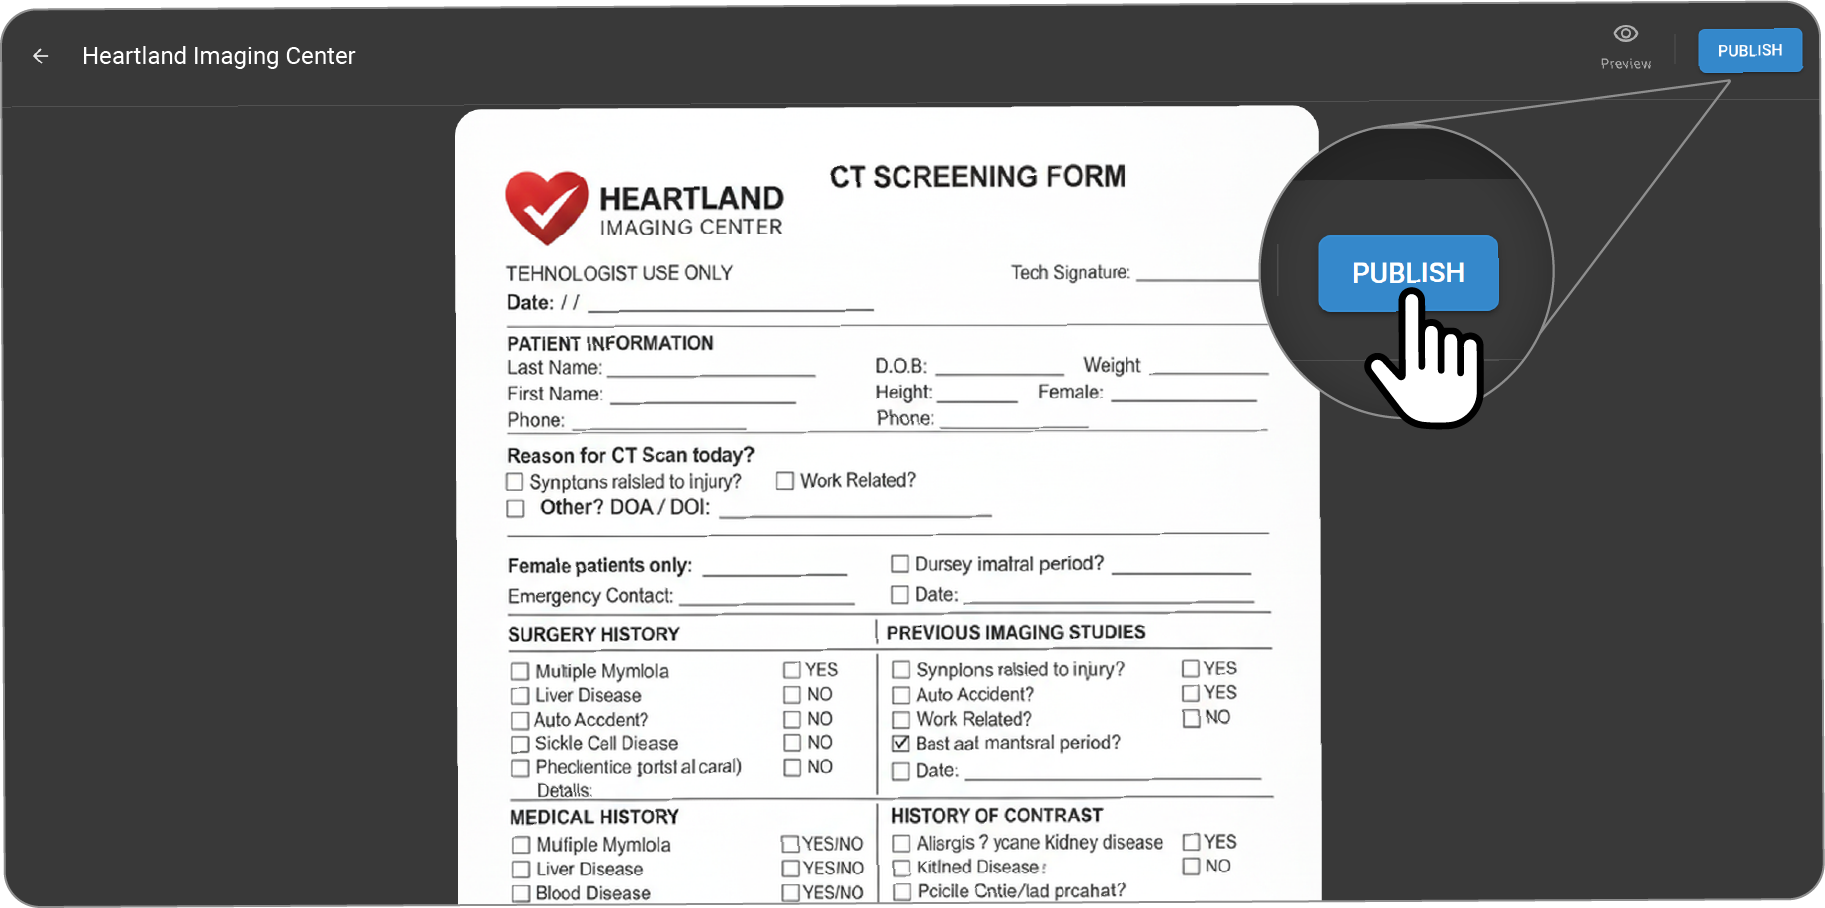
Preview and Publish:
-
Preview the form to confirm it meets your requirements.
-
If everything is satisfactory, click 'Publish' to make the form available for patients.
-
Accessing Blume Forms
-
Log in to your OmegaAI account.
-
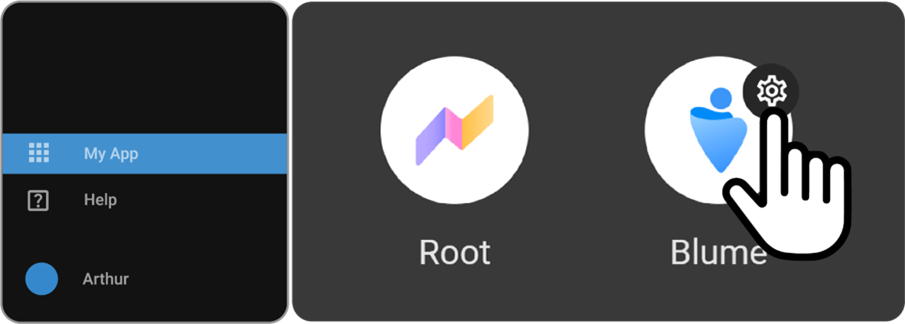
Navigate to the 'Apps' section.
-
Click on the 'Settings' icon within the Blume application.
Managing Existing Blume Forms
-
Go to the Blume Settings screen.
-
Locate the form you wish to manage.
-
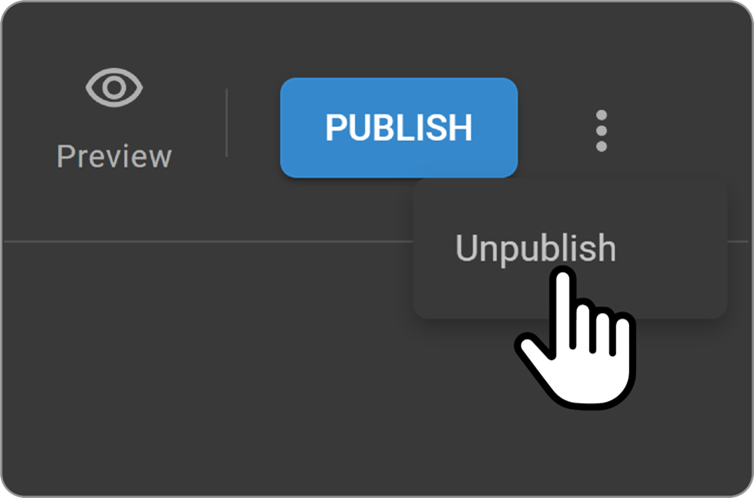
Use the three dots menu next to the form to:
-
View
-
Edit
-
Unpublish as needed.
-
Submitted Forms
-
Submitted Registration Forms: Displayed in PowerServer (PS) -> Document Viewer -> Patient Docs section.
-
Submitted Clinical Forms: Displayed in PowerServer (PS) -> Document Viewer -> Documents section.
Navigation Steps
-
Navigate to Blume Settings from My App on OAI.
-
Navigate to Blume Settings from My App.
-
Click on "icon to Create New Form."
-
Click on "+" icon to create new form.
-
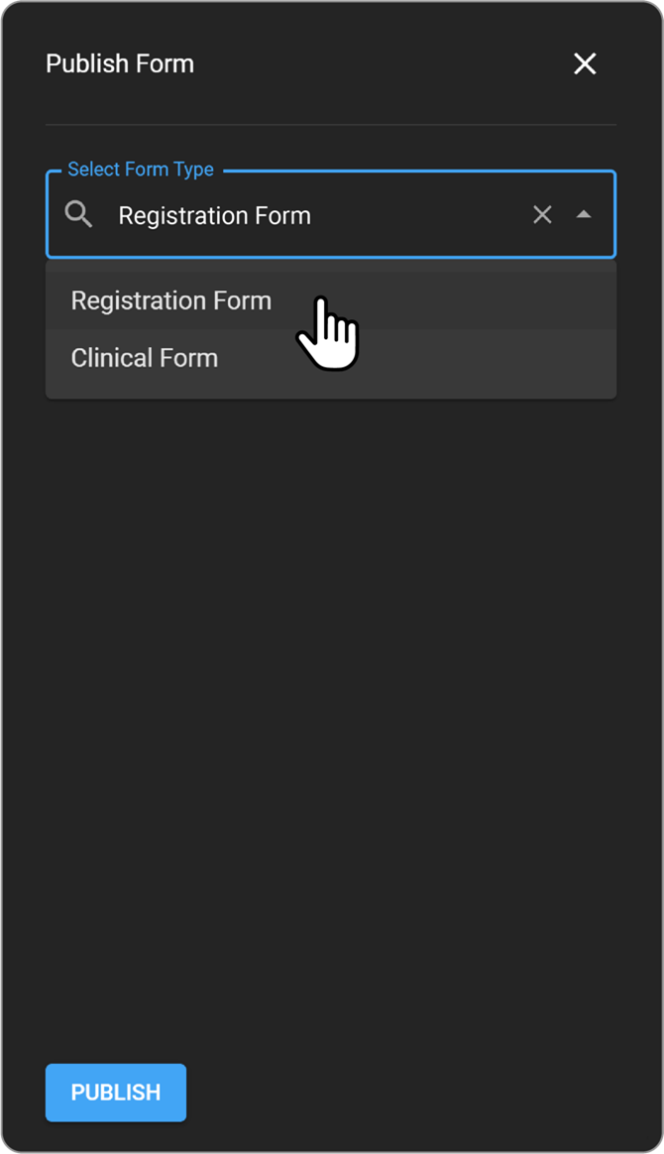
Publish Form window appears.
-
Select a template Registration Form or Clinical Form from the drop-down.
- Add relevant fields (e.g., patient information, medical history).
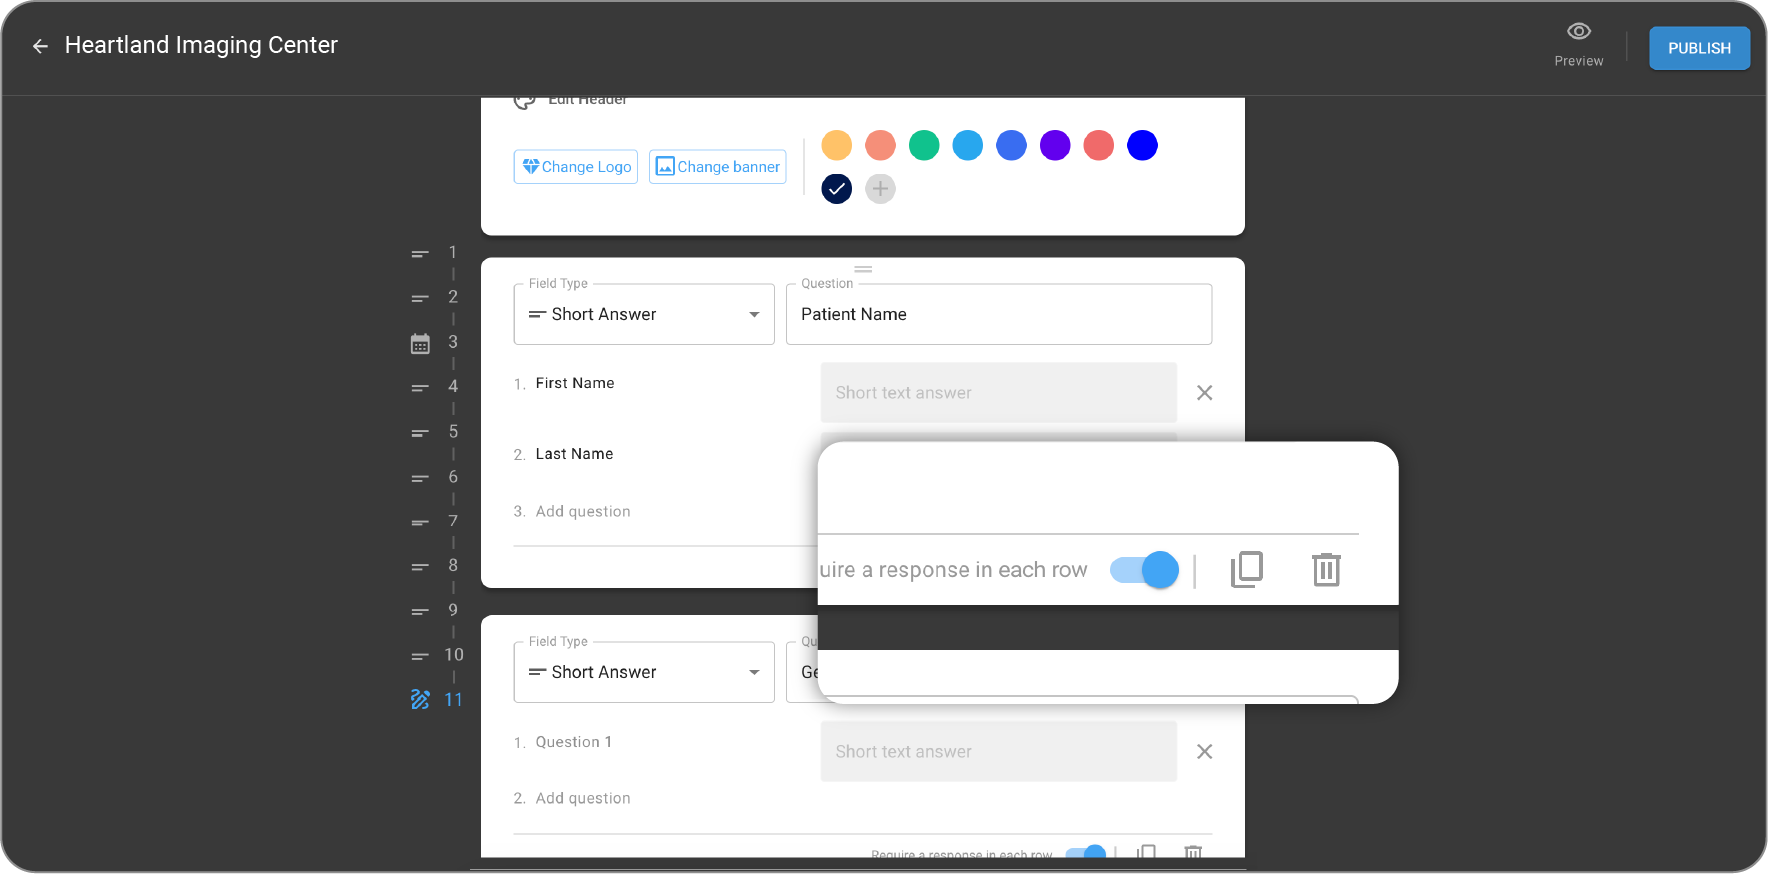
- Customize field properties (mandatory, optional, etc.).

-
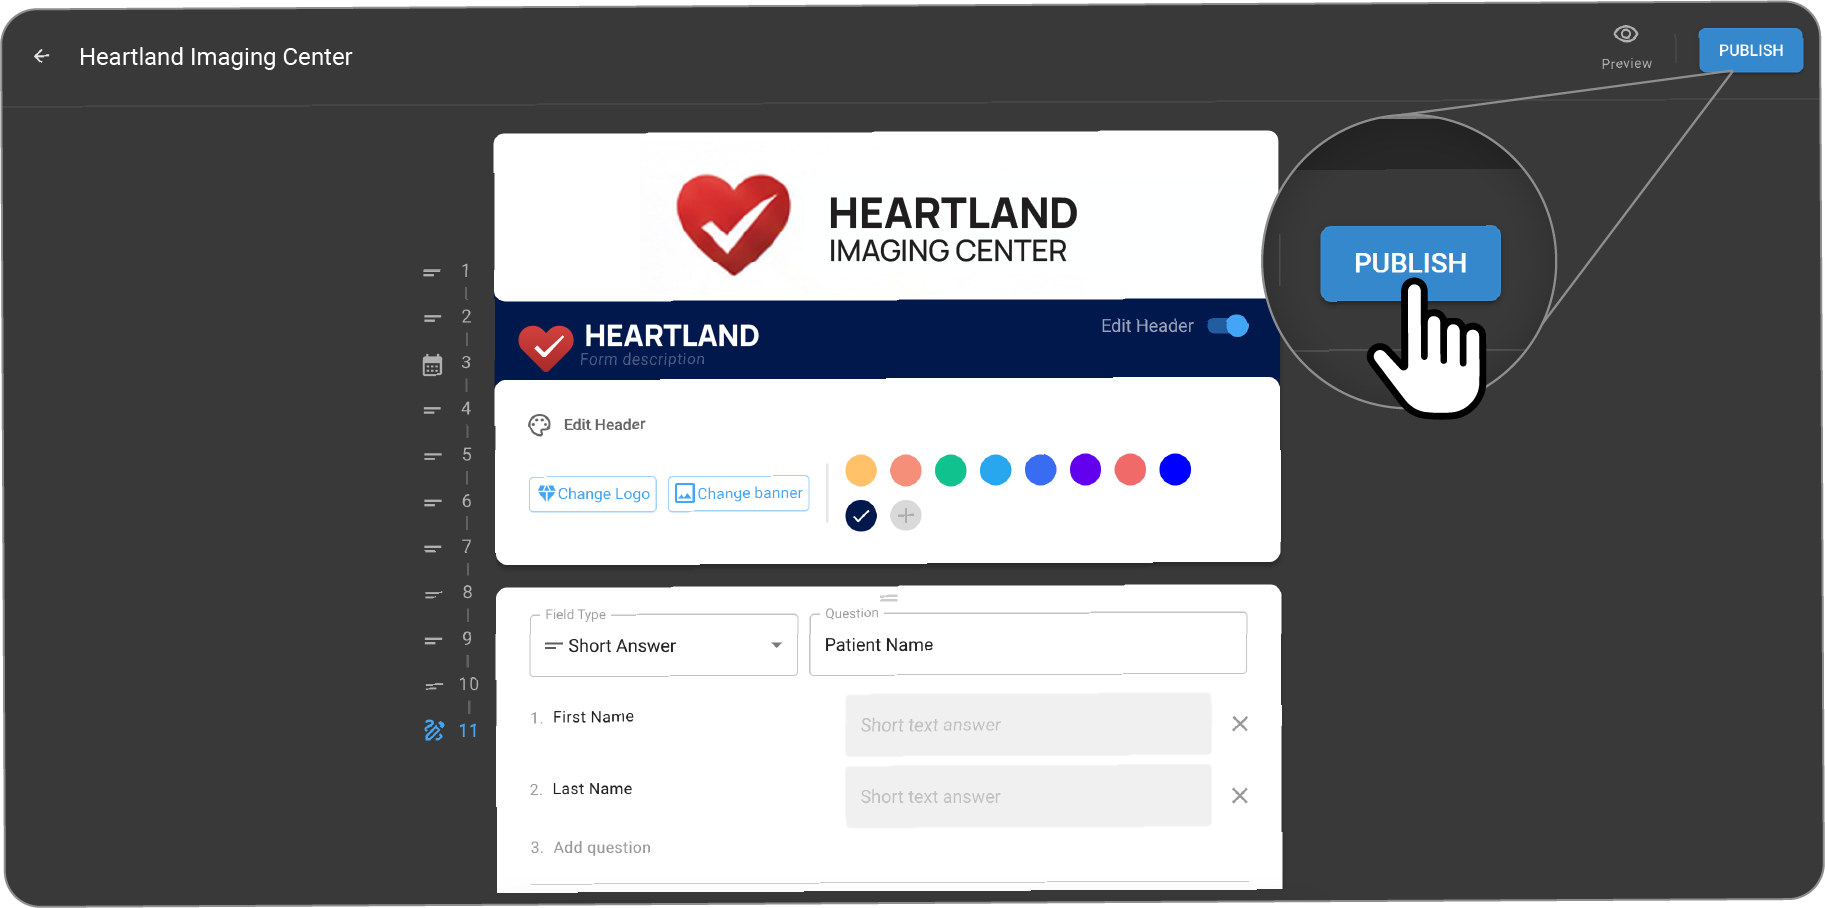
Click on PUBLISH button in top right corner to publish the form.
-
Click the Publish button in the top right corner to publish the form.
-
Click on three dots and select the Unpublish option to discard the
-
Click on three dots and select the Unpublish option to discard the main form.
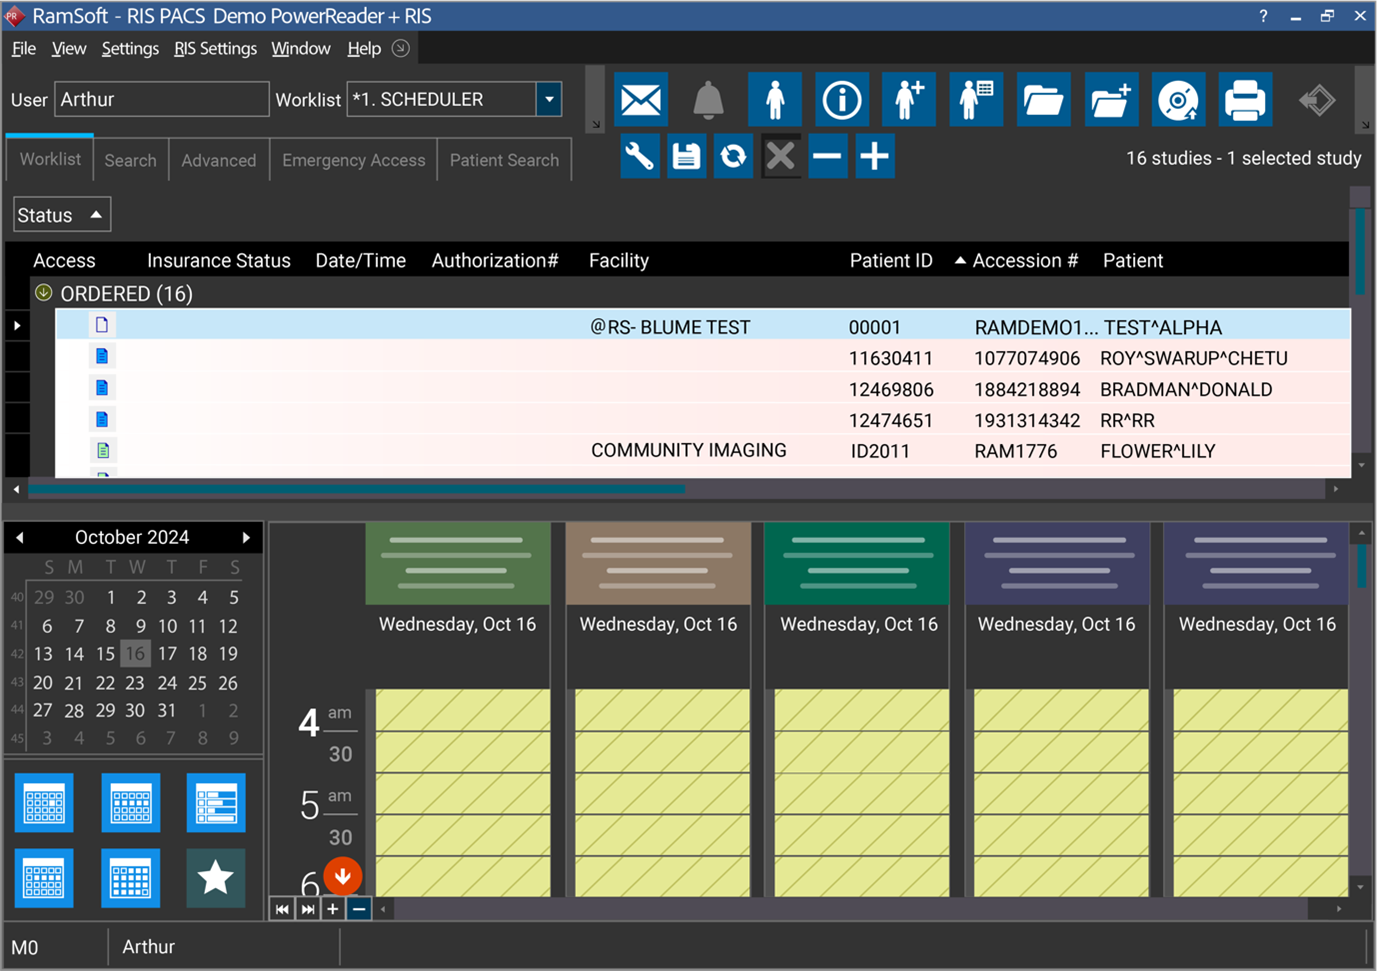
PowerServer Homepage
Notes: PowerServer
-
After login, youΓÇÖll land on the PowerServer homepage.
-
The homepage displays key metrics, tasks, and modules.
-
Access patient records, appointments, and imaging tools from the main menu.
-
Customize the layout by pinning frequent actions or notifications.
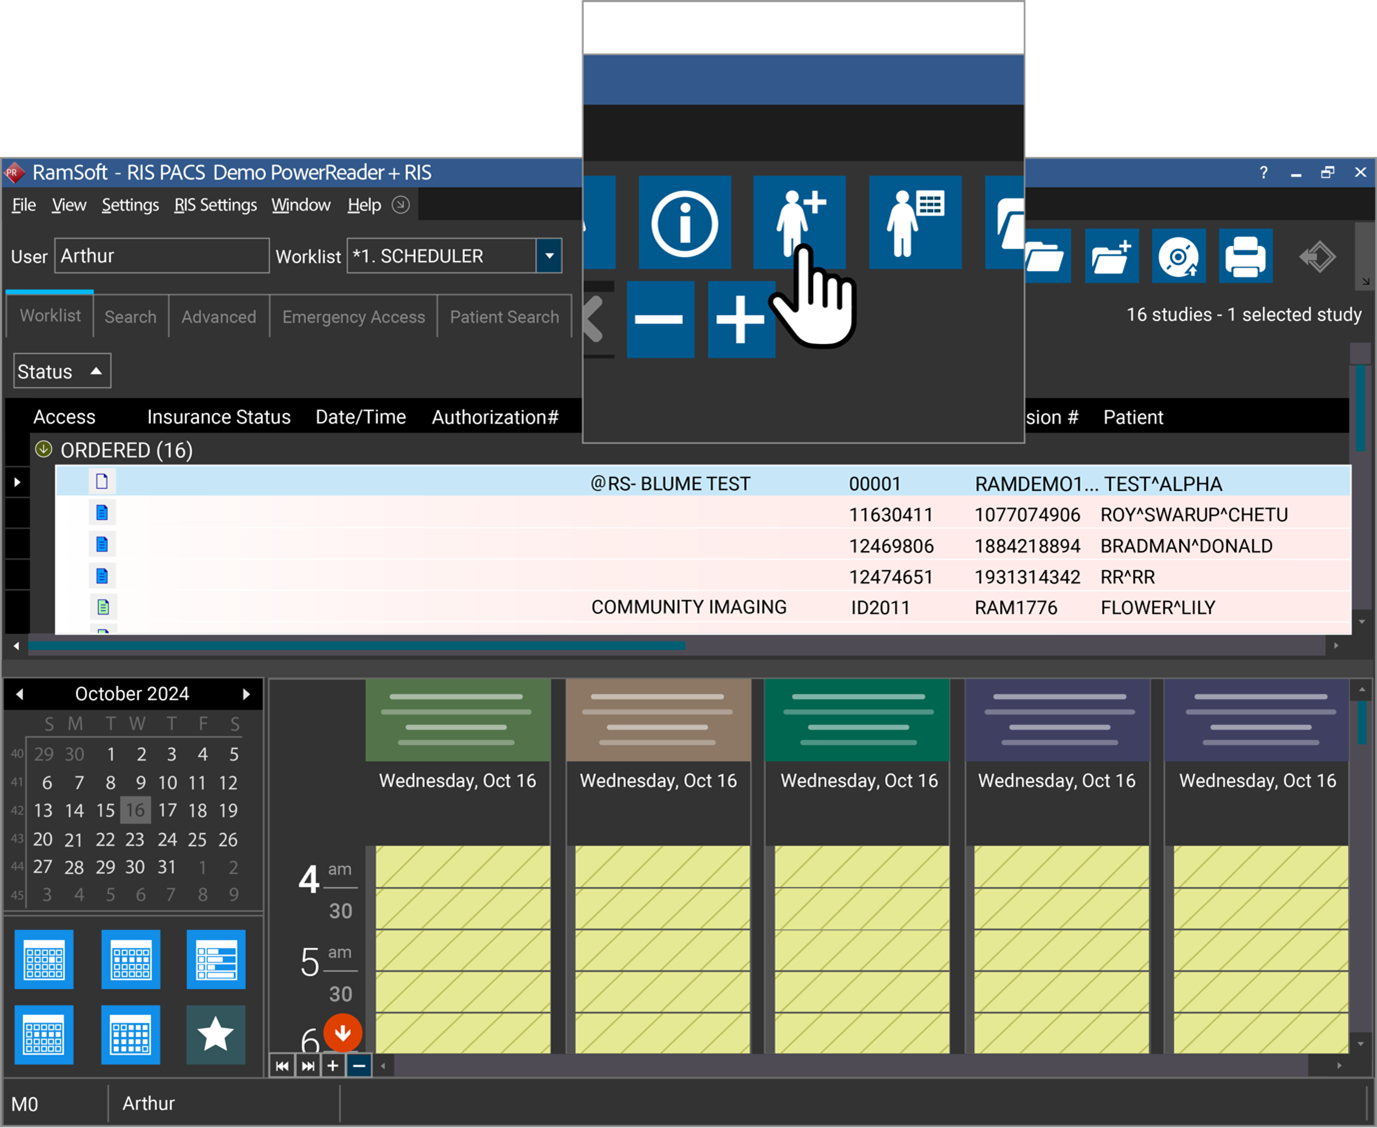
Adding Patient PowerServer
-
Navigate to the main toolbar .
-
Click the "Add New Patient icon
-
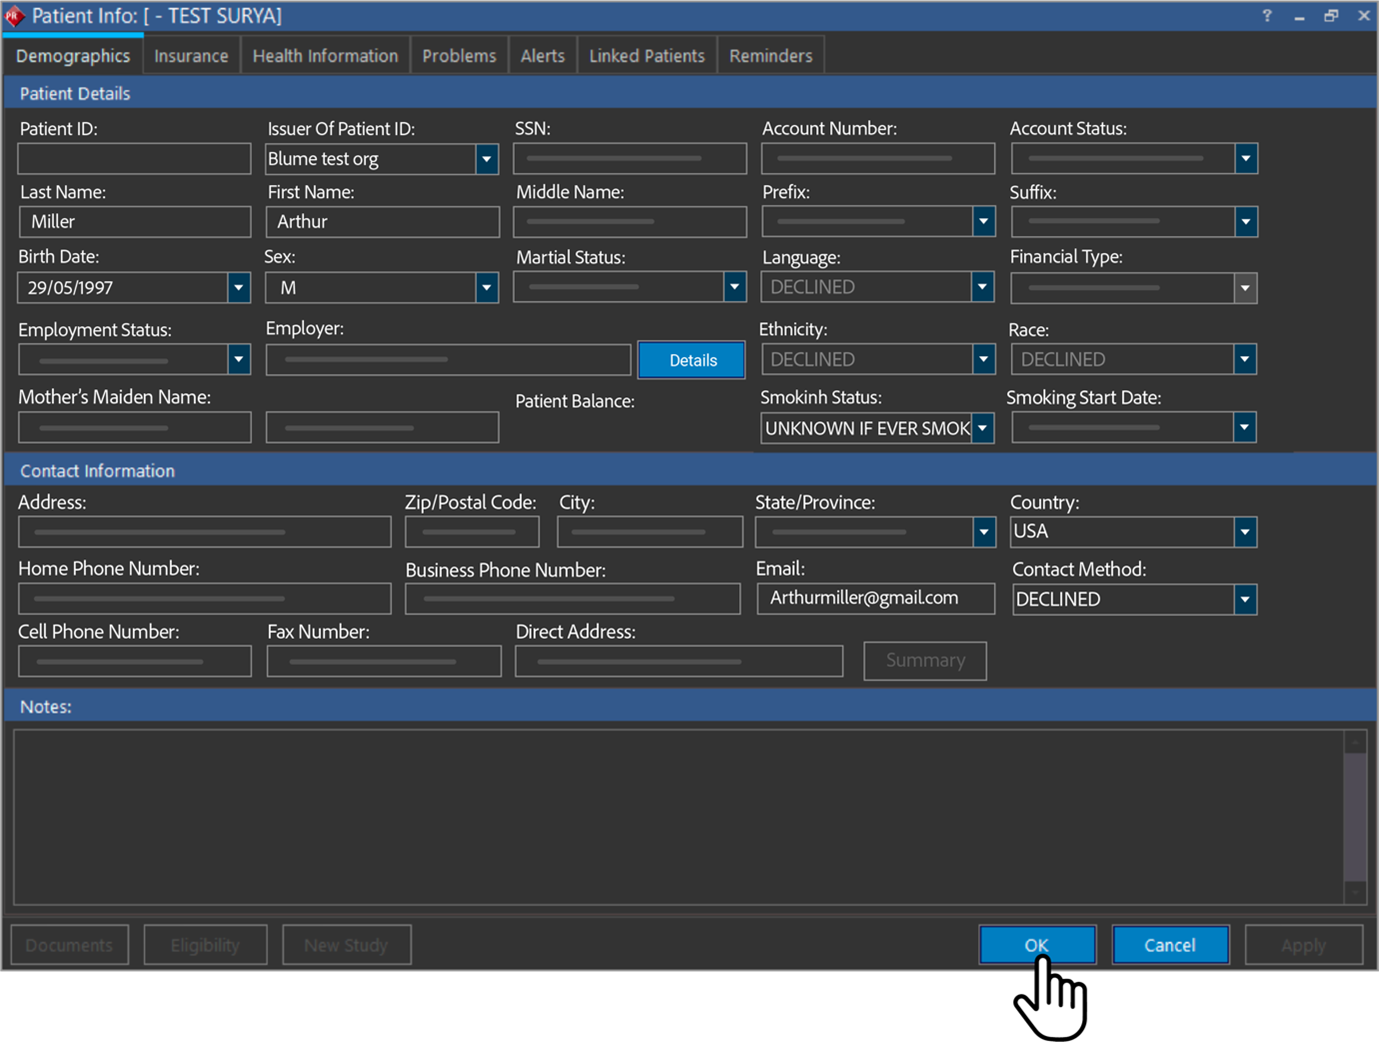
Click Add New Patient icon.
-
Enter patient demographic details (name, date of birth, contact information).
-
Upload any relevant documents or health records.
-
Save the patient profile.
Book Appointment
- Creating a New Appointment
The integration facilitates smooth management and confirmation of appointments. Once an appointment is confirmed, the details, along with any forms, are sent to the document viewer, ensuring that all information is easily accessible for review.
- Initial Setup
First, access the Power Server portal and ensure you are logged in with the appropriate credentials. To initiate a new appointment, navigate to the scheduler.
The Scheduler is designed to monitor resource usage, serving as a detailed calendar or planner for listing events (studies) at their scheduled times and dates. When activated, users can view and schedule studies within their associated facilities. Systemwide administrators and users not restricted to a specific facility will have access to view all facilities in the scheduler.
To schedule a study for an appointment:
Method 1:
- Right-click on Open Time Slot.
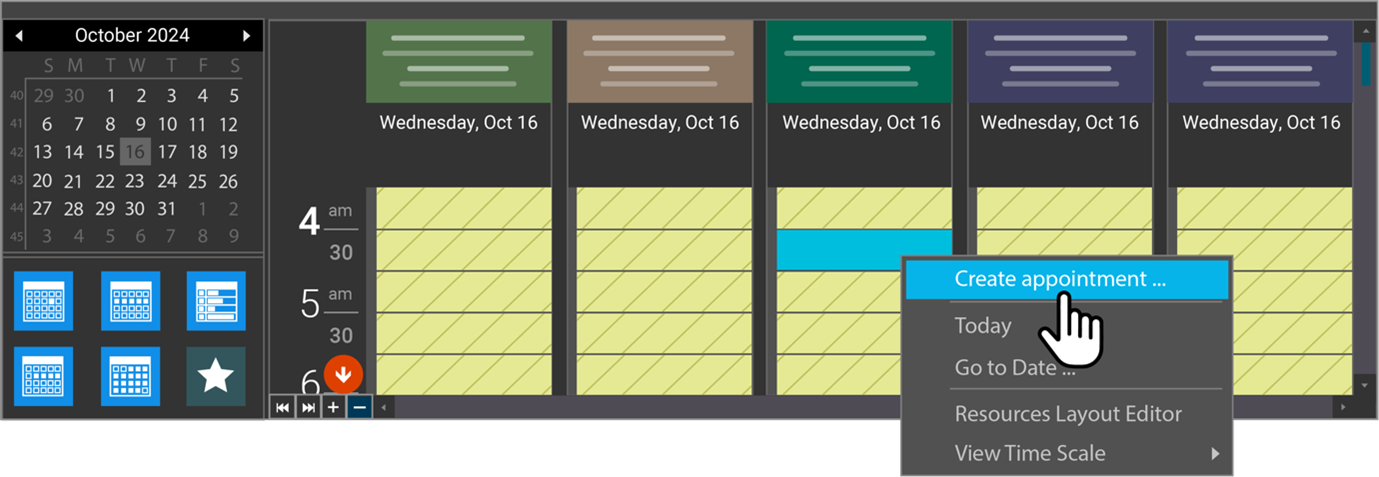
Method 1: Right-click on Open Time Slot
The available resources and their schedules for a facility are set in the Resources section under Settings -> Users and Facilities -> tab.
-
Click Create appointment.
-
Fill in the details.
-
Click Ok.
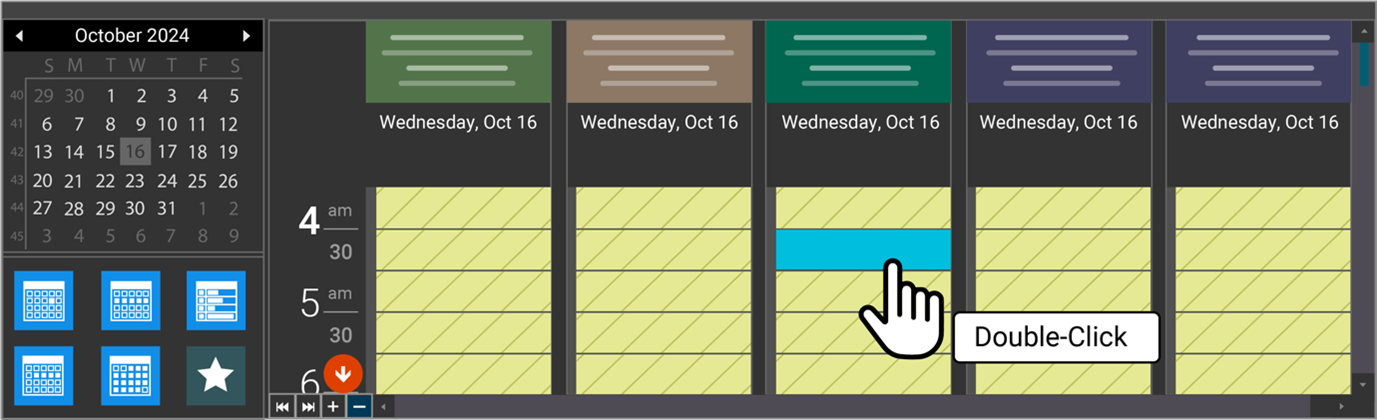
Method 2:
Double-clicking the slot in Scheduler.
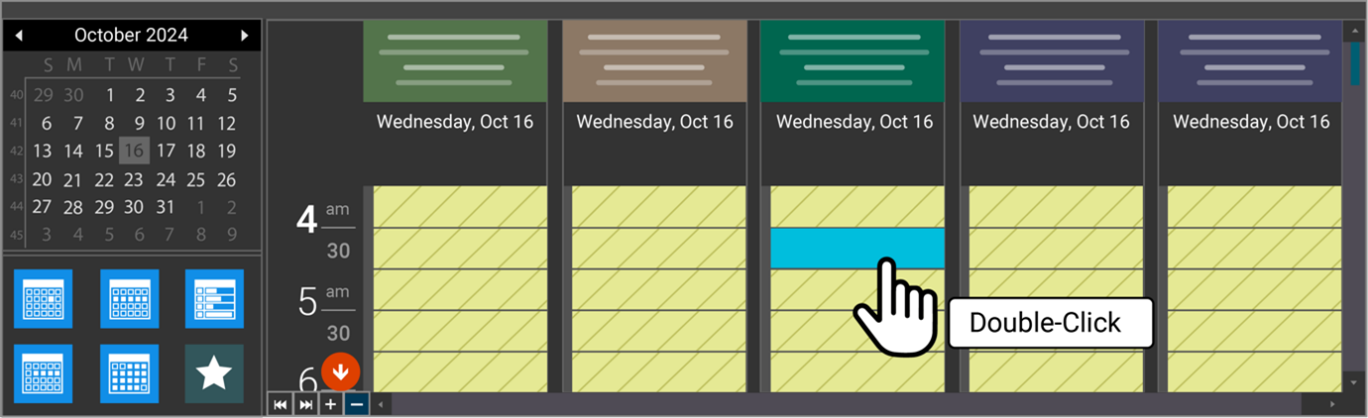
The second method for scheduling an appointment is by double-clicking on a slot on the scheduler. This will launch the New Order form again, and then the steps can be followed as explained above.
(Note that by default a minimum of 15 minutes is applied to Study Type durations for appointments scheduled with less than 15 minutes time slot.)
Method 3:
Dragging appropriate resources into Scheduler
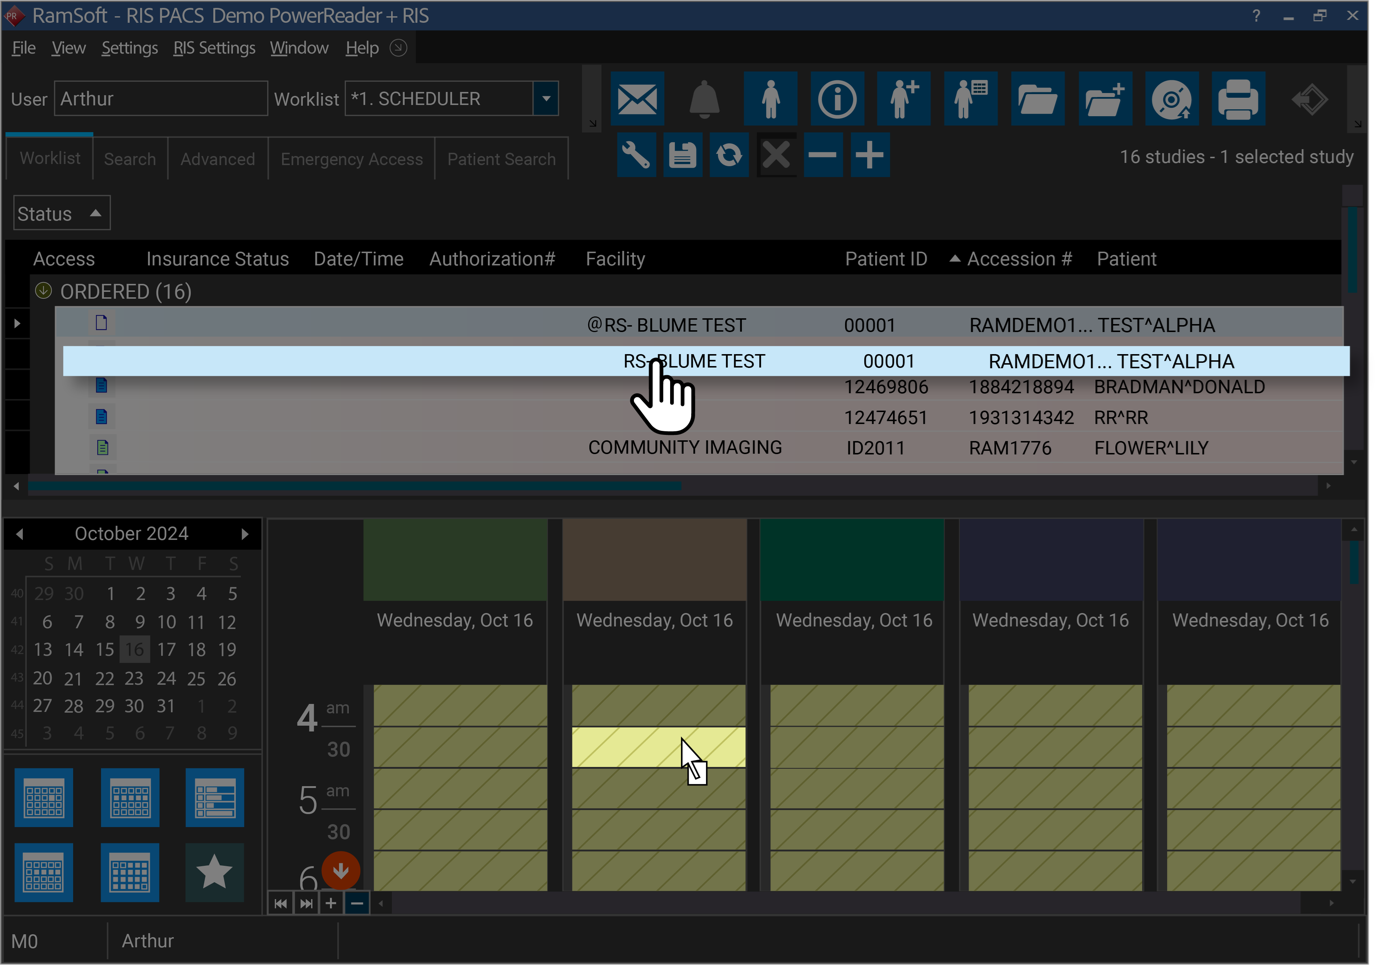
A third method for scheduling a study is by dragging them to the appropriate resource in the scheduler.
To schedule a study, the modality of the resource must match the study's scheduled modality. The study should be at the status of ORDERED (a status below SCHEDULED status). When you modify an appointment's date and time, the system will automatically update the Study date and time in the Study Info screen.
Method 4:
Create an Appointment option
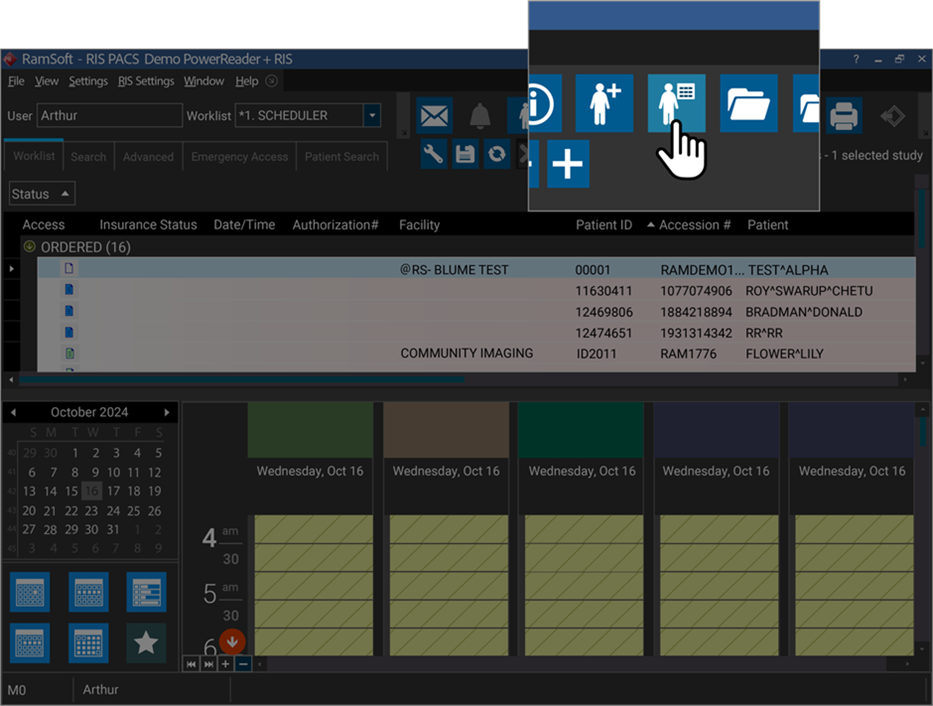
The fourth method for creating an appointment is by choosing the Create New Order option on the menu bar and opening the form.
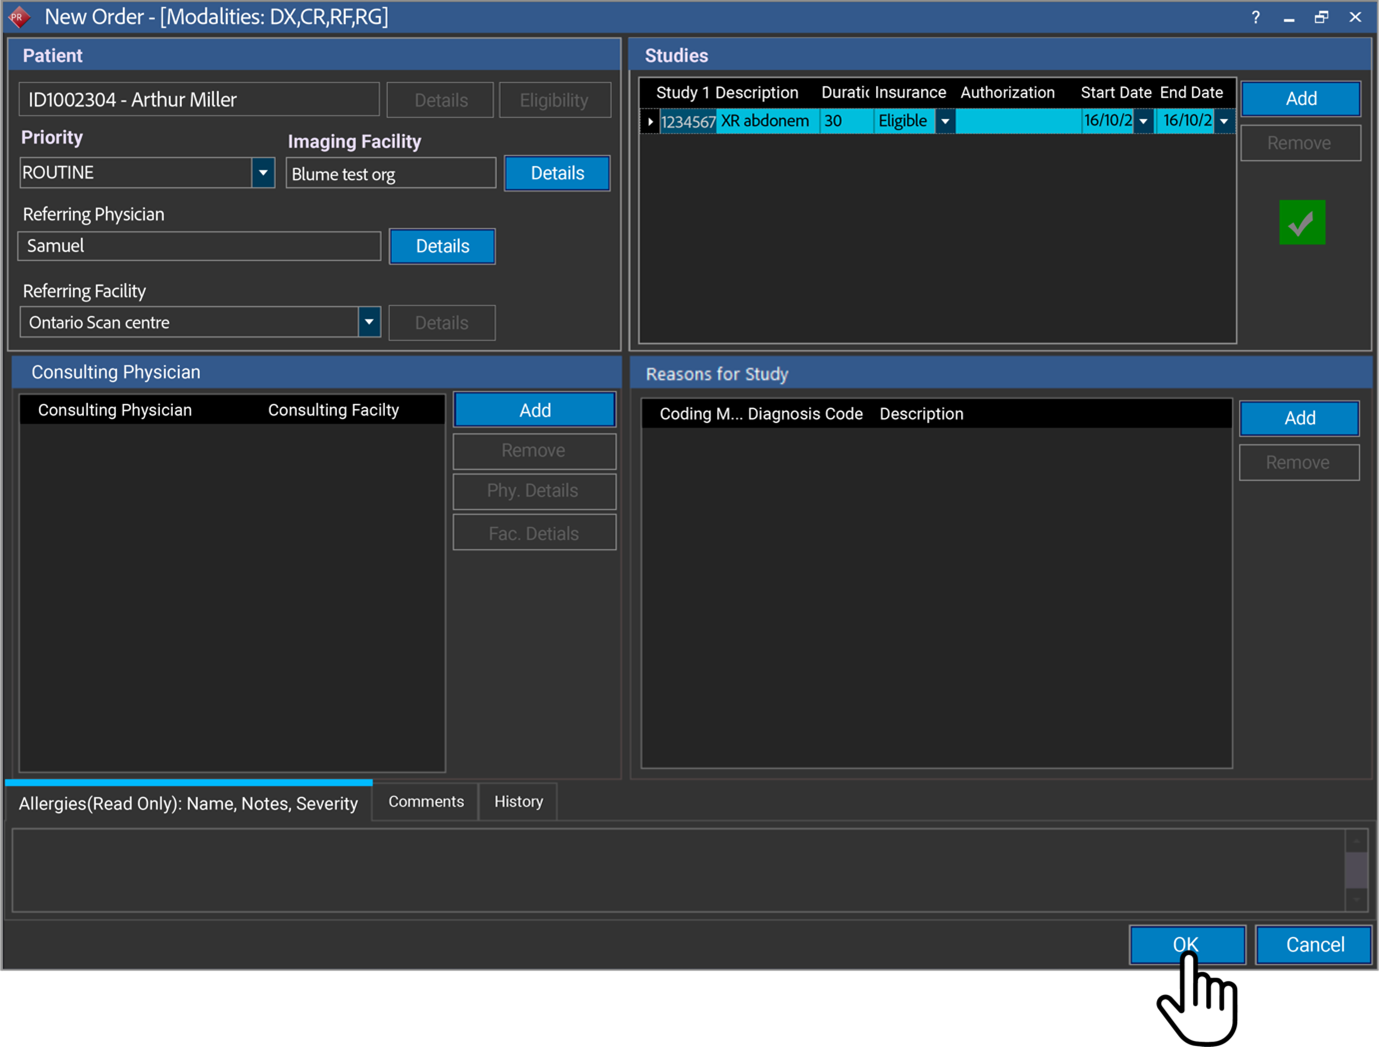
For Your Information:
Appointment creation from PS will sync and display a record in the Scheduled Appointment tab with the status Pending on the Blume Portal.
Once the Blume user confirms the appointment, the status on Blume will change to scheduled, and the appointment status will change to confirmed on PowerServer.
Reschedule that appointment from Blume will change the status from Scheduled to Requested; this time the appointment should be changed from Confirmed to Scheduled.
Navigation Steps
-
Go to the Appointments section.
-
Double-click on the respective date and time to create a new appointment.
Refer to the other methods of creating appointments as explained above.
- Select the patient from the metasearch or add a new one.
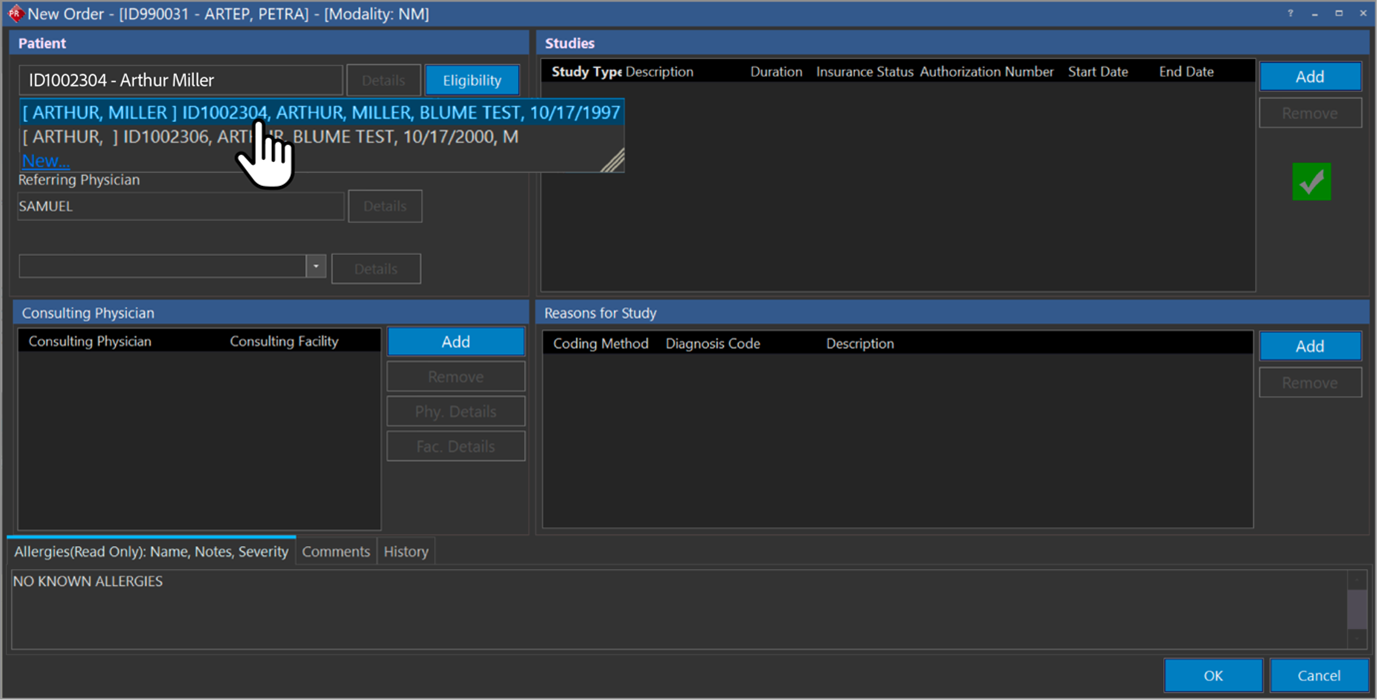
-
Select the referring physician.
-
Select the studies.
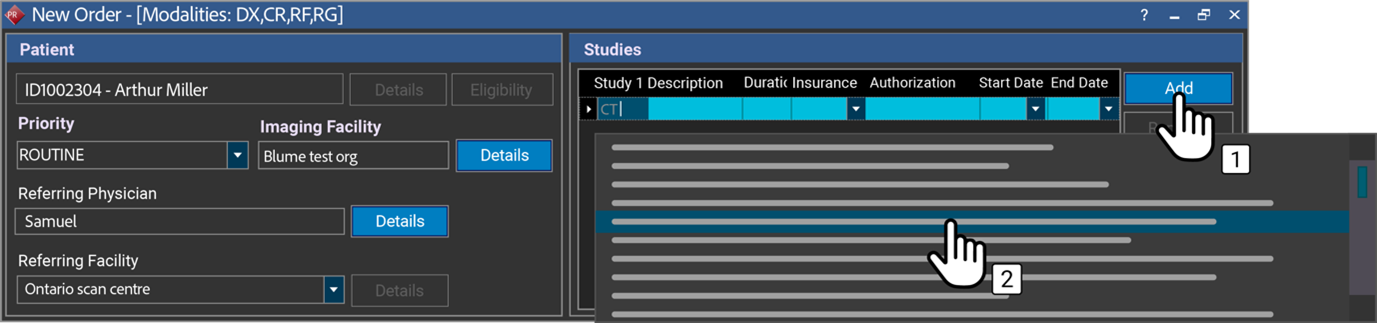
-
Choose the study types/ order set needed and click Add for multiple studies of the same resource.
-
Confirm and save the appointment.
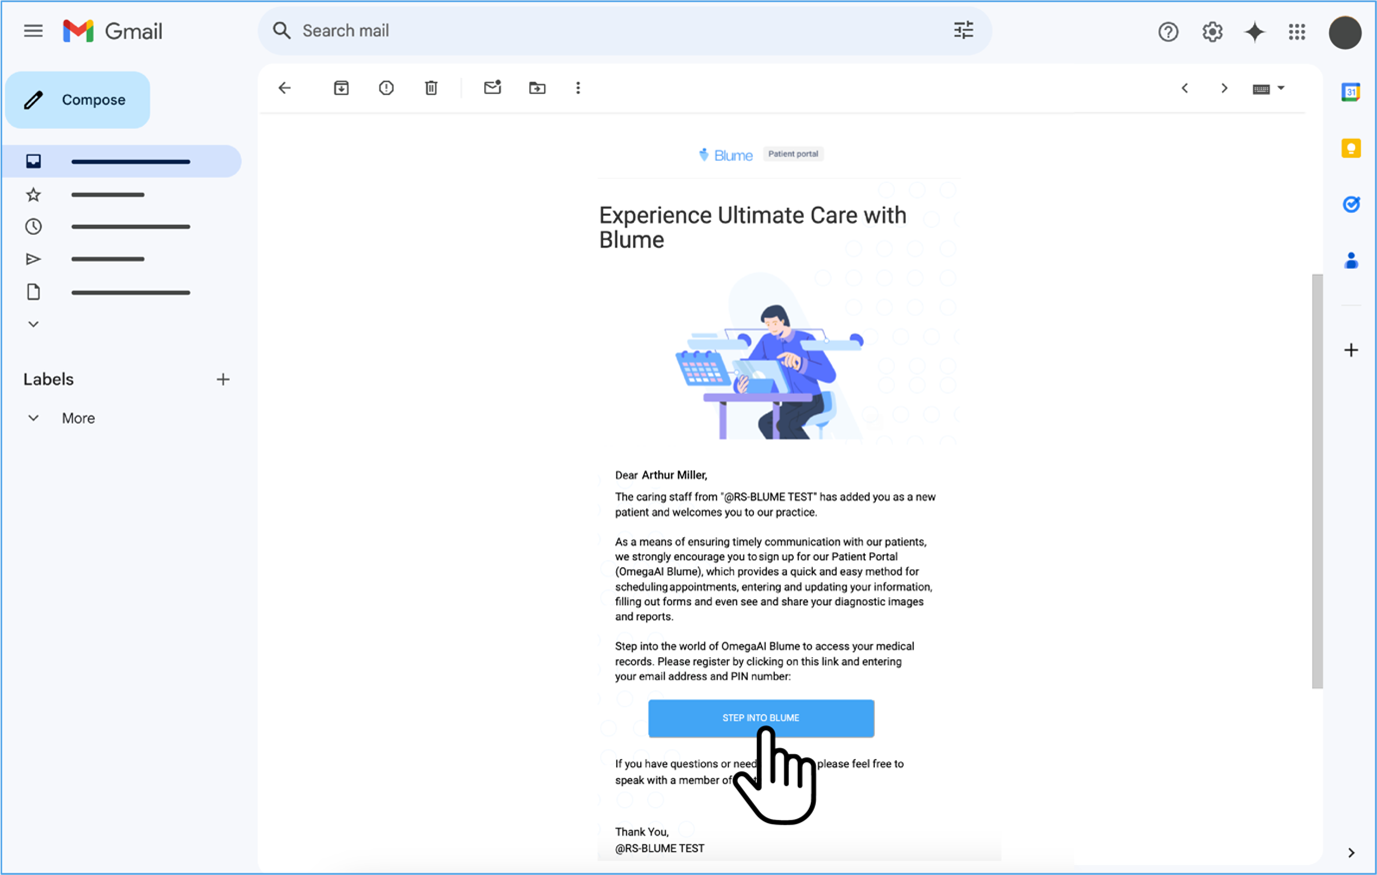
Blume Onboarding
Basic Information:
-
Access the Blume platform via login.
-
Click on the "Step into Blume" button below received on your email invite.
- Enter the registration details and click on Register.
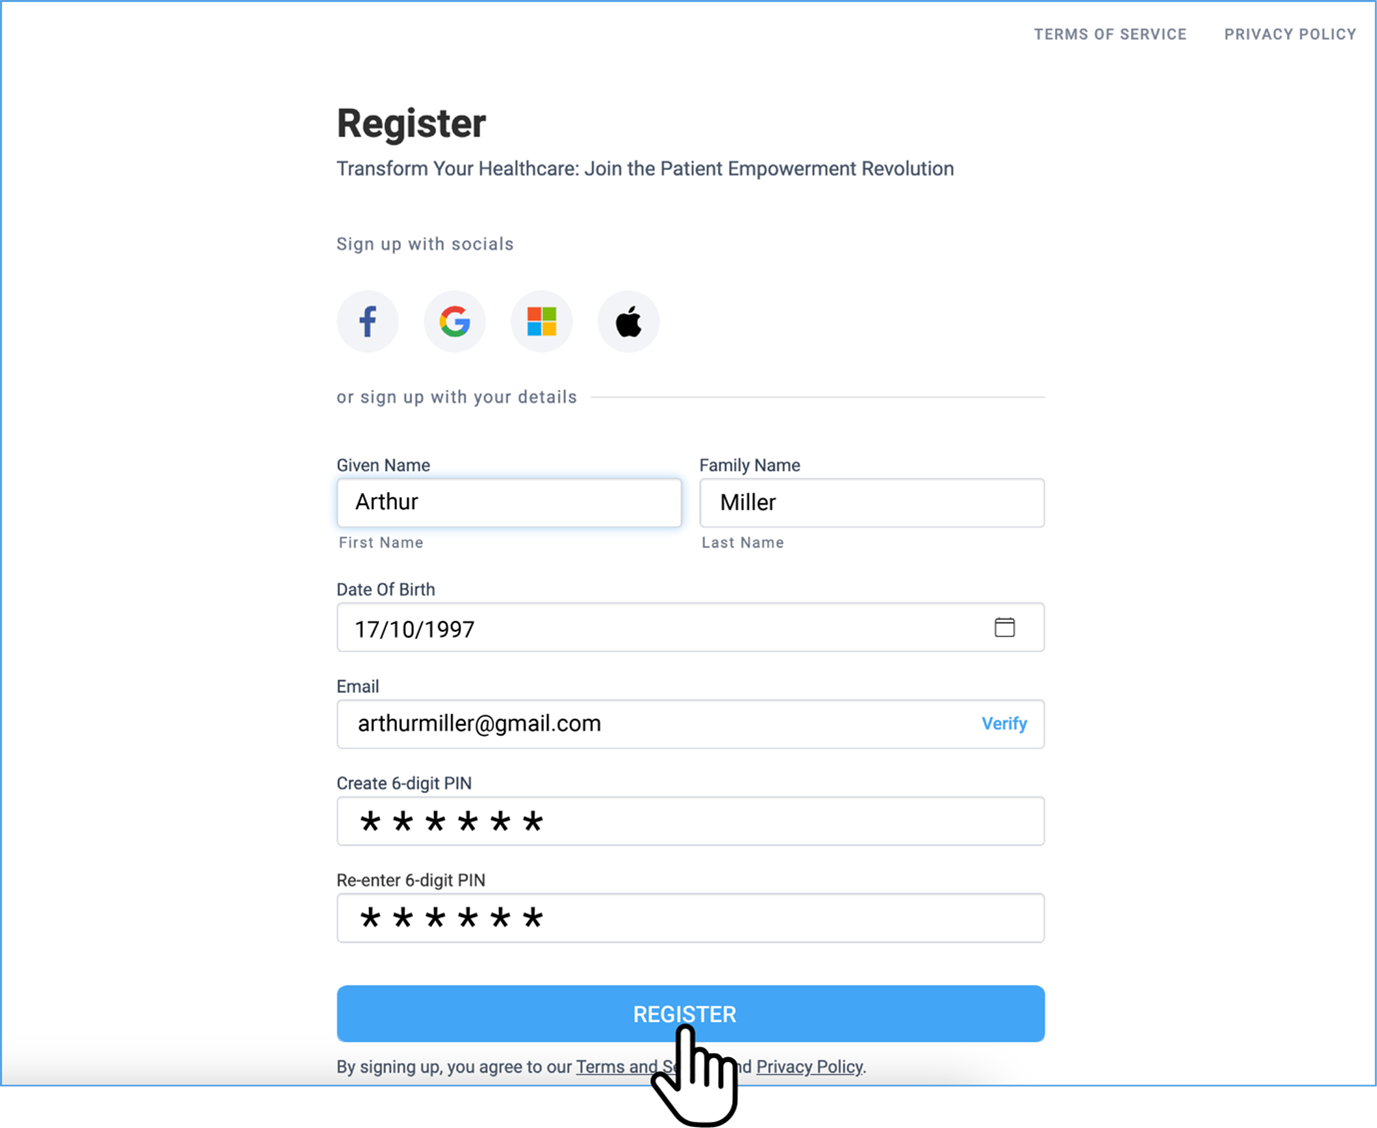
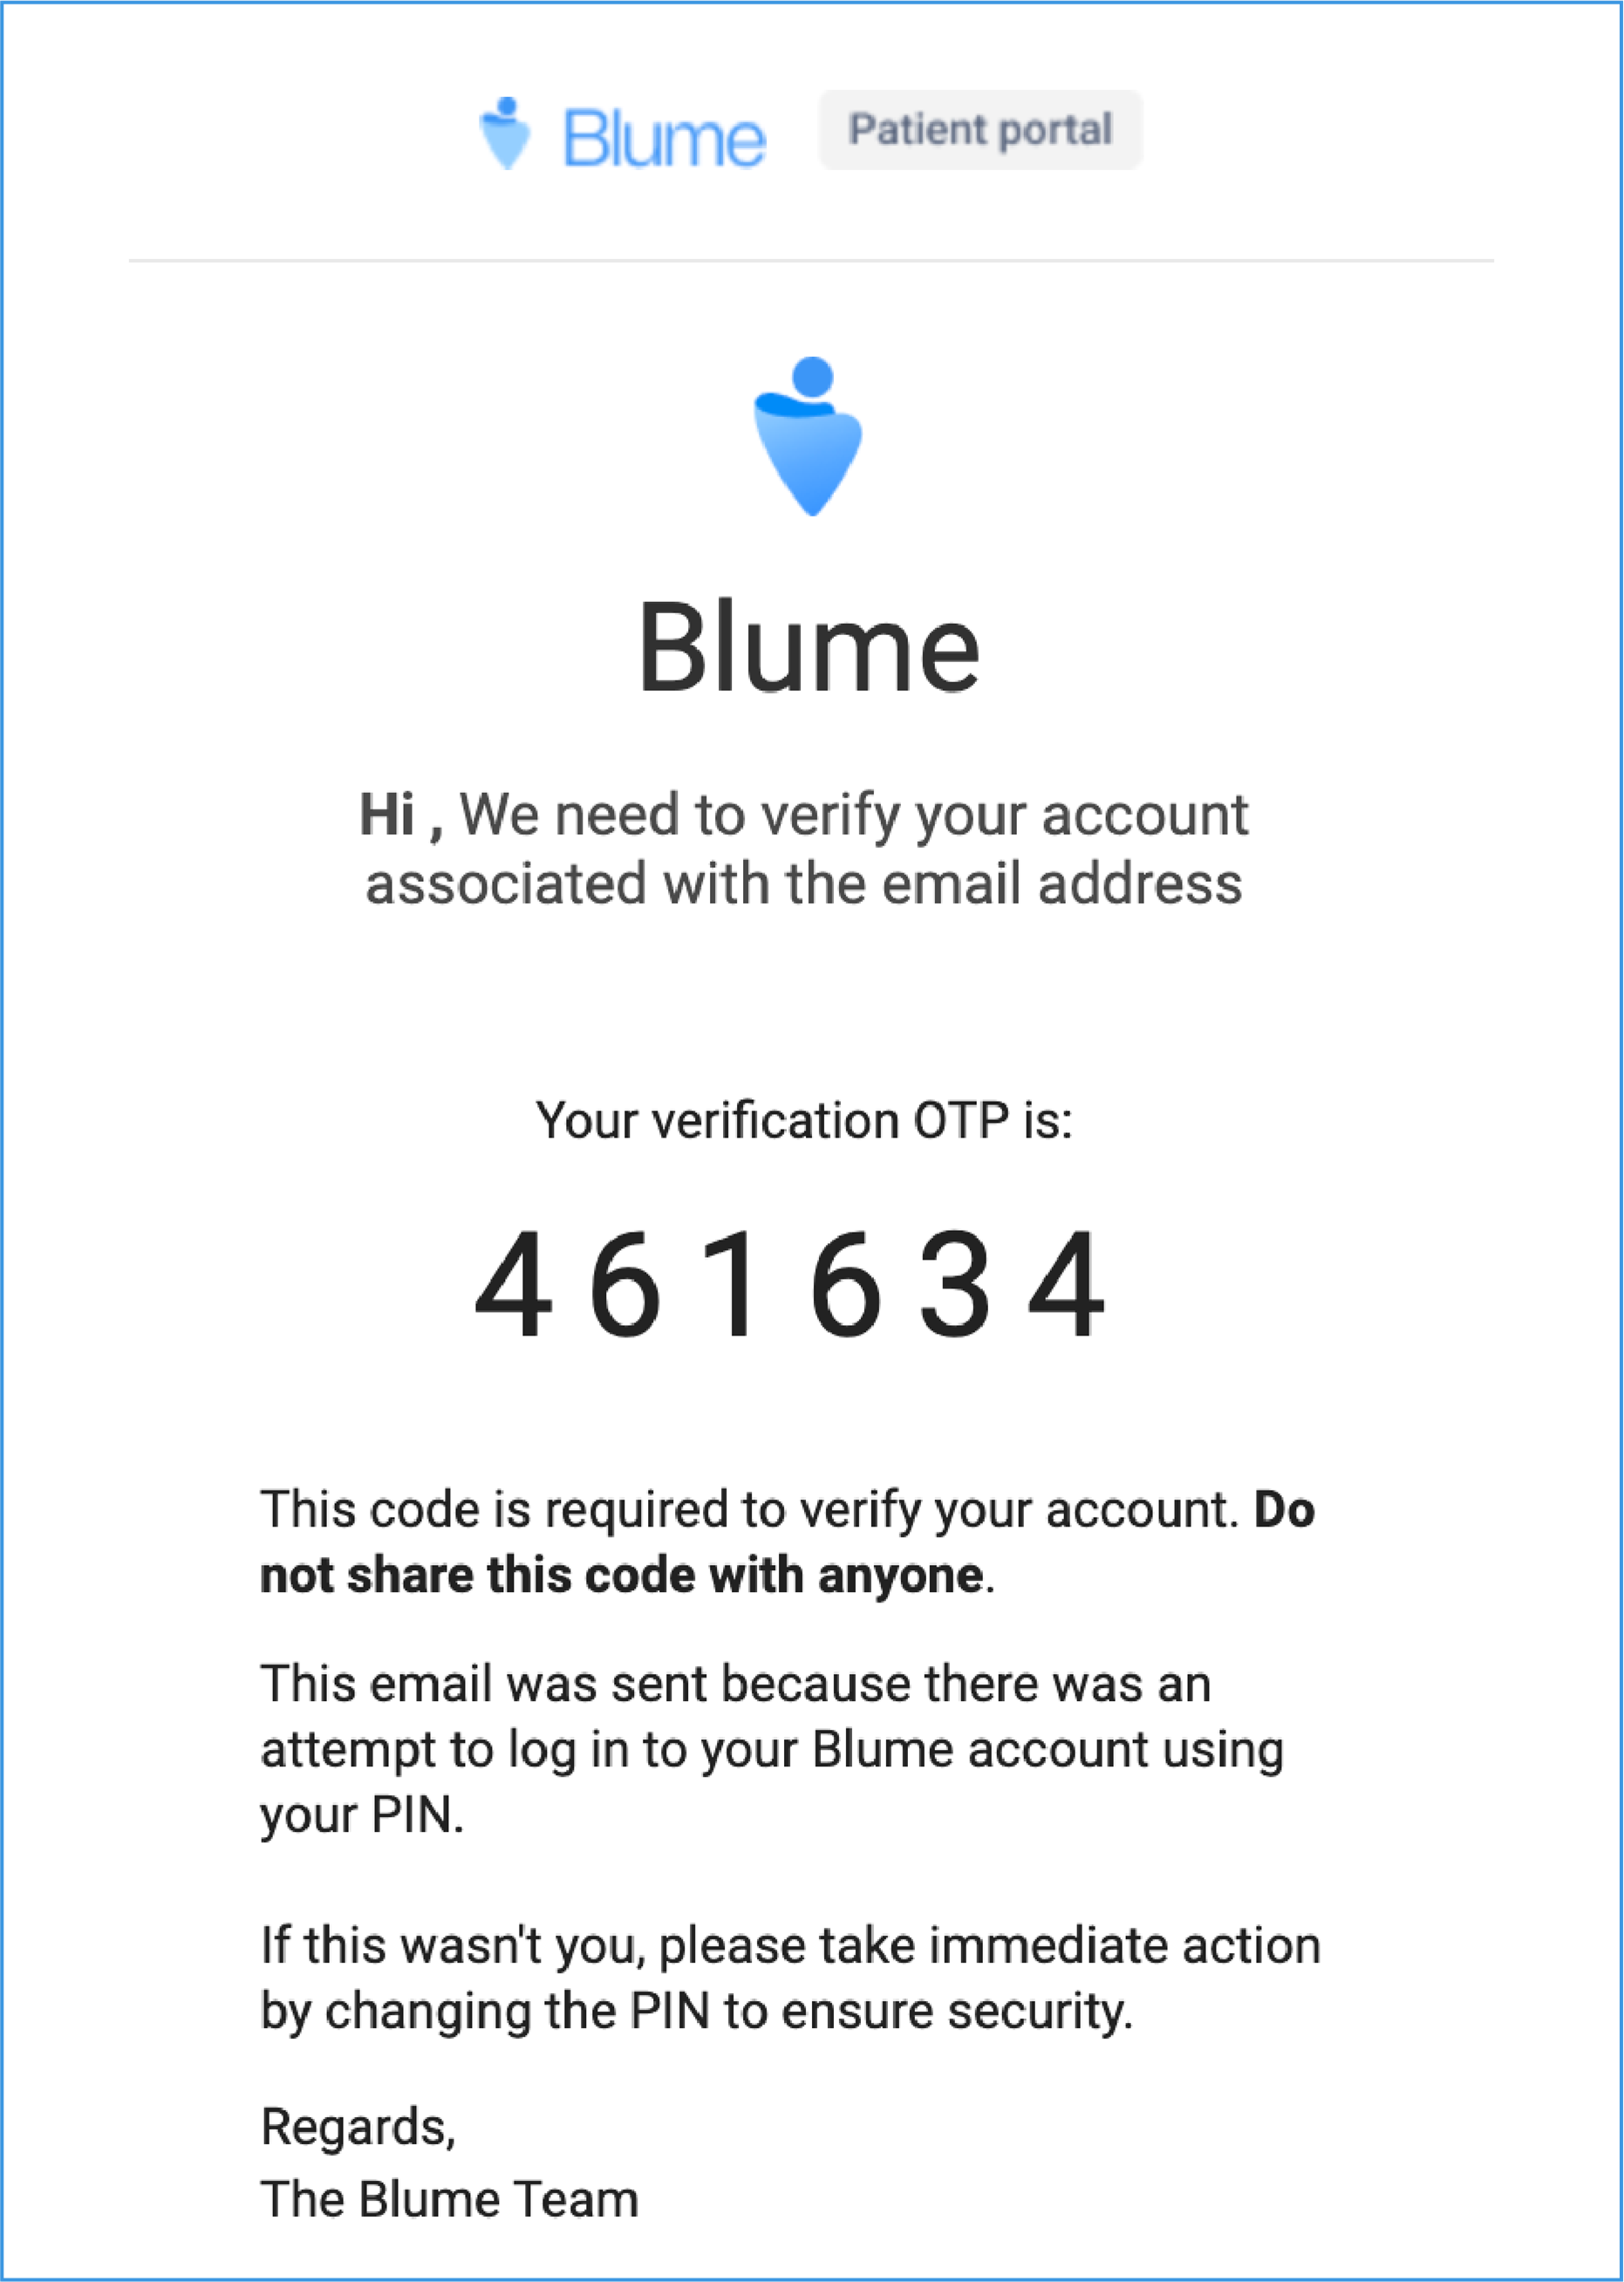
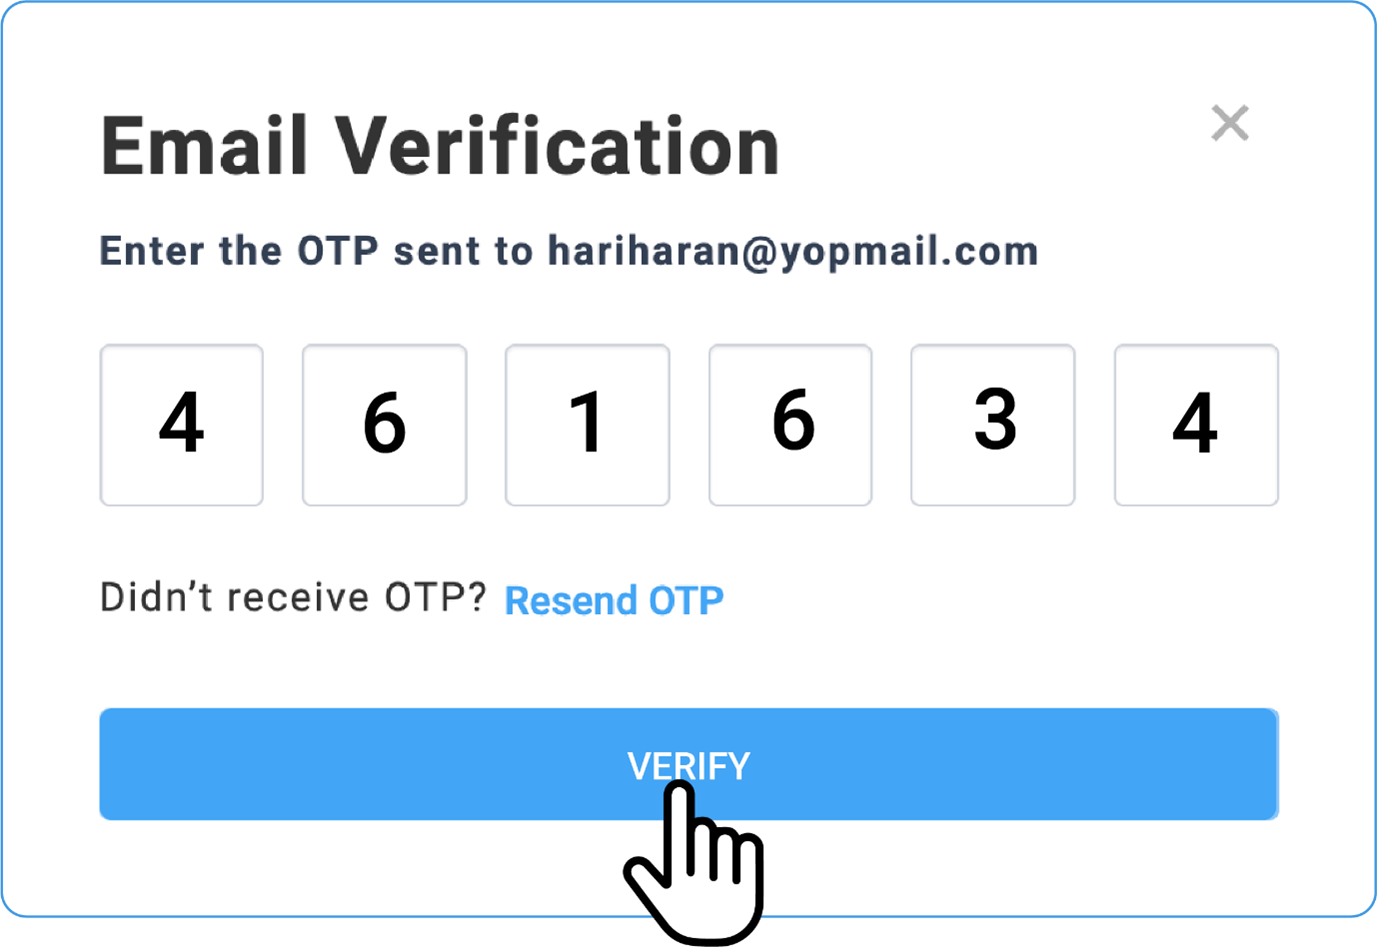
- Perform OTP verification associated with the email address.
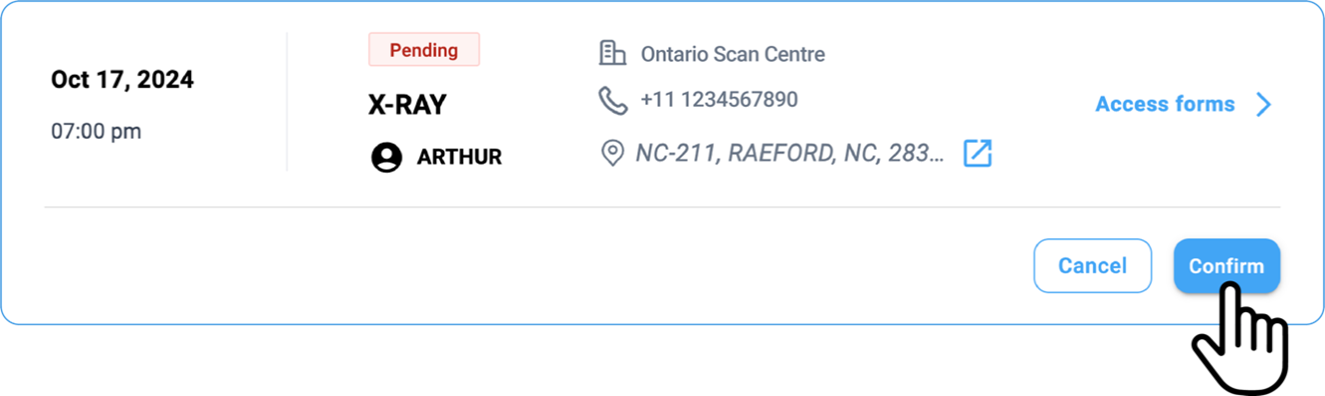
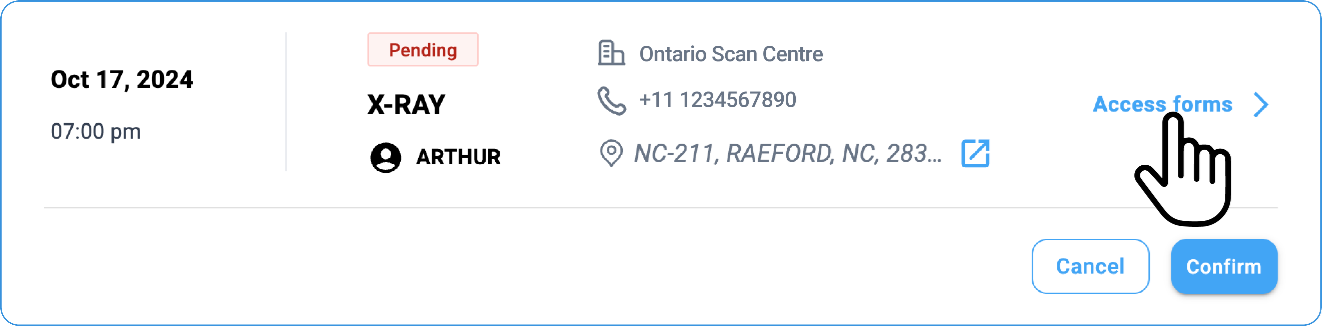
- Go to the appointment and click on the Confirm button.
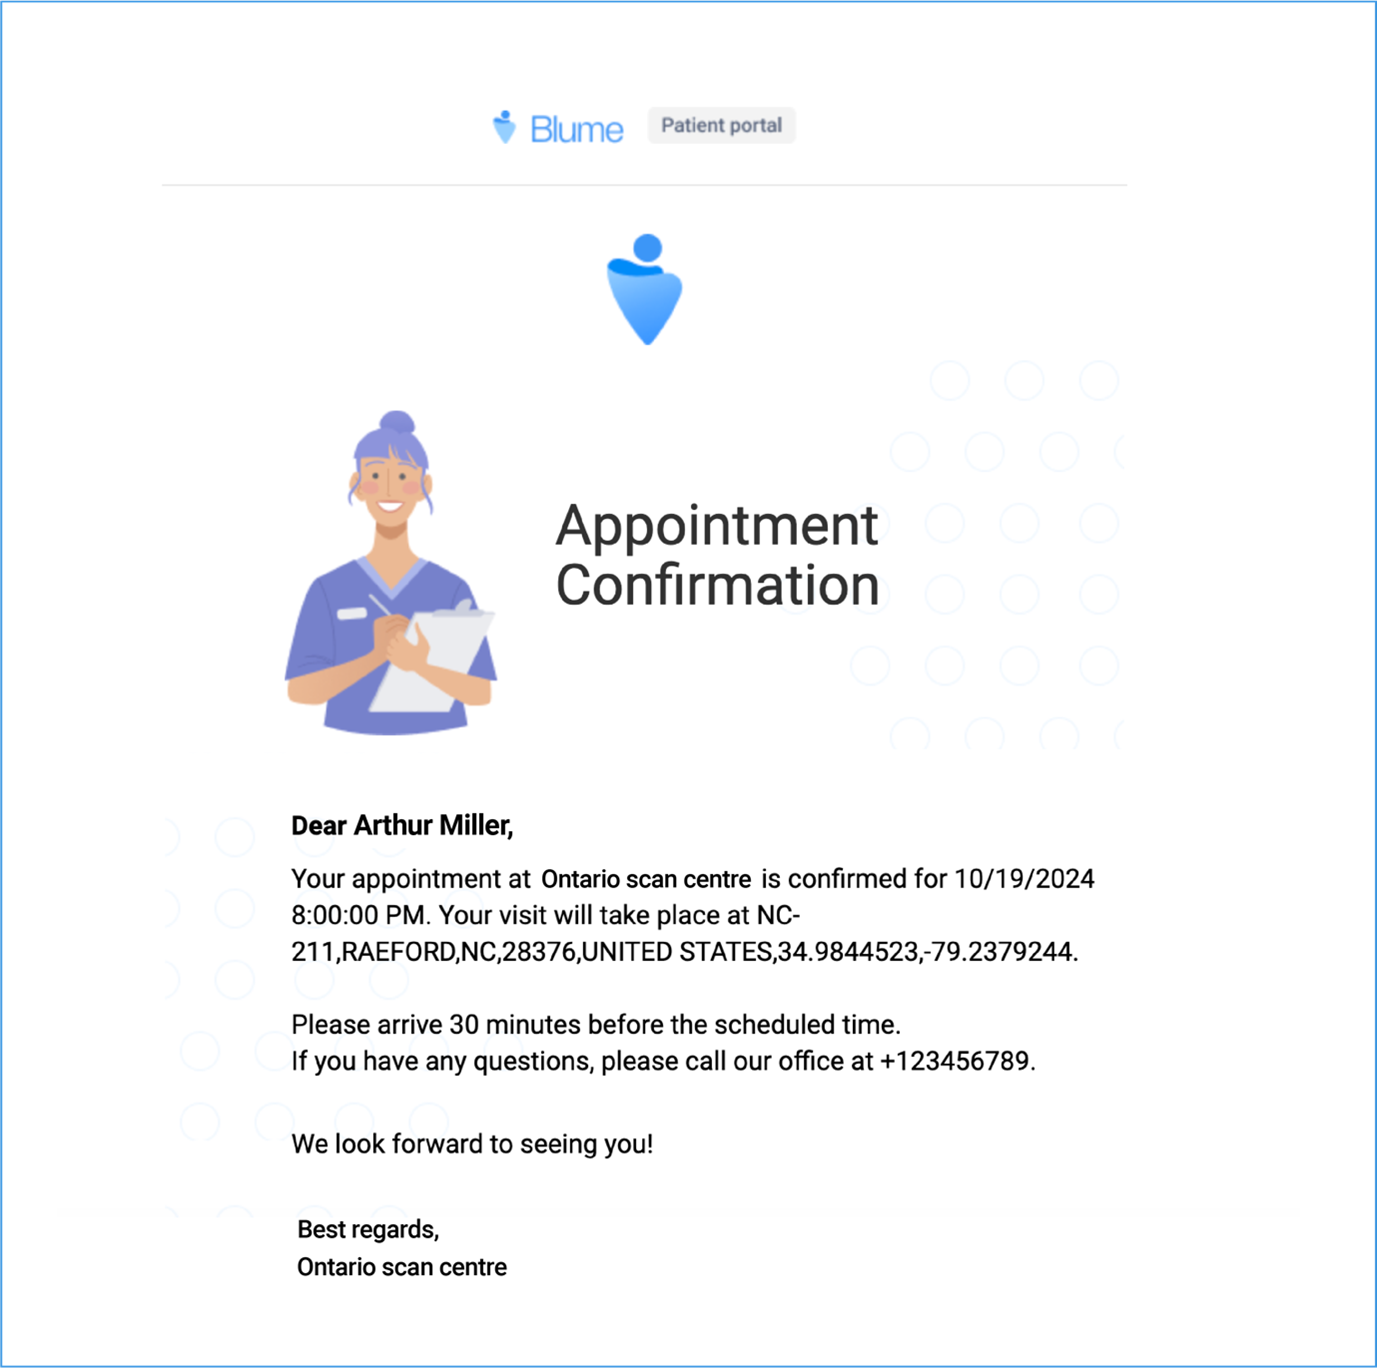
- An Appointment Confirmation message appears: Appointment Confirmation
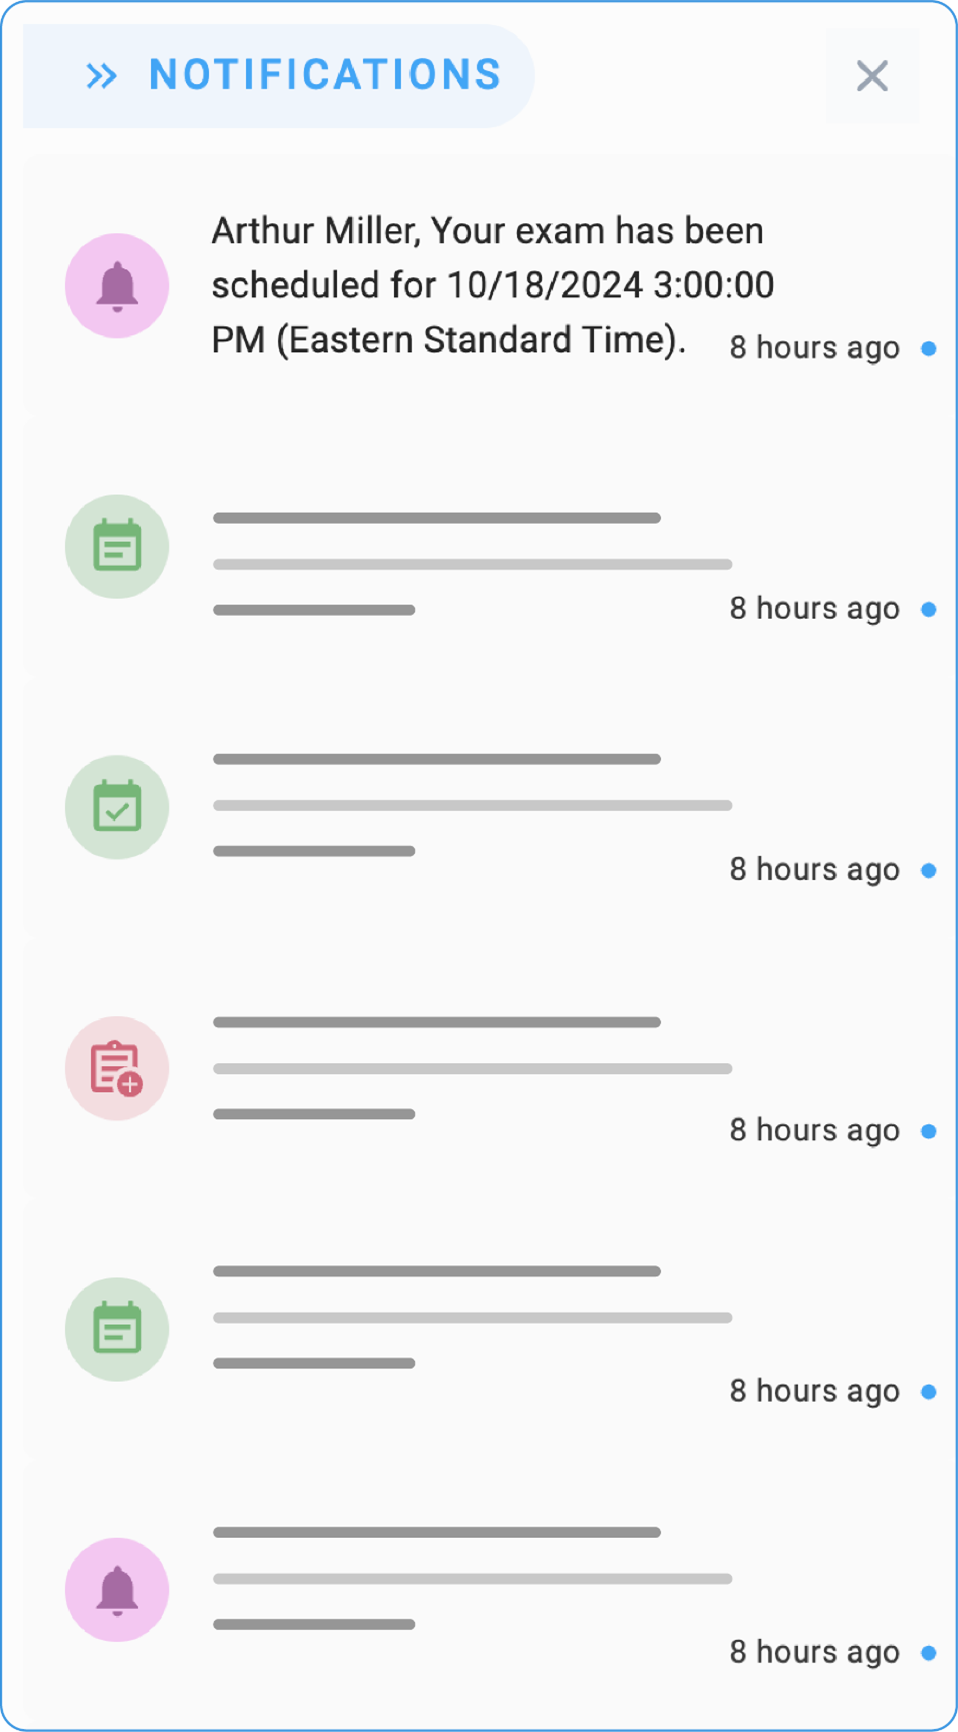
- A notification indicating the scheduled appointment is received in the Notification section.
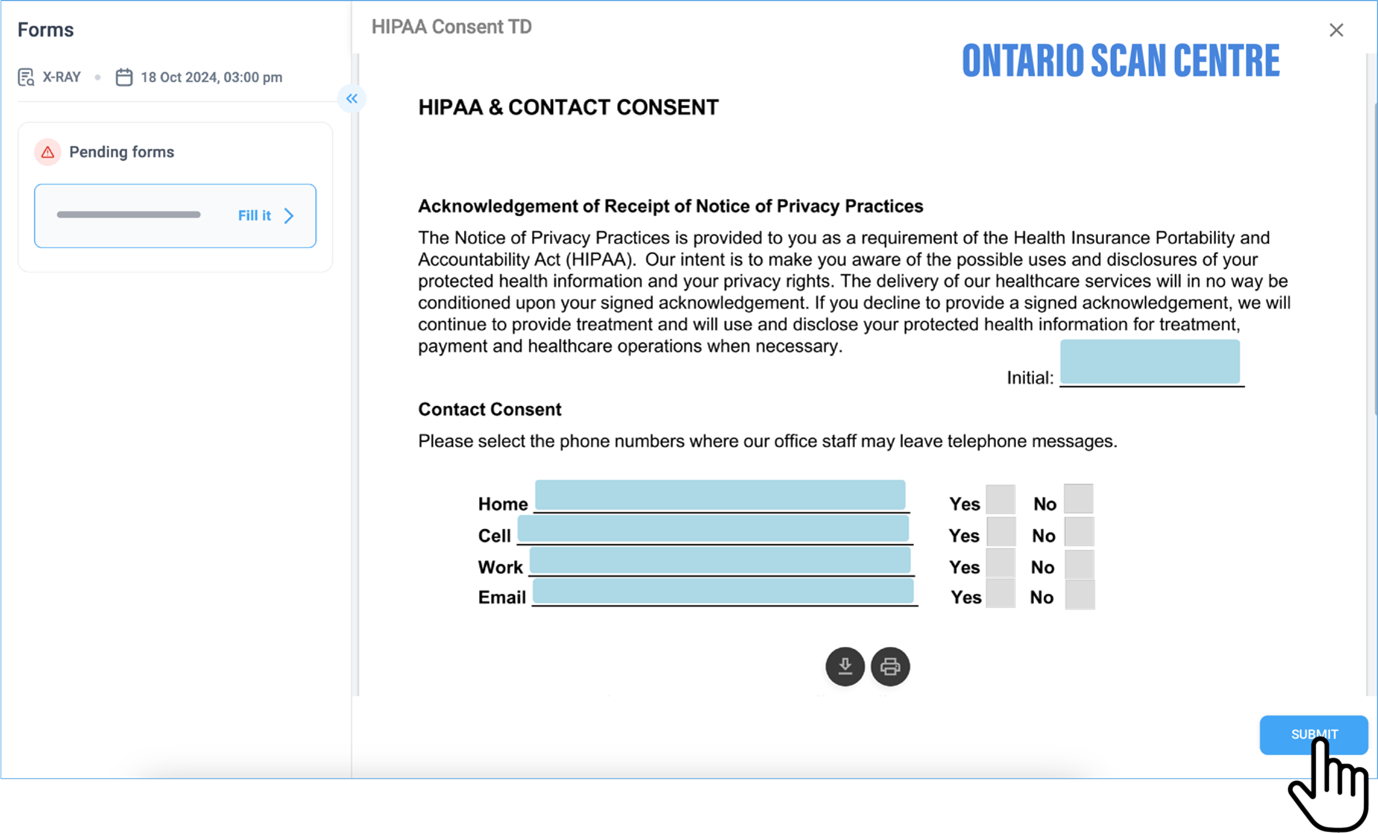
Filling Form
- In the open form, enter all required information based on the specific configuration set by each facility. This may include:
-
Patient Information
-
Preferred Dates
-
Required Healthcare Services.
-
A key feature highlighted is the capability to complete E-forms within the Blume platform, which guarantees their accurate presentation in Power Servers document reader.
-
Completed E-forms automatically synchronize with the Power Server, allowing for real-time updates and visibility.
-
This automation eliminates the need for manual intervention and reduces potential errors in documentation.
Submitting the Form
- After completing the form, click the submit button. If the system is functioning properly, the appointment request should be submitted without any issues. However, in some cases, a refresh may be necessary to confirm that the form has been submitted successfully.
Navigation Steps
-
Go to the assigned form section in OmegaAI or PowerServer.
-
Open the form assigned to the patient or user by clicking on Access Form.
-
Enter the required information into each field of the Pending Form.
-
Review the data for accuracy.
-
Submit or save the form for future reference.
Quick Guide to View Forms and Use the Image Viewer in the PowerServer
Key steps
-
Access the Patient Records or Forms section.
-
Choose the patient whose form or imaging you need to examine.
-
Open the form or use the Image Viewer to view medical images, including X-rays or MRIs.
-
Navigate to the Documents section to access patient documentation.
-
Employ the Zoom and annotation tools for a detailed analysis.
-
Save or export the images, as necessary.
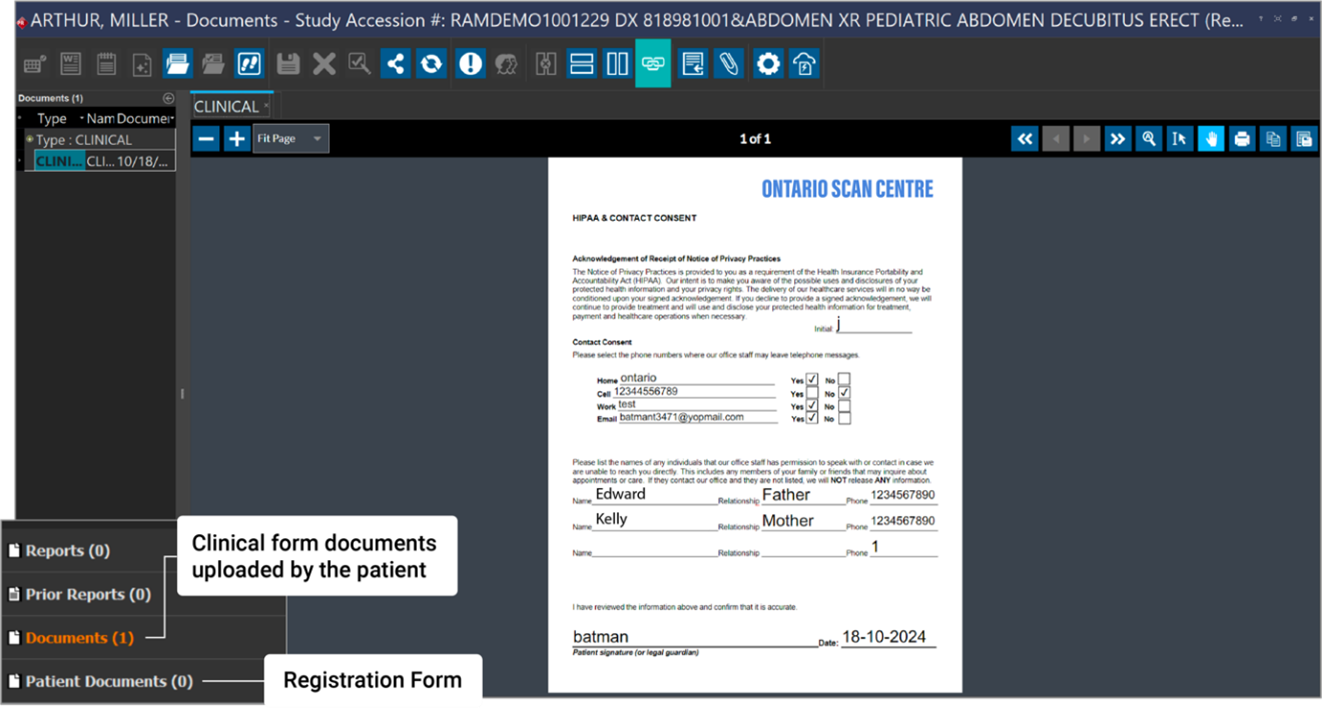
Note: The uploaded forms will be visible in the patient record only when the required Power Server configuration is in place.
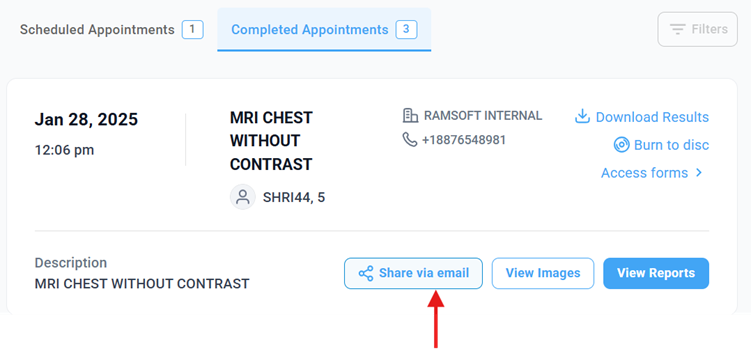
Share the Study on the Blume Portal
-
Open the study: Navigate to the desired study you wish to share.
-
Access the Sharing Options. Locate and click the Share via Email option below the study.
-
Two sharing options will appear:
Copy the link:
-
Click the copy the link option.
-
Paste the link into your browser
-
Verify access by entering the patients ID/SSN/HC or Birth Date to view the study.
(External users without a Blume login can receive a read-only link to view the shared study.)
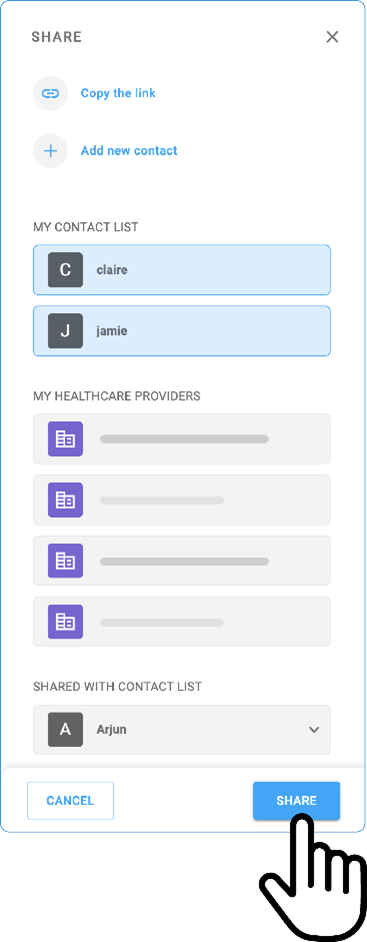
Share with a New Contact:
-
Click + Share with a New Contact
-
Enter the contact Name & email address
-
Click the share button to send or cancel button to delete or re-enter the details.
Note:
-
Previously added contacts will be listed below for direct selection.
-
Multiple contacts can be selected and shared simultaneously.
-
You can also share the study with existing healthcare providers listed under the Healthcare Provider List.
-
Organizations associated with patients using the same registered email address will appear here for easy sharing.
Pull Prior on PowerServer.
The Pull Prior feature on PowerServer enables automated retrieval of prior studies (DICOMs) into Blume, enhancing continuity of care and clinical efficiency. However, the behaviour of this feature varies depending on the type of organization setup within OmegaAI.
Applicability
This workflow applies exclusively to organizations configured as Blume-only Organizations within OmegaAI.
Organization Types in OmegaAI
OmegaAI supports two types of organizational configurations:
- Standard Organizations
- Created and managed directly within OmegaAI.
- Studies uploaded to PowerServer are automatically visible in Blume without additional conditions.
- Blume-only Organizations
- Created through a distinct provisioning process (via internal infrastructure).
- These organizations follow a specialized flow for study ingestion and user validation.
Pull Prior Workflow for Blume-only Organizations
For Blume-only organizations, the Pull Prior mechanism includes an additional validation layer:
- When a study is uploaded to PowerServer:
- If the patient/user account already exists in Blume, the study is ingested and displayed as expected.
- If the user account does not exist in Blume, the study is automatically moved to the archive.
- Once the user creates an account in Blume using the same email address associated with the study, the system will:
- Automatically retrieve the archived study using the Pull Prior automation.
- Display the study in the Blume worklist.
Example: A study is uploaded for a specific user email id under a Blume-only org. If that user has not yet registered on Blume, the study is archived. Once the same user signs up using the same email, the study is pulled back into Blume automatically.
Enhanced Pull Prior Configuration
The Pull Prior feature also supports advanced configuration for retrieving prior studies across multiple organizations and PACS stations:
- Organization Selection: Users can select from all associated organizations, including child and affiliated entities.
- PACS Station Selection: After selecting organizations, users can choose from linked PACS stations.
- Prior Study Limit: Users can specify how many recent prior studies to retrieve (default: 5, maximum: 10).
- Scheduling Options:
- Default: Prefetch priors at any time.
- Optional: Restrict prefetching to specific time ranges for operational efficiency.
This intelligent automation ensures that patient data is only surfaced when the user is registered, maintaining both data integrity and privacy compliance within Blume-only environments.
Configuration Steps for Pull Prior on PowerServer
The Pull Prior action in PowerServer is designed to automatically retrieve relevant prior studies once a patient is successfully matched with a Blume user. This is particularly applicable to Blume-only organizations, such as @rs-blume-test.
Trigger Condition
Trigger: Patient is successfully matched with the Blume user.
This ensures that prior studies are only fetched once the user account exists in Blume, maintaining data integrity and compliance.
1. Add the “Pull Prior” Action
- In the WFA rule editor, select the action: Pull Prior.
- This action fetches prior studies associated with the same patient from a specified organization and PACS station.
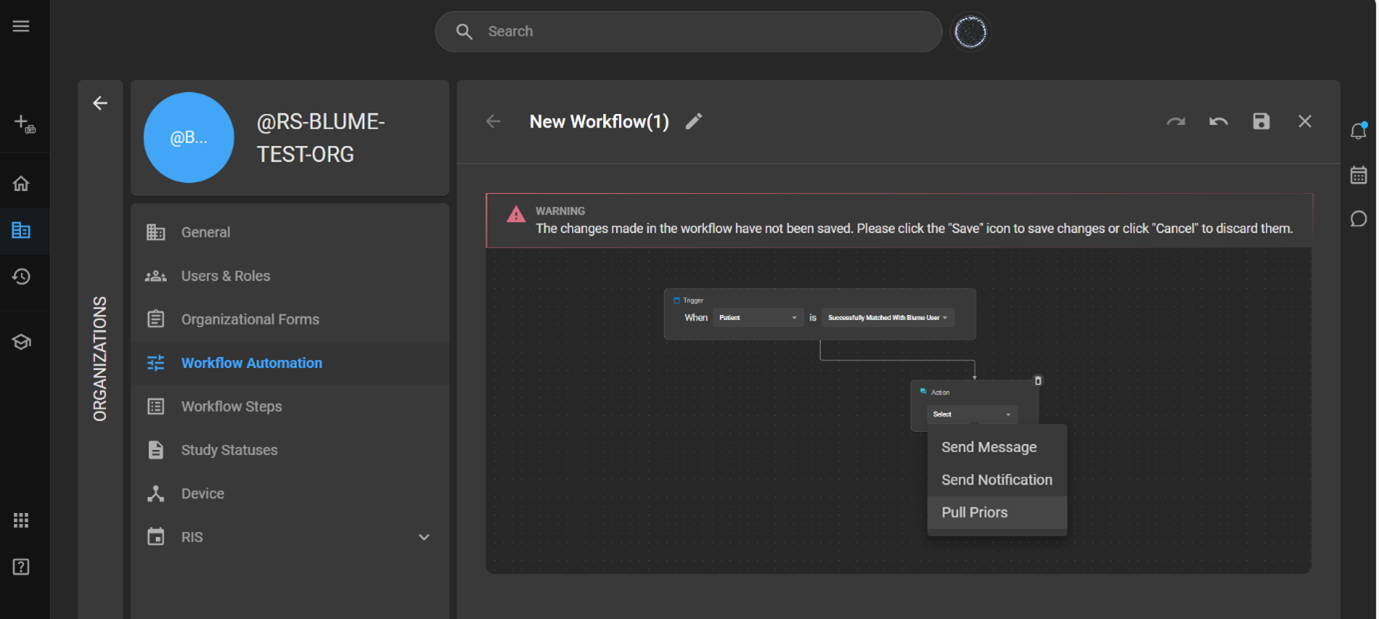
2. Select Organization and PACS Station
- Use Meta Search to select:
- Organization (e.g., @rs-blume-test)
- PACS Station (e.g., Radish)
- You may select multiple PACS stations simultaneously.
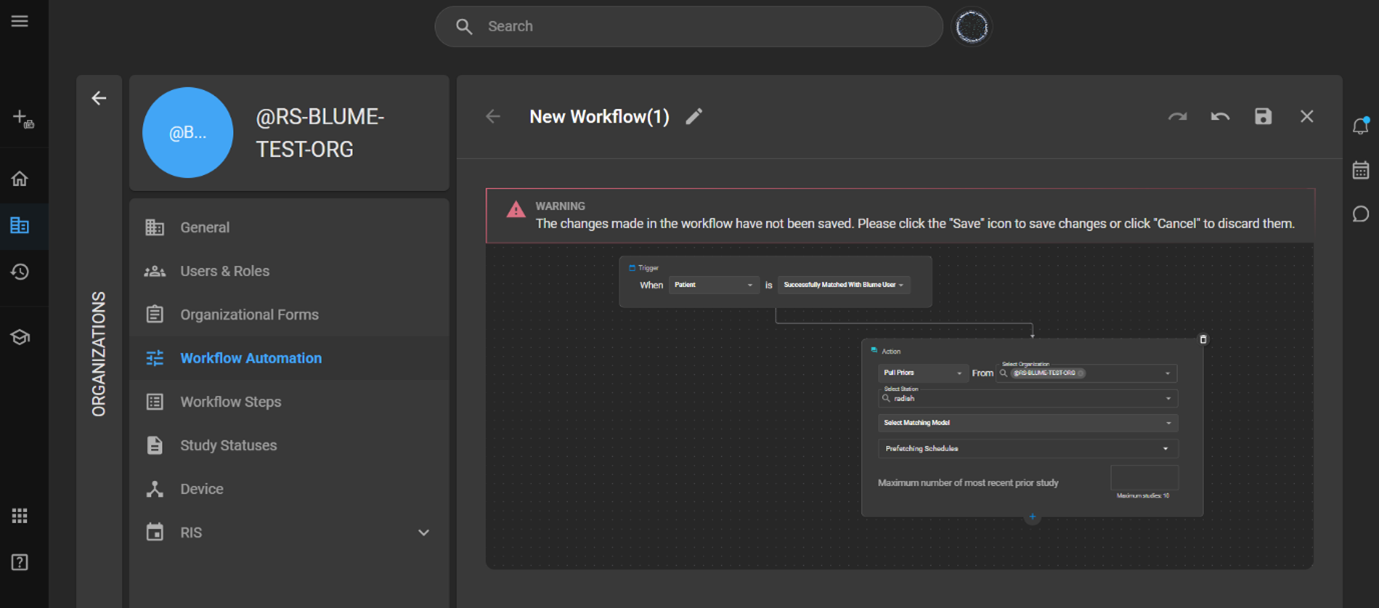
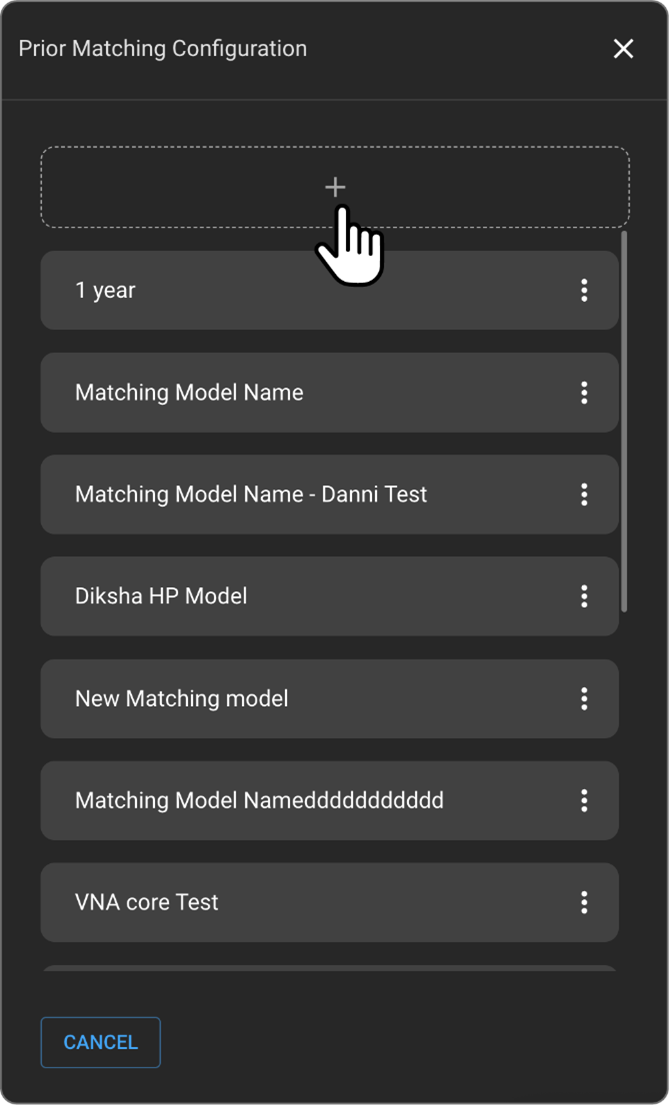
3. Choose a Prior Matching Model
- Click the Prior Matching Model dropdown.
- A list of available models (e.g., 1 Year, CT Chest) will appear on the left panel.
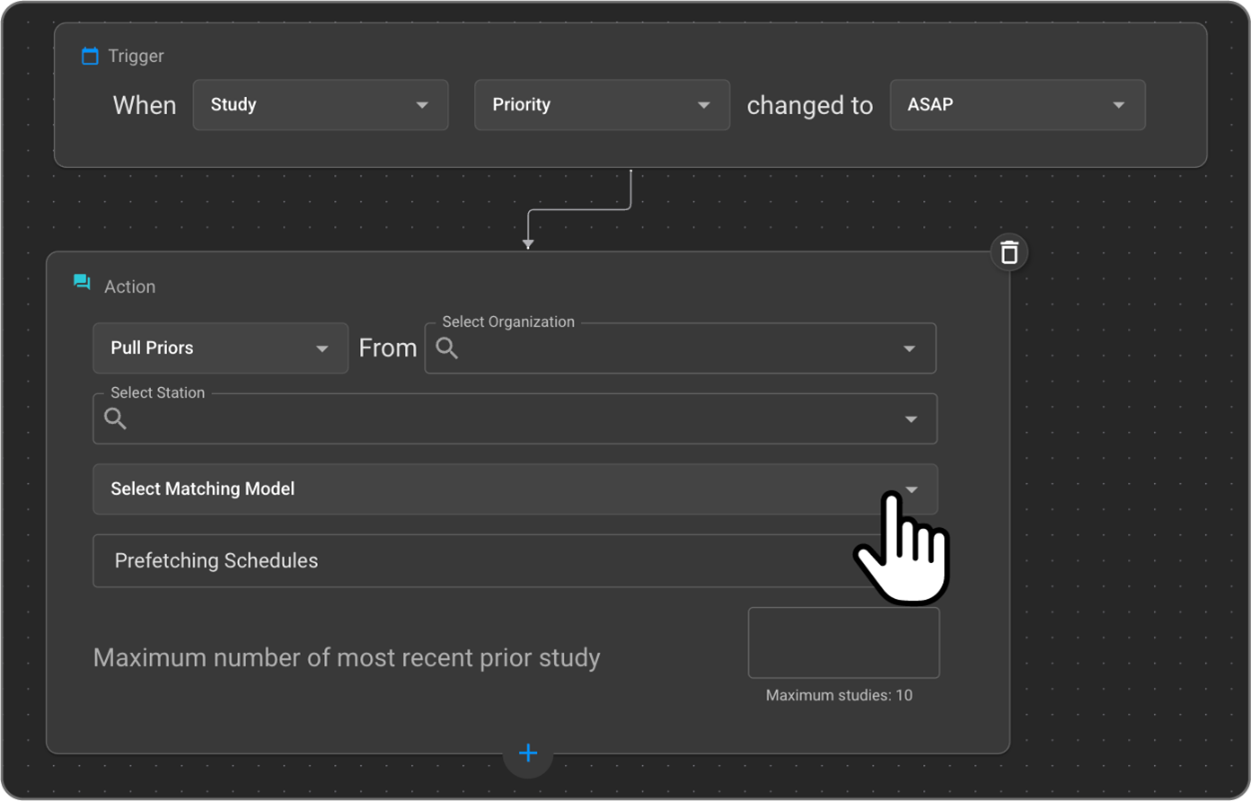
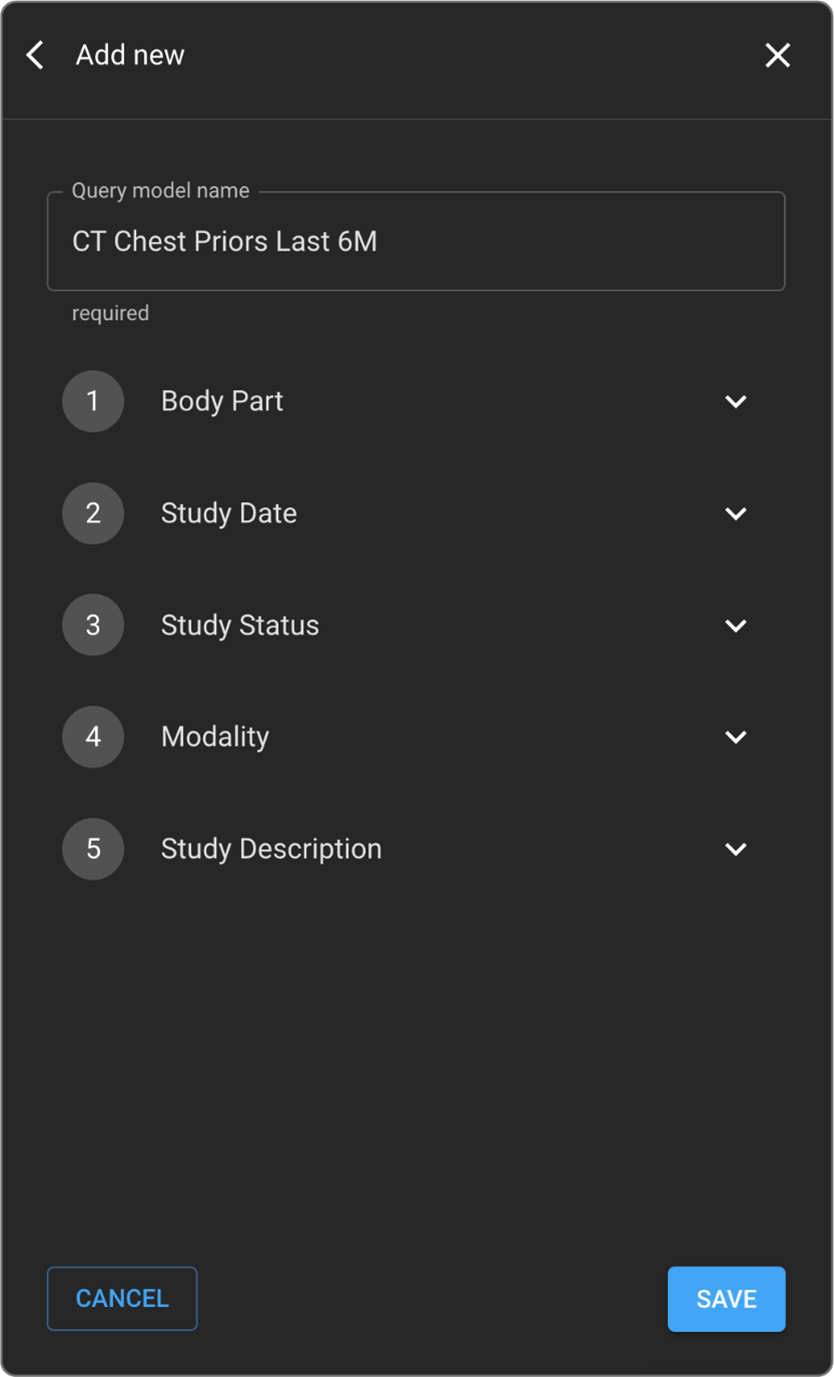
4. Create or Customize a Prior Matching Model
To define clinical relevance, create or modify a model using the following filters:
| Filter Type | Description |
|---|---|
| Body Part | Select anatomical regions (e.g., Abdomen, Brain, Adrenal Gland). |
| Study Date | Filter by time range (e.g., last 6 or 12 months). |
| Modality | Choose imaging modalities (e.g., CT, CR, MRI). |
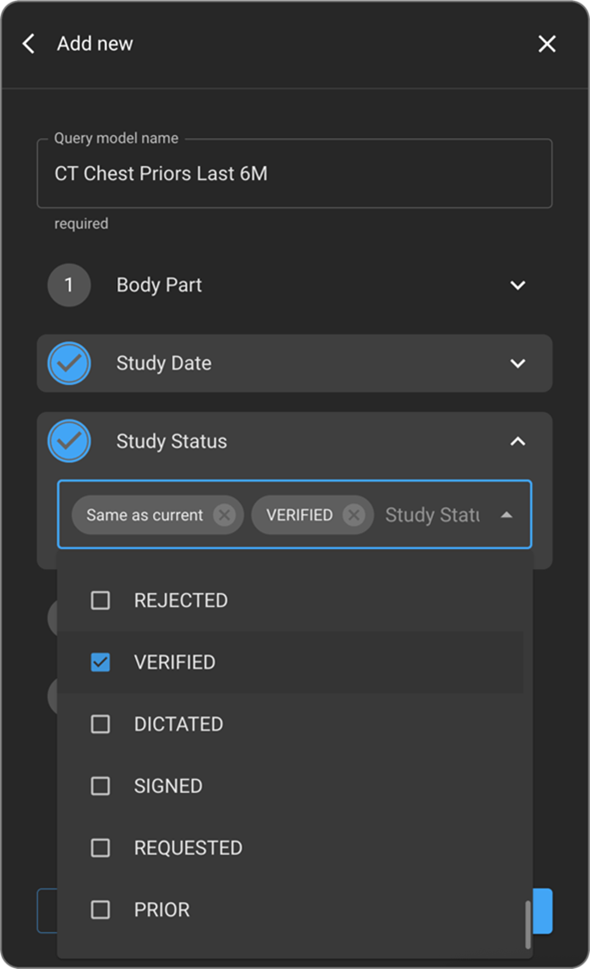
| Study Status | Filter by status (e.g., Verified, Completed). |
| Study Description | Add keywords (e.g., “Follow-up”, “Cancer Screening”). |
- Customize each filter as needed.
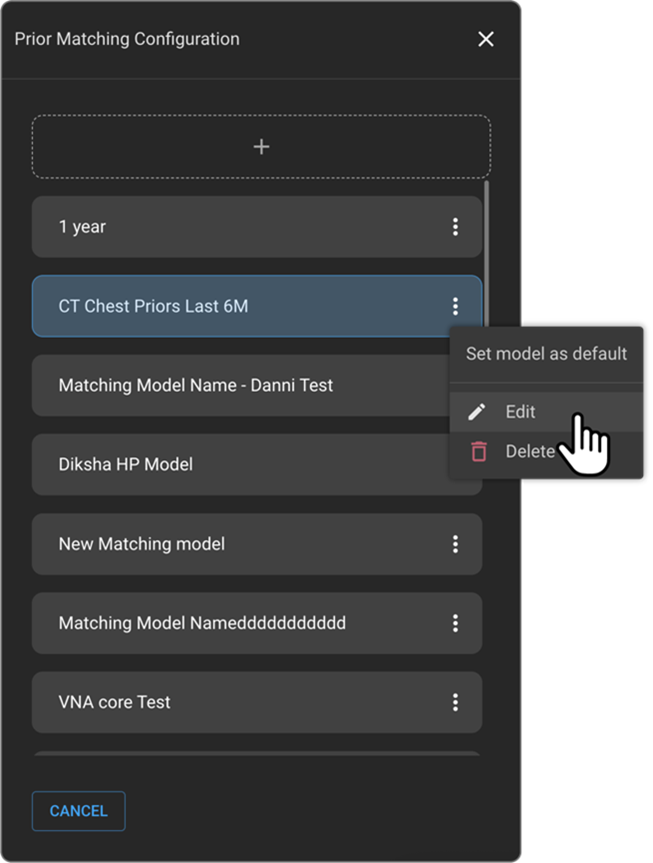
- Rename the model descriptively (e.g., “CT Chest Priors Last 6M”, “MRI Brain Same Patient”).
- Click Save to store or Cancel to discard changes.
Note: The Prior Matching Model defines the constraints for fetching clinically relevant prior studies.
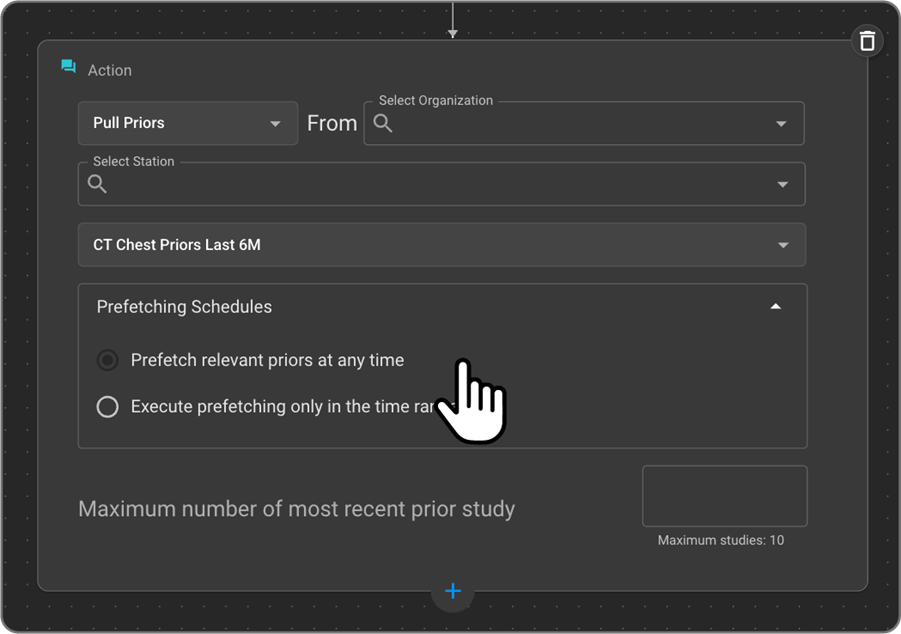
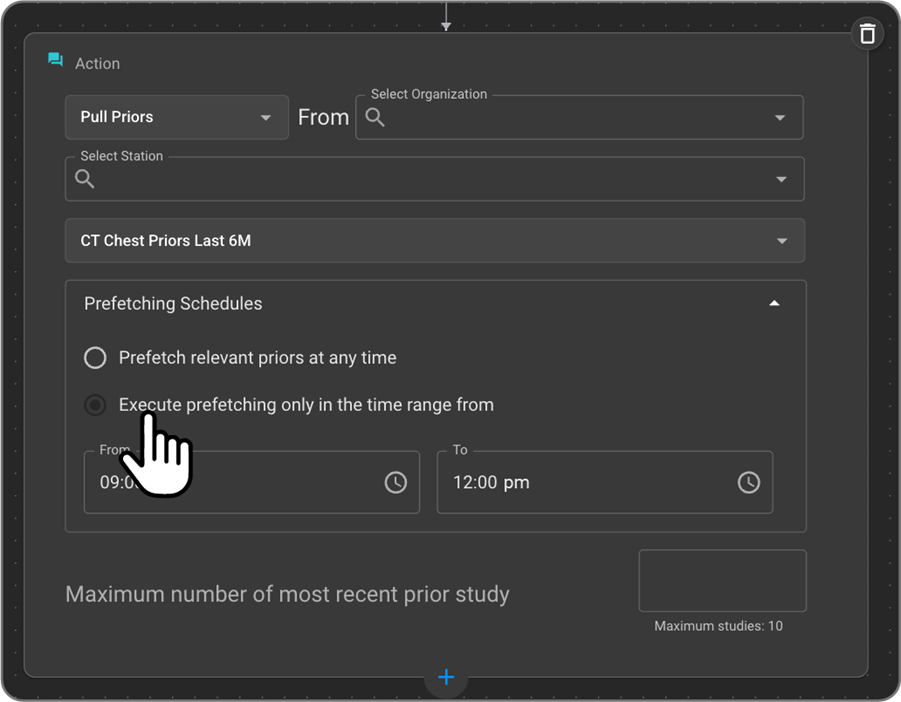
5. Set Prefetching Schedule
- Default Option: Prefetch relevant priors at any time (may increase system load).
- Recommended Option: Execute prefetching only in the time range from:
- Define a start and end time (e.g., 6:00 AM – 10:00 PM).
- Even if the rule is triggered outside this window, execution will occur only during the defined hours.
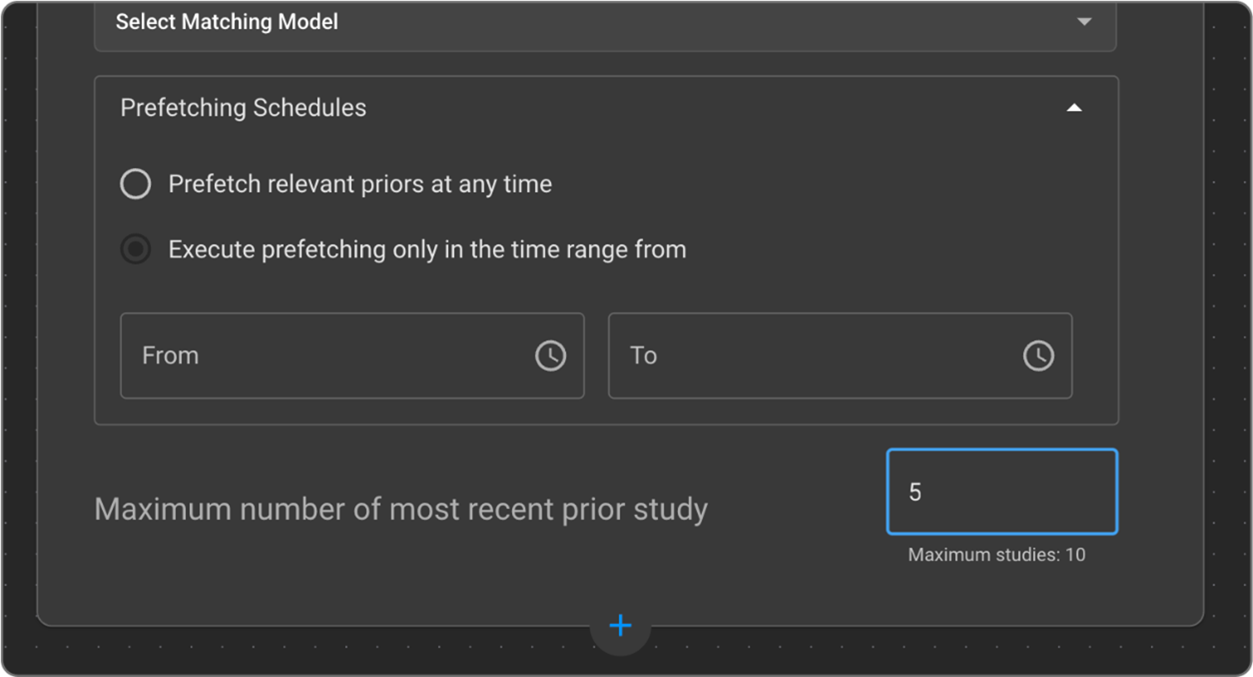
6. Set Maximum Number of Prior Studies
- Field: Maximum number of most recent prior studies
- Default: 10
- Leave blank to pull the latest 10 studies, or enter a custom number (e.g., 5).
Example: If a patient has 30 prior studies and the limit is set to 5, only the most recent 5 will be retrieved.
Example Use Case
A CT Brain study is marked as Verified. The WFA rule executes the Pull Prior action after the patient is matched with a Blume user. The system:
- Searches the @rs-blume-test organization.
- Pulls from the Radish PACS station.
- Applies the “CT Brain – Last 12M” matching model.
- Retrieves the latest 5 CT Brain studies from the past year.
- Makes them available in OmegaAI for radiologist review.
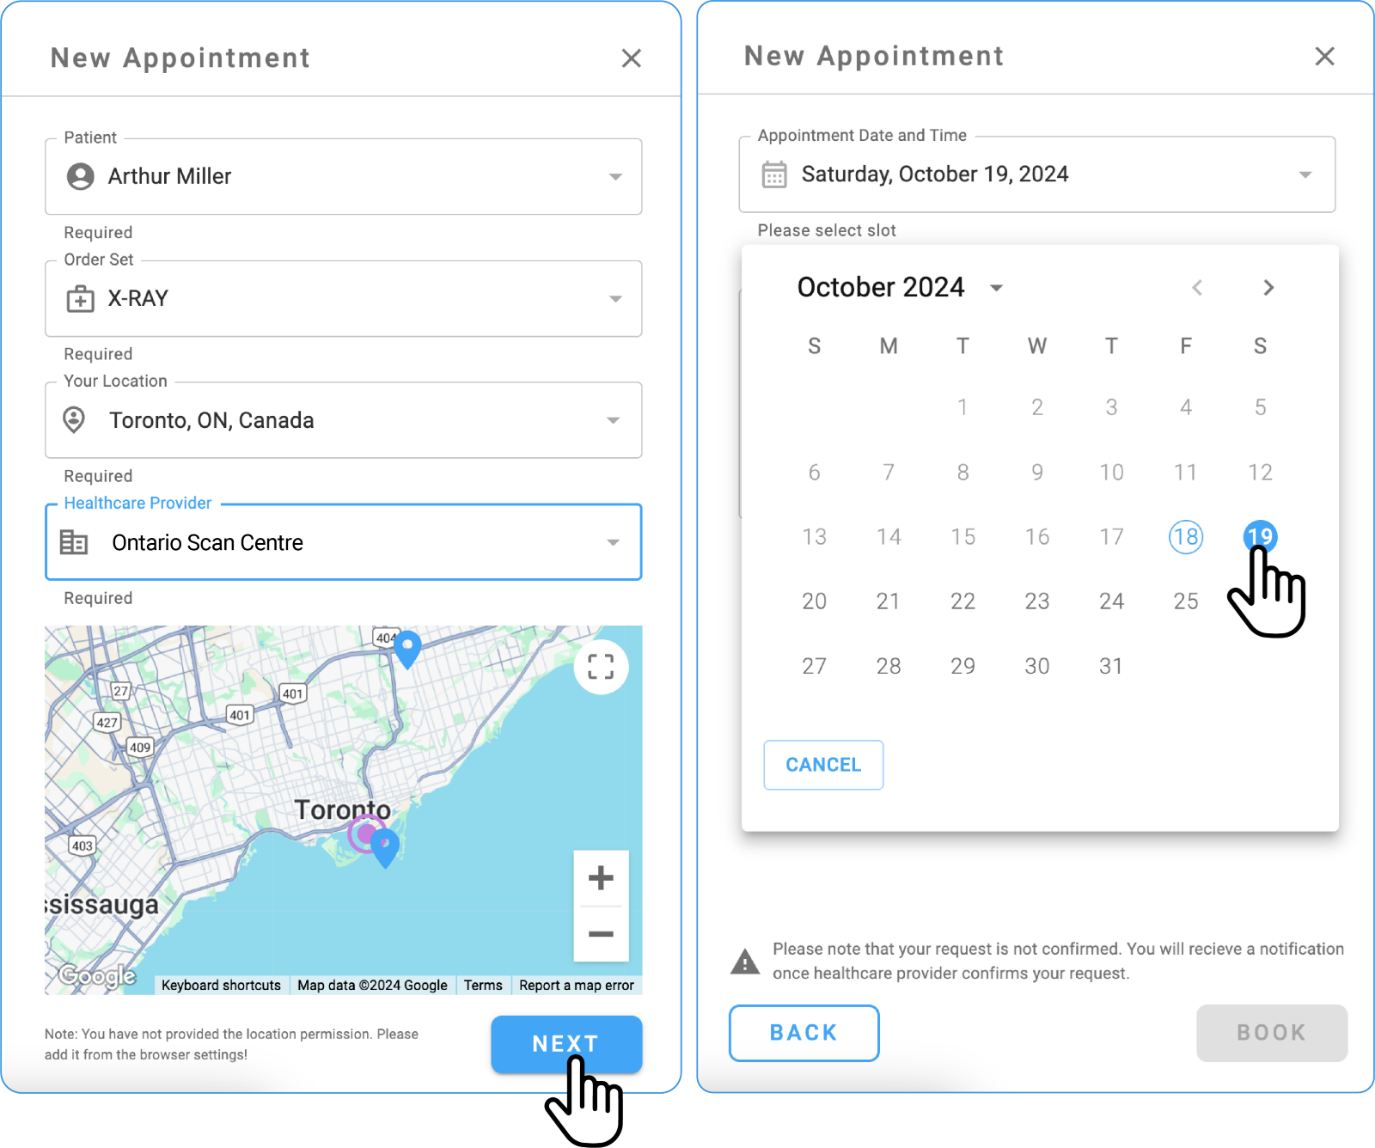
Self-Scheduling in Blume and Confirming Appointments on PowerServer.
- Key Steps
-
Log In to your Blume account.
-
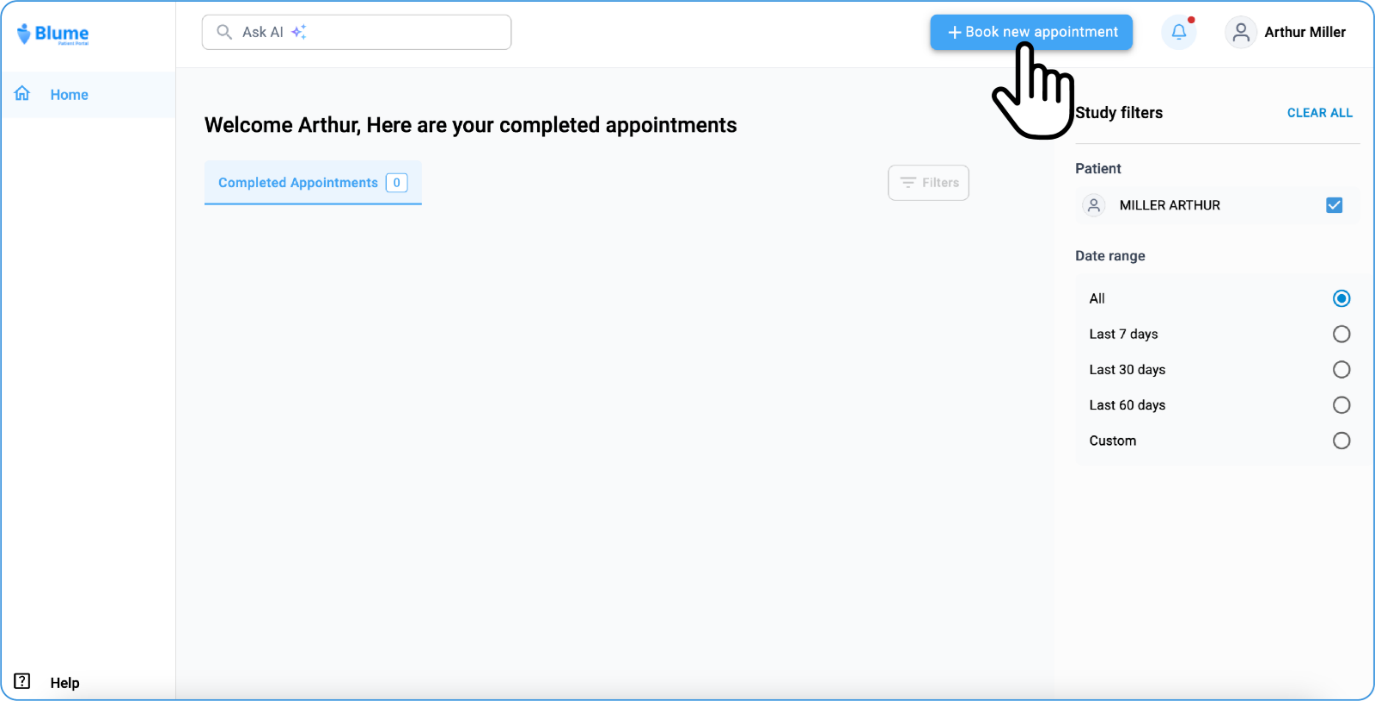
Navigate to Book New Appointment
-
Click on Book New Appointment.
-
In the New Appointment window, enter the patient details, location, and healthcare services and click on Next.
-
Select the date and time.
-
Click on Book.
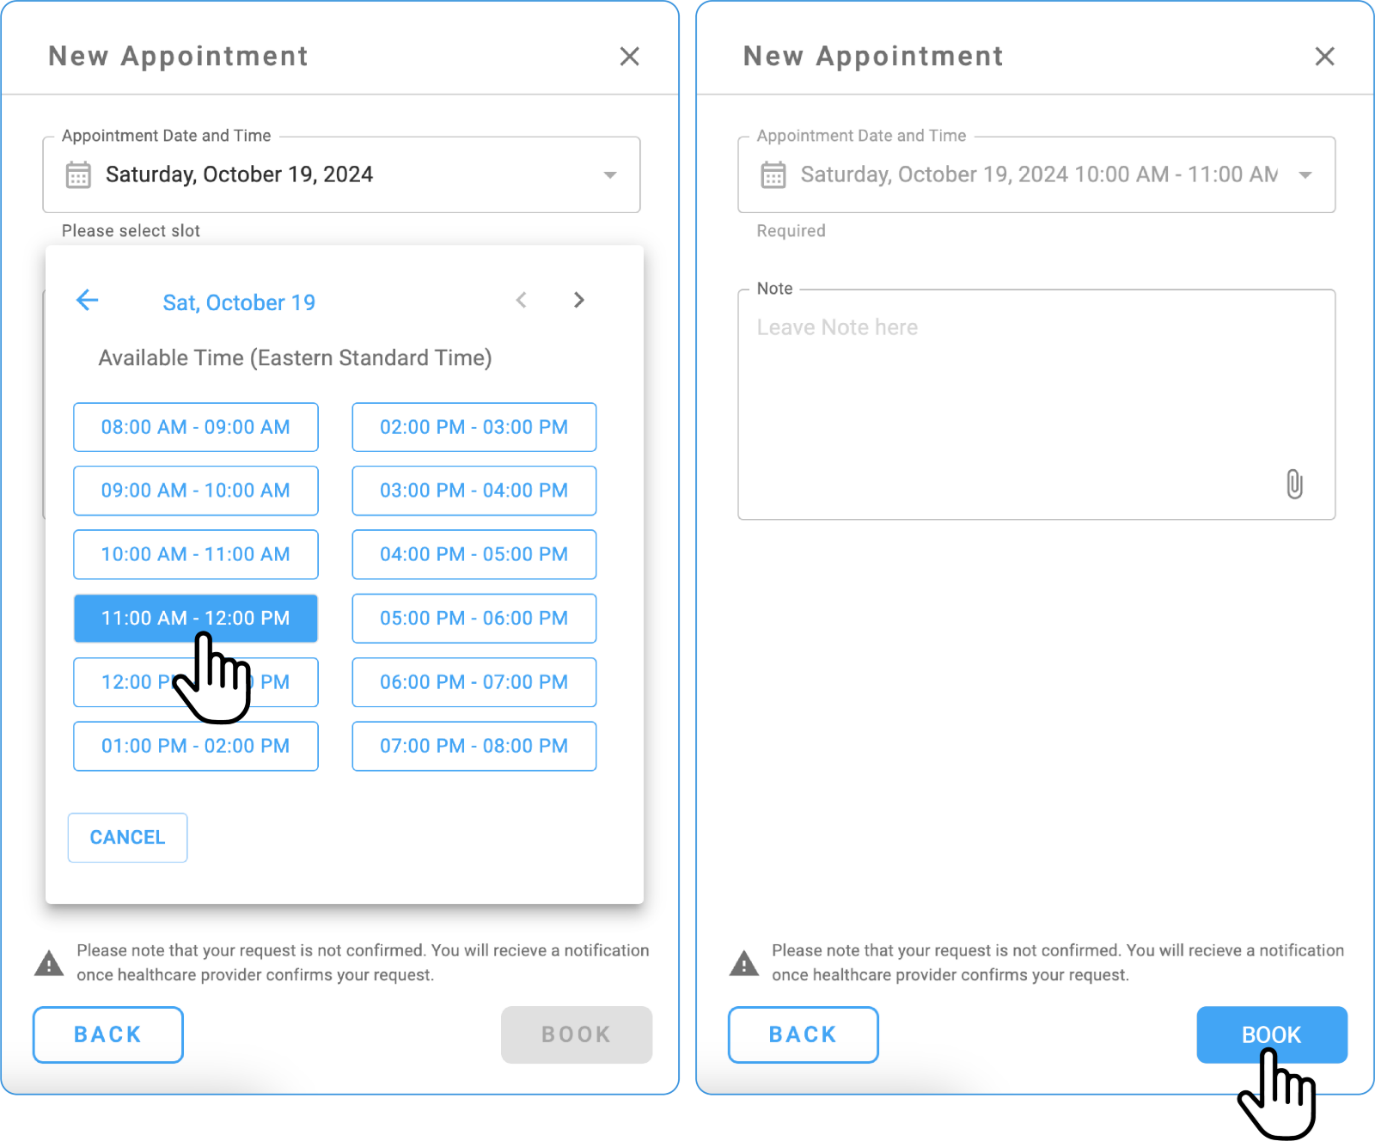
Filling form
-
Filling the Form:
- Click on the Access Form from the study.

- The form must be completed as outlined in Section E, ensuring that all required information is provided for the appointment setup.

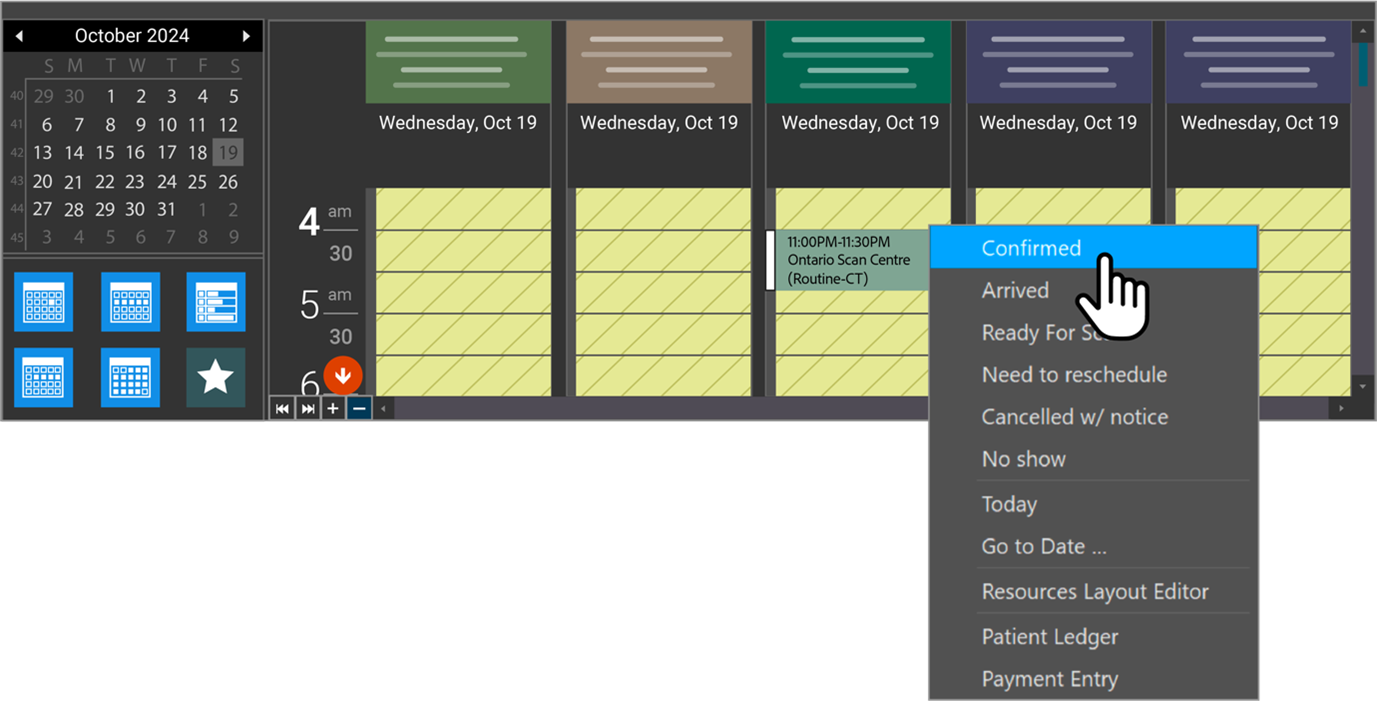
Confirming appointment in PowerServer
-
Access PowerServer and verify the appointment request.
-
Right-click and select the Confirmed option from the list.