Blume as an Asset in Breeze
Introduction
This manual serves as a comprehensive guide for administrators managing the Blume asset within Breeze. This guide covers asset features, licensing configurations, self-scheduling, OmegaAI integration, and customization options.
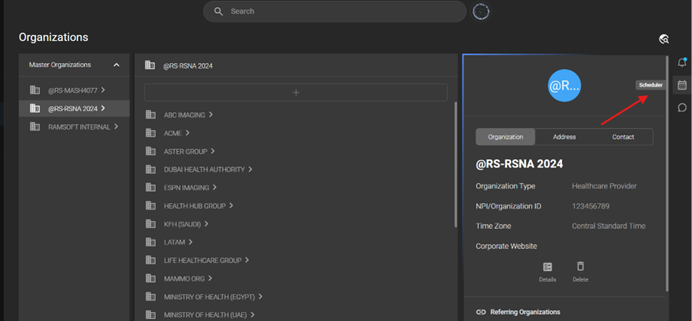
A. Setting Up Organizations in Breeze
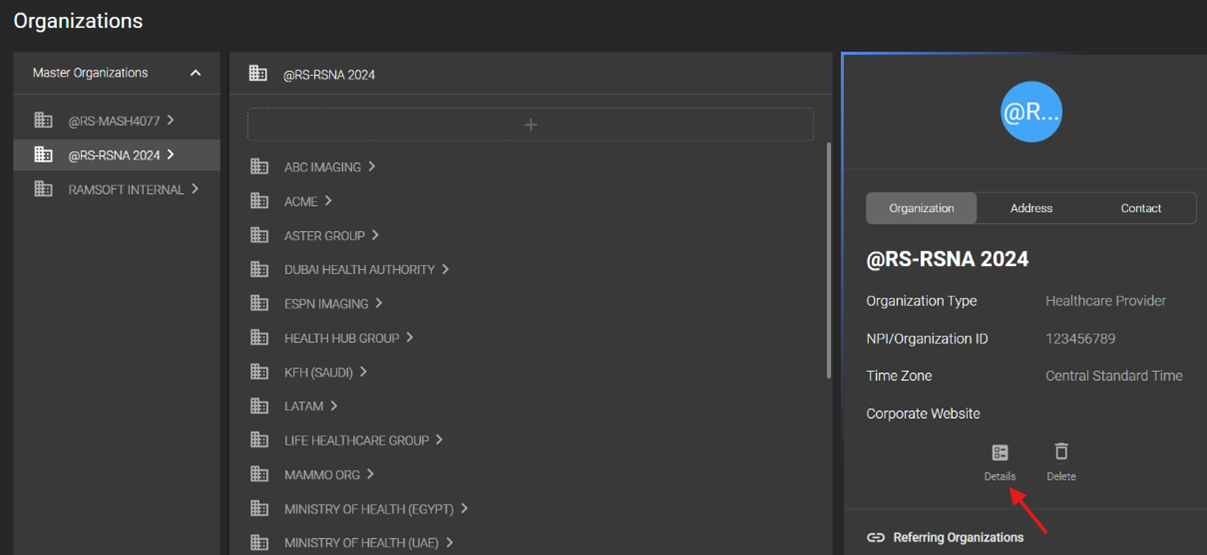
Creating a New Organization
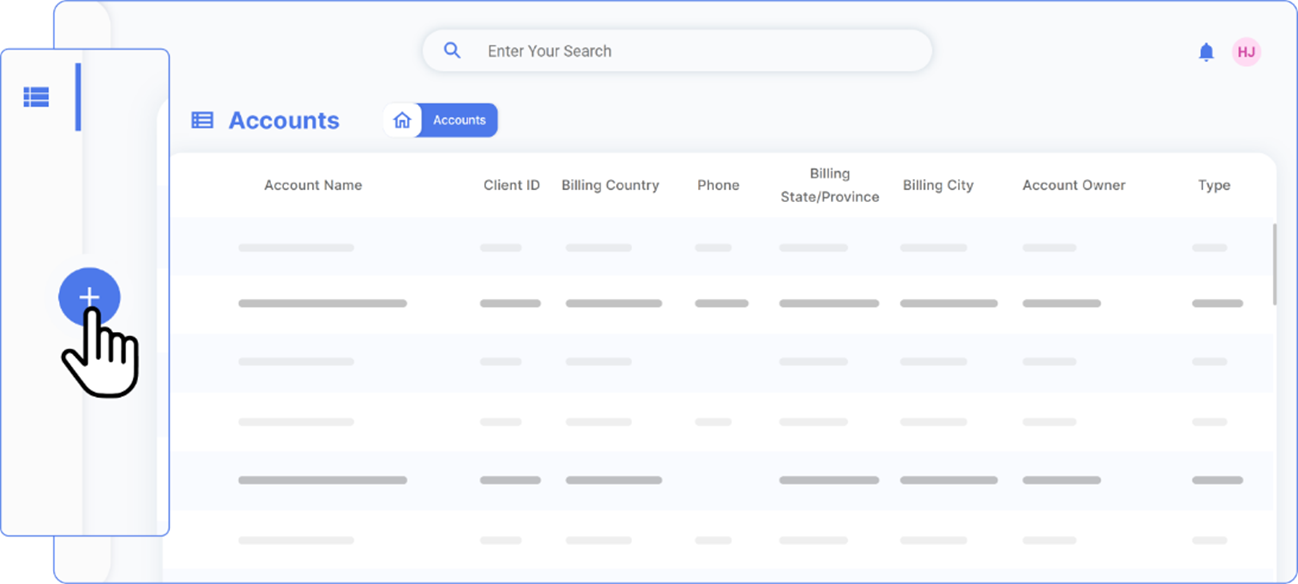
To set up a new organization in Breeze:
-
Navigate to the Organizations tab.
-
Click the + (Add Organization) button.
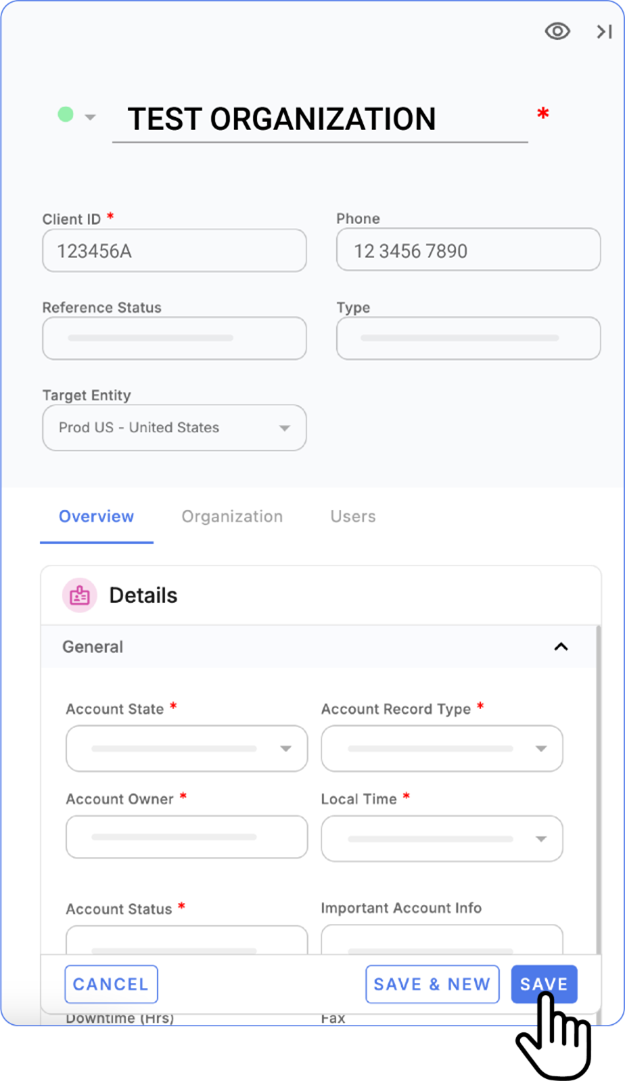
Fill in the mandatory fields:
-
Organization Name: Enter the exact name as listed.
-
Client ID: Retrieve the client ID from Salesforce or other verified sources.
-
Account Status: Set to "Active".
-
Certificate Status: Mark as "Active".
-
Add optional fields such as local time zone and address if available:
-
Example: "Toronto Location, EST Time Zone".
-
Click Save.
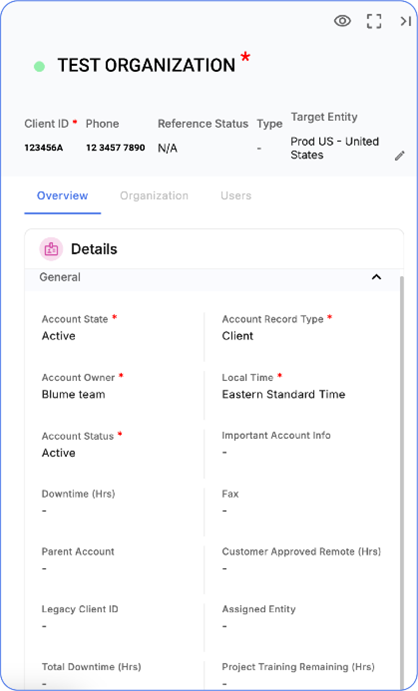
Editing Organization Details
To modify existing organization details:
- Navigate to the organization in Breeze.
2 Click on the relevant field (e.g., Account Owner, Client ID) to edit.
-
Save the changes.

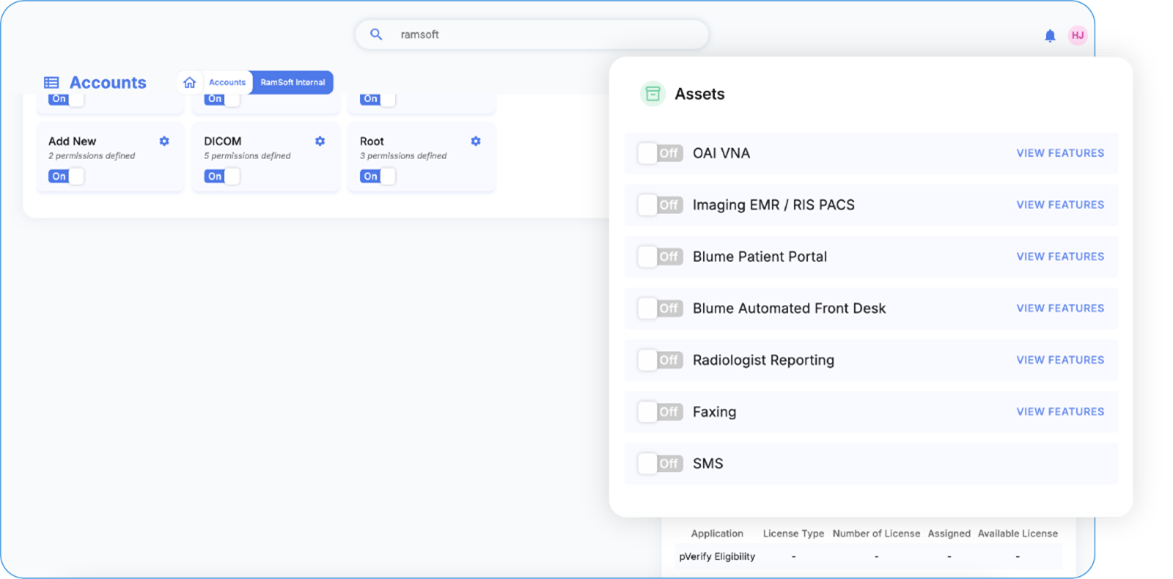
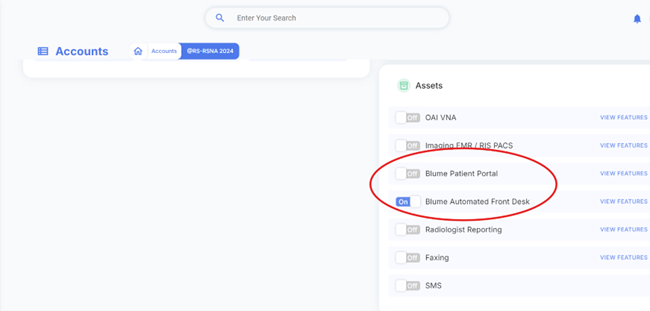
Enabling Assets for an Organization
To enable assets for an organization:
-
Go to the Assets section within the organization's settings.
-
Turn on the required assets, such as Blume or AFD.
-
Verify that the changes reflect accurately across Blume and OmegaAI.

B.Key Features of Blume in Breeze
1. No License
Without a Blume license, none of the features will be accessible.
This implies that:
-
No self-scheduling setting on OmegaAI
- The self-scheduling option will not be available for the organization on OmegaAI. Users will not be able to edit self scheduling settings.
-
No forms management on OmegaAI: Clinical and registration forms are unavailable.
- The forms configuration section will not be accessible. This means users will not have the ability to create or modify custom forms for the organization on OmegaAI.
-
No notifications: Neither in-app nor email notifications will work.
-
No study viewing or sharing: Patients cannot view, download, or share their studies.
- The Send Study to Blume option will not be visible to the organization on OmegaAI. As a result, users will not be able to send studies directly to Blume from the interface.
-
No appointment management: Booking, rescheduling, and canceling appointments will be blocked.
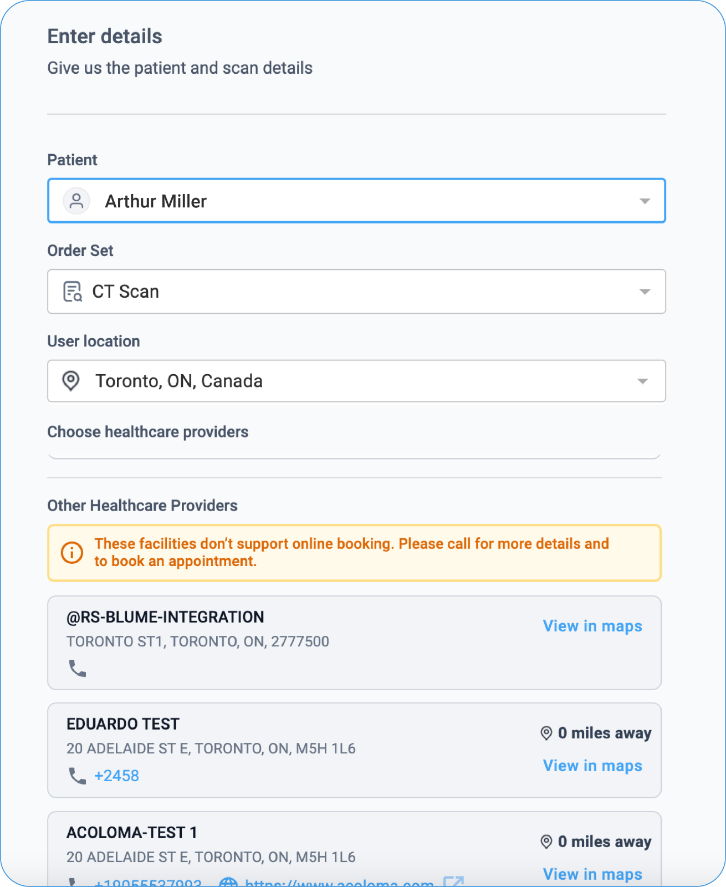
Note: If a patient attempts to book an appointment with a facility that has not purchased any license, they will see a message: This facility does not support online booking. Please call for more details and to book an appointment.

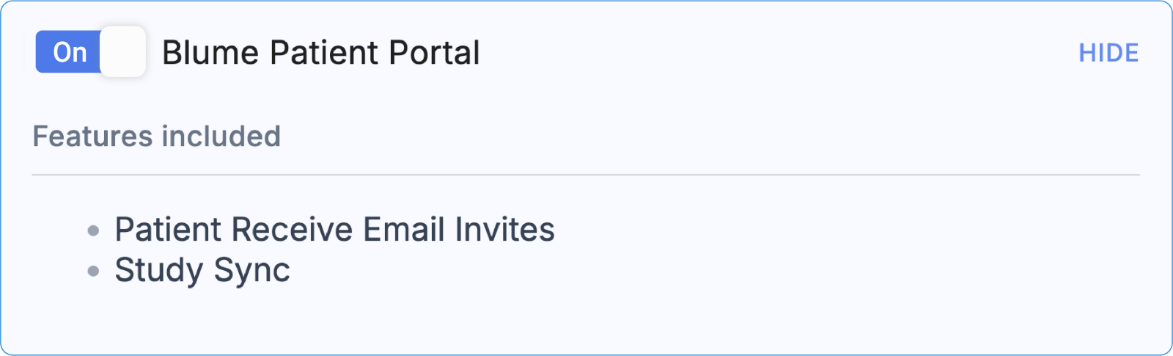
2. BPP (Basic Blume License)
The Basic Blume License (BPP) provides limited functionality, focusing primarily on patient email invites and basic study management (view and share study).

Enabled features include:
-
Email invites: Patients receive email invitations.
-
Study synchronization: Ensures that study data is synced between Blume and OmegaAI.
Limitations:
-
Self-scheduling, forms, and notifications remain unavailable.
-
Patients can only view, download, and share studies via email but cannot book appointments online.
How to Enable BPP:
-
Navigate to Settings > Asset in Breeze.
-
Turn on the Blume Patient Portal option.
AFD license option will be automatically turned off when BPP is enabled.
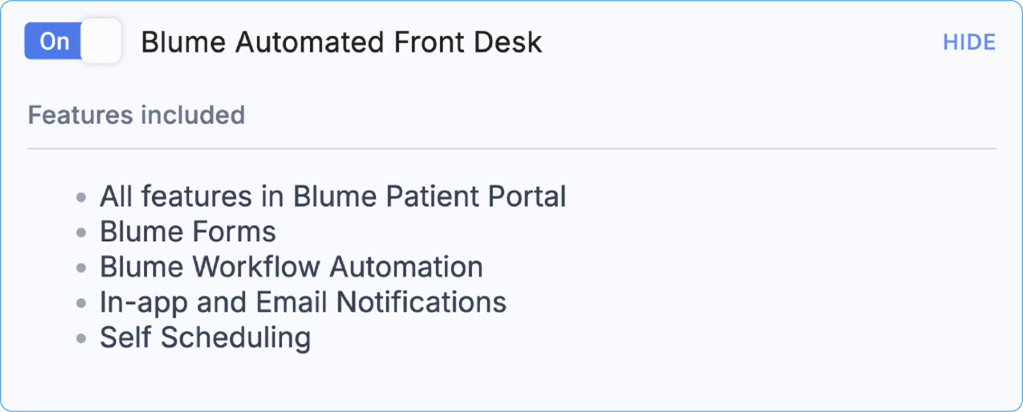
3. AFD (Blume Premium License)
The Blume Premium License (AFD) unlocks the full range of features, providing complete access to all tools and functionalities.
These include:
-
Self-scheduling: Patients can book appointments online.
-
Forms management: Clinical and registration forms are available for customization.
-
Notifications: In-app and email notifications are fully enabled.
-
Study management: Patients can view, download, share, and manage their studies.
-
Appointment management: Patients can book, reschedule, and cancel appointments as needed.
How to Enable AFD:
-
Navigate to Settings > Asset in Breeze.
-
Turn on the Blume Automated Front Desk option.
-
Ensure that other license options (e.g., BPP) are turned off.
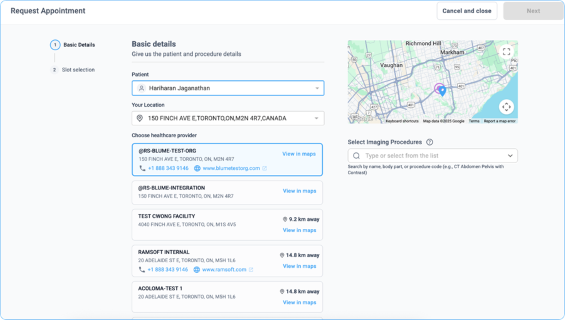
Self-Scheduling Management
Self-scheduling allows patients to book their appointments online from the patient portal: Blume

-
Enabling/Disabling Self-Scheduling
-
Navigate to Scheduler > Settings > Organization on OmegaAI.
-
Select the specific modality (e.g., CT, MRI).
-
Toggle the Self-Scheduling button:
-
-
On: Enables self-scheduling via the Blume Portal / Customised URL for the modality.
-
Off: Disables self-scheduling via the Blume Portal / Customised URL

-
How to get the Customized URL for self-scheduling? (This URL must be published on the customers' website to enable self-scheduling)
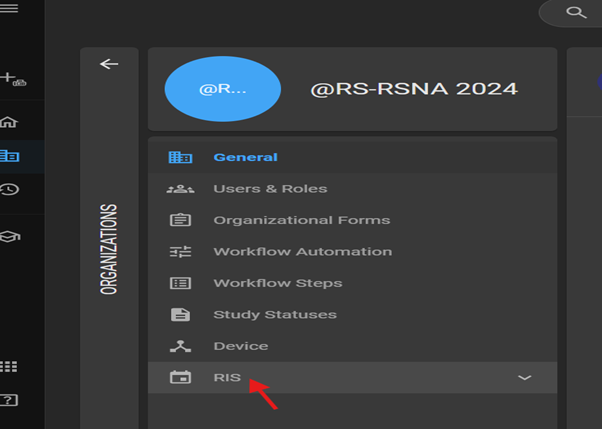
- Go to Organization > Details > RIS > Self Scheduling > Edit on OmegaAI.
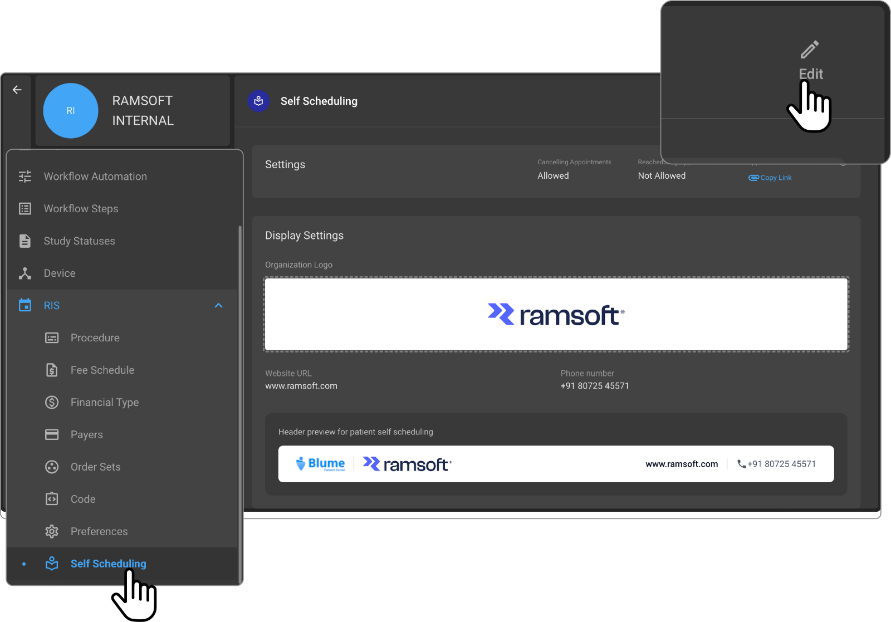
- Click the Copy Link under the Appointment Link for the Website.
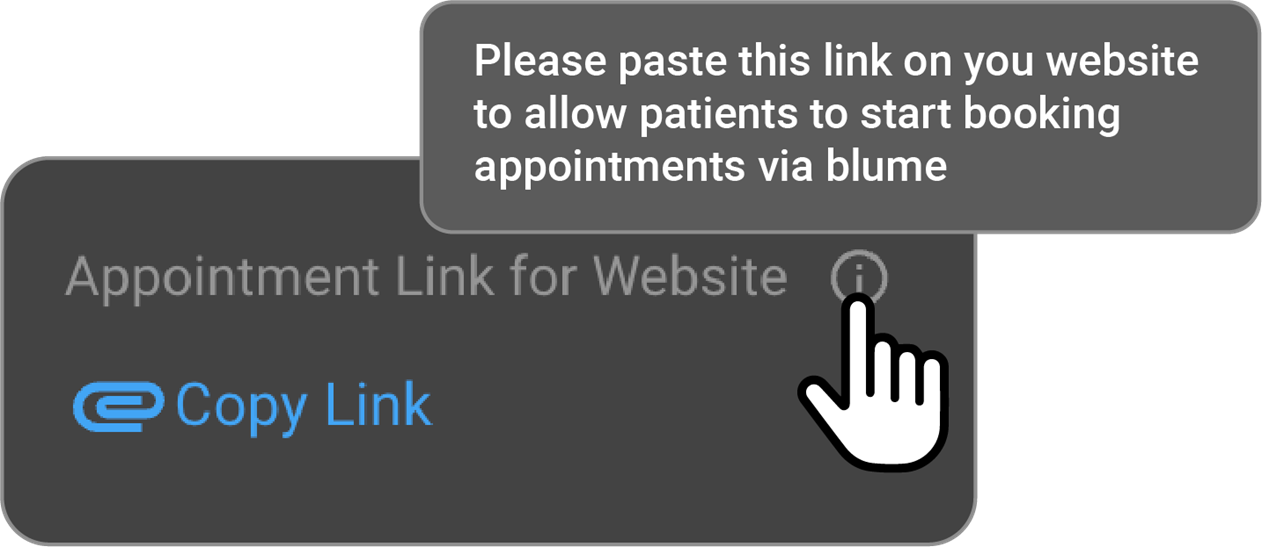

- Embed the link on the organizations website for patient or referring physician use.
Booking and Appointment Management
-
Basic License
-
Patients can view studies but cannot book appointments online.
-
If a patient tries to book, they will see the following message: This facility does not support online booking. Please call for more details and to book an appointment.
-
-
Premium License
- Patients can view studies, book appointments, and reschedule/cancel appointments.
Organizations using Blume with a premium license can configure whether patients or physicians are allowed to reschedule or cancel appointments. This configuration can be managed via OmegaAI.
- Admins can toggle rescheduling and cancellation options:
- Navigate to the Organization Settings
- Go to Organization > Details > RIS > Self-Scheduling on OmegaAI.
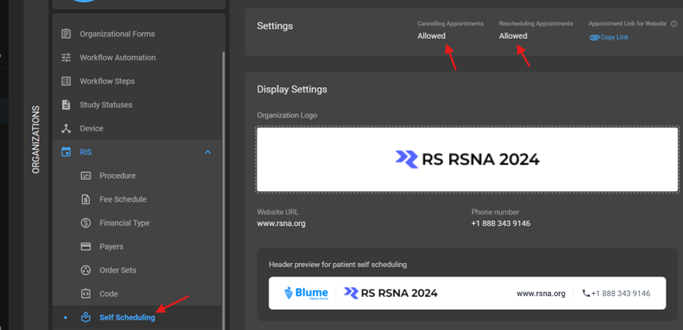
- Default Behavior
- By default, both Canceling Appointments and Rescheduling Appointments are enabled for premium licenses.
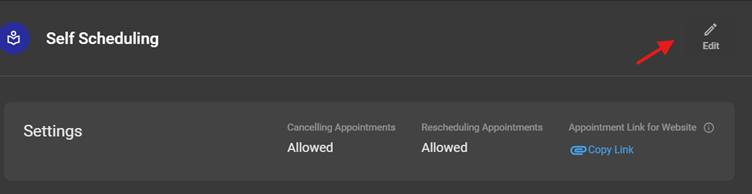
- Editing the Settings
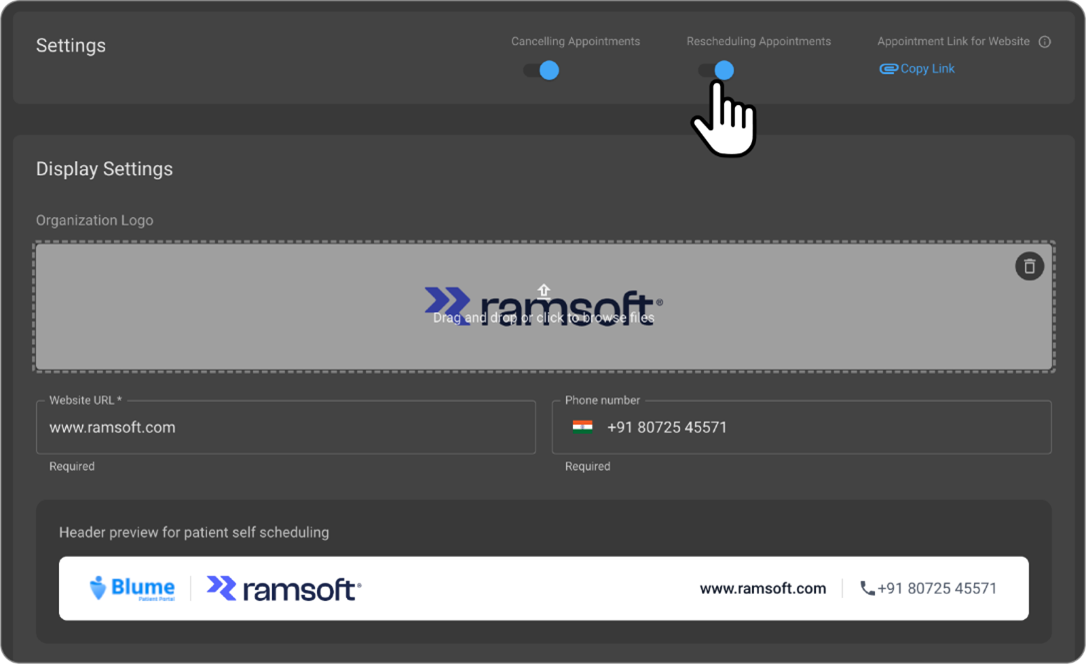
- Click the Edit button to toggle the options for Canceling and Rescheduling appointments on Blume for patients/physicians.
-
Allowed enabled: The function will be available on Blume, and patients/physicians will be able to see and use it.
-
Turned off: The function will not be available on Blume, and patients/physicians will not see or use it.

Example Use Case
-
An organization may want patients/physicians to reschedule appointments on Blume but not cancel them.
-
To achieve this, they can enable the Rescheduling option while disabling the Canceling option using the toggle buttons on OmegaAI.
-
As a result, only the Reschedule button will be visible on Blume, and the Cancel button will not appear.
By enabling or disabling these options in OmegaAI, organizations can selectively control the availability of Rescheduling and Canceling functions on Blume. This flexibility allows organizations to align the functionality with their specific policies and workflow requirements.
- Configuring Self-Scheduling in OmegaAI Scheduler
-
To enable or disable self-scheduling for specific modalities in OmegaAI, follow the steps below:
- Steps to Enable/Disable Self-Scheduling
- Navigate to Scheduler Settings
- Go to Scheduler > Settings > Organization on OmegaAI. Select the organization.


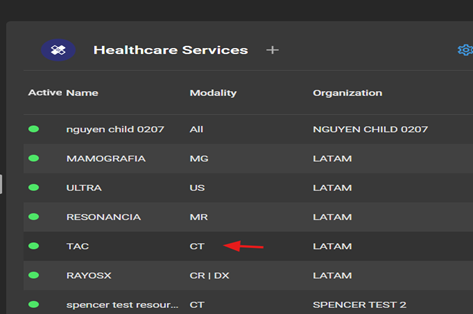
- Select Modality
- Choose the specific modality (e.g., CT, MRI) for which you want to configure self-scheduling.
Please note that the self-scheduling option can be enabled for multiple modalities simultaneously. However, if self-scheduling needs to be configured for a specific modality, you must select each modality individually and toggle the self-scheduling option ON or OFF as required.
- Edit Modality Settings
- Click the Edit button at the top of the page.

- Toggle the Self-Scheduling Button
-
On: Enables public booking/self-scheduling for the selected modality via the Blume Portal.
-
Off: Disables public booking/self-scheduling for the selected modality via the Blume Portal.
Example Use Case
Using this functionality, self-scheduling can be selectively enabled or disabled for different modalities based on the facility's requirements.
For example, if a facility wants to allow CT bookings for both physicians and patients via the Blume Portal but does not want to make MRI bookings publicly available, they can:
-
Turn On self-scheduling for CT following the above-mentioned steps.
-
Turn Off self-scheduling for MRI following the above-mentioned steps.
This feature offers flexibility by allowing organizations to manage the public availability of specific modalities, ensuring that only the desired services are accessible for self-scheduling on the Blume Portal
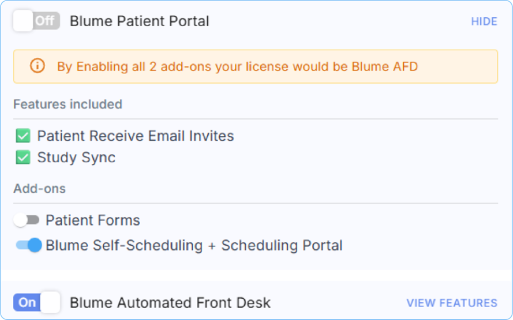
4. Blume Add-On Licenses
To enhance flexibility and user experience, Blume now offers two new Add-On Licenses for BPP users, enabling selective feature expansion without requiring an upgrade to the full Blume Automated Front Desk (AFD) license.
- Forms Add-On License
This license enables organizations with a BPP (Blume Patient Portal)** license to configure and publish forms directly from OmegaAI to Blume.
Key capabilities include:
- Access to the Forms UI within OmegaAI.
- Ability to create, customize, and publish registration forms, clinical forms, and much more.
- Patients can view, complete, and access submitted forms via the Blume portal.
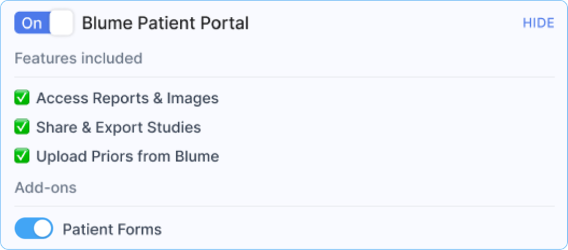
This add-on is ideal for organizations that want to digitize form workflows without enabling full AFD (Blume Automated Front Desk**)** capabilities.
- Self-Scheduling & Scheduling Portal Add-On License
Organizations enabling this add-on will have access to the scheduling interface within OmegaAI and the Blume portal. Patients will see scheduling options and receive confirmation when appointments are booked.
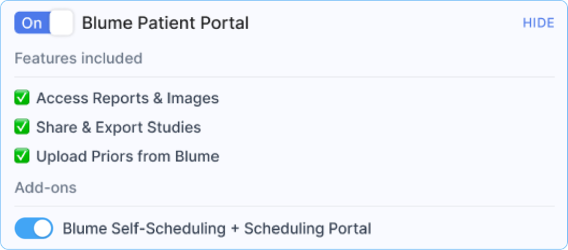
This license empowers patients to manage their appointments independently.
When enabled, it provides:
- Access to the self-scheduling interface on Blume.
- Ability for patients to book, cancel, or reschedule appointments.
This add-on is suitable for organizations that want to offer appointment flexibility without enabling form-related features.
Important Note on Combined Add-Ons
If both the Forms Add-On and the Self-Scheduling & Scheduling Portal Add-On are enabled alongside the BPP license, the combined functionality becomes equivalent to the full Blume Automated Front Desk (AFD) license.
To ensure clarity and avoid duplication, when an organization activates both add-ons, a confirmation prompt will appear in Breeze:
Enable Blume Automated Front Desk license? If all three add-ons are enabled on the Blume Patient Portal, it is equivalent to enabling the Blume Automated Front Desk license. Would you like to enable the Blume Automated Front Desk license now?”
This ensures clarity and helps organizations make informed decisions about their licensing strategy.
5. Troubleshooting and Support
Common Issues
- Features not working: Verify that the correct license is enabled (BPP or AFD).
- Self-scheduling unavailable: Ensure the Self-Scheduling button is toggled on for the relevant modalities.

-
To Check Asset License Access and Changes
-
Log in to OmegaAI using your admin credentials.
-
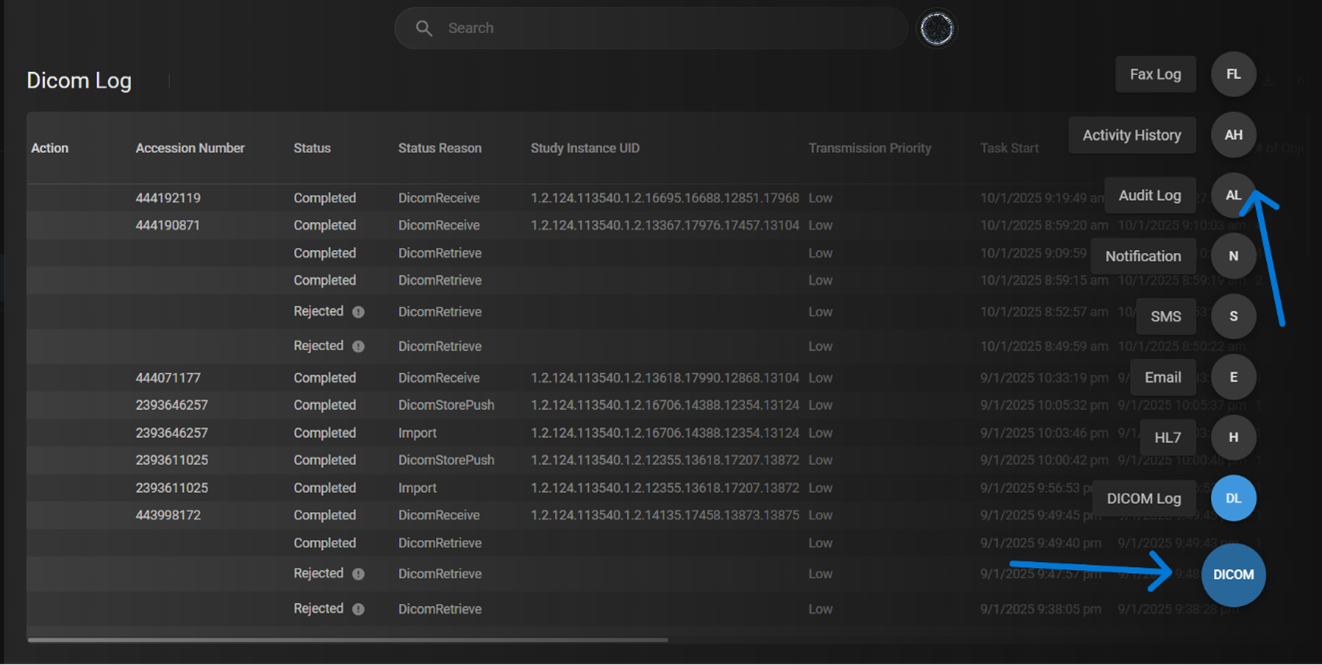
Navigate to Logs:
On the left-side vertical taskbar, click Logs.
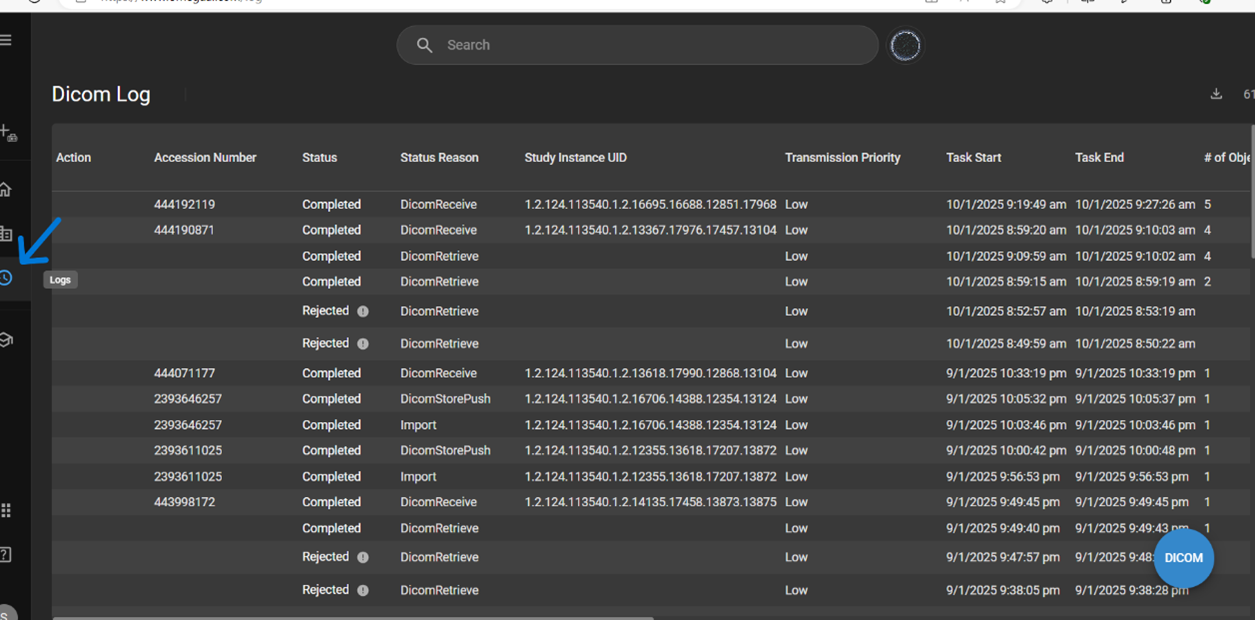
-
To Select Log Type: Navigate to the bottom-right corner and click the blue circle with the default DICOM option selected.
-
Scroll up in the pop-up menu and select Audit Log (AL).
-
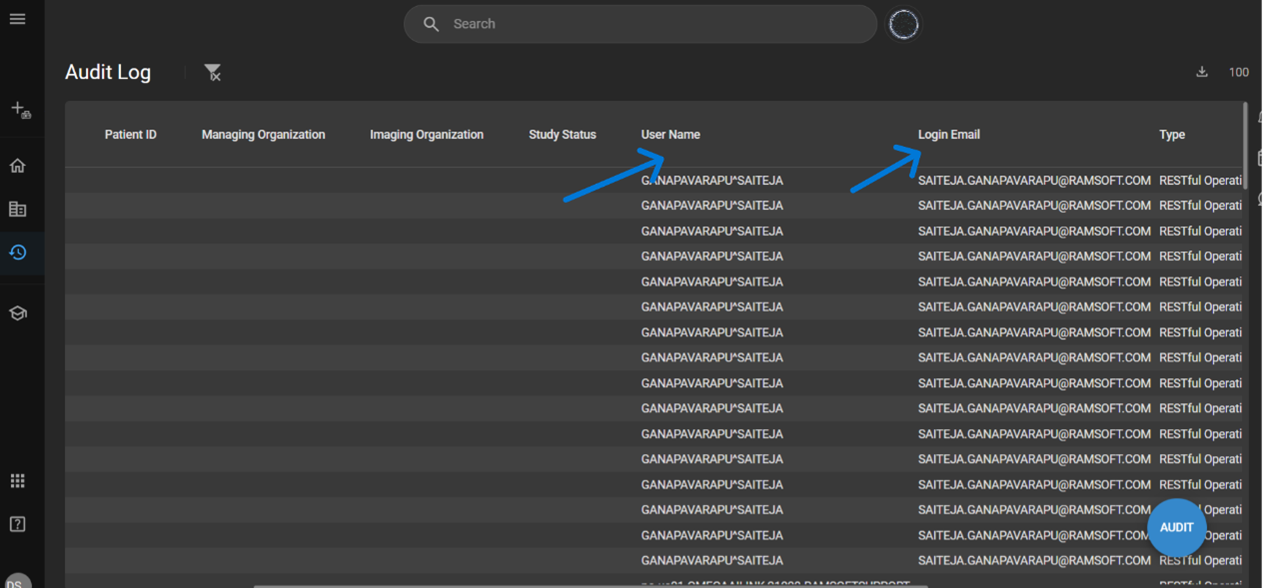
Choose Your Organization: Use the organization filter to select your managing organization.
-
Search Details: You can view details such as Access Date/Time, Username, and Login Email.
-
You can refer to the Outcome Description column, which specifies any changes in the license or asset.


This process helps in tracking user activity and license modifications for better audit and compliance.
Note:
A) Access to features such as viewing studies, sharing studies, managing appointments, and self-scheduling within Blume depends on the organization's licensing configuration on Breeze as decribed above. The availability of these functionalities may vary based on the specific license like AFD, BPP, or No License purchased by your healthcare provider.
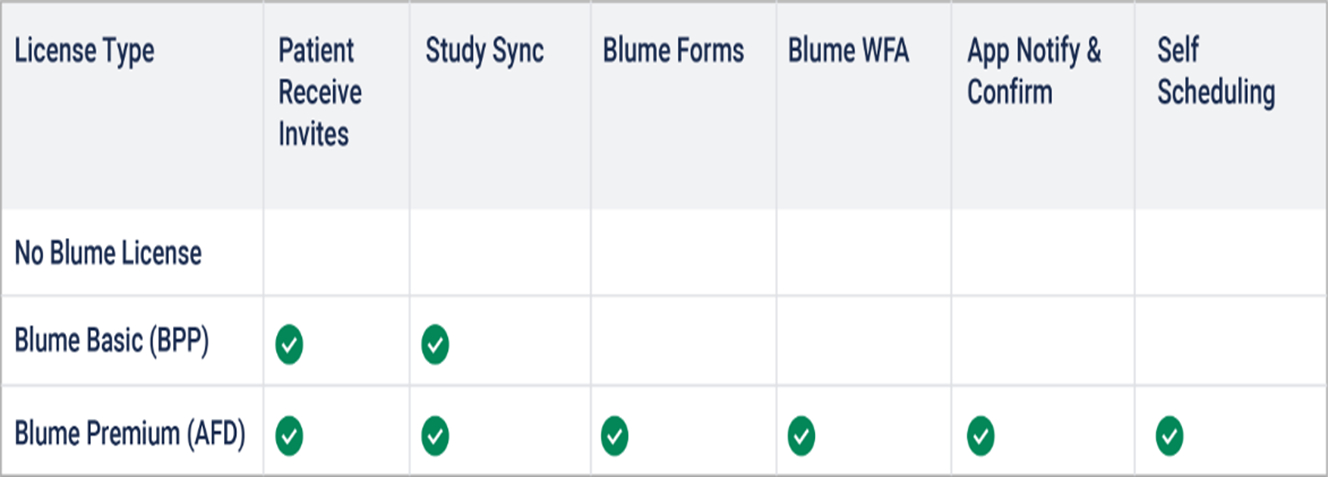
B) The Blume Basic (BPP) license provides access to Patient Invites and Study Sync, while the Blume Premium (AFD) license includes all BPP features plus Blume Forms, Blume WFA, App Notifications & Confirmation, and Self-Scheduling. Without a Blume license, users do not have access to any of these features.
C) If you encounter restricted features, please get in touch with your healthcare provider for more information regarding their current Blume license settings.
D) License Transition and Data Accessibility
-
When an organization enables the AFD license, Blume users gain access to:-
- Self-scheduling
- Customized clinical and registration forms
- In-app and email notifications
- Viewing, downloading, sharing, and managing studies
- Booking, rescheduling, and canceling appointments
-
Switching Licenses and Data Retention:
-
If the organization switches from AFD to BPP, all previous studies (reports/images) and appointments issued during the AFD license remain accessible. However, for new appointments, only Study Sync and Email Invites (BPP features) will be available.
-
If the organization switches back to AFD from BPP, users regain access to all past study details and appointments from both the AFD and BPP license periods.
-
-
No License Period:
-
When an organization has no active license, users do not have access to any features, including email invites, study sync, self-scheduling, or appointment management.
-
If the organization later enables the BPP license, users can access all past studies and newly synced ones.
-
If the organization enables the AFD license, users can view past studies and appointments from the no-license period along with new ones.
-
-
Returning to No License:
- If the organization disables AFD/BPP and reverts to No License, past records from the AFD/BPP period remain accessible, but users lose access to all new appointment-related features.