View, Edit, and Delete Appointments
After an appointment is booked, you can open its details, change it, or remove it from the calendar. This article shows you how, and explains the limits on editing past and completed appointments.
Before you begin
- Appointment on the calendar: Go to the appointment's date in the Scheduler. See Go to a specific date.
- Past appointments: You can edit past appointments only within the two-day window. See Managing Past Appointment Requests.
View an appointment's details
|
|
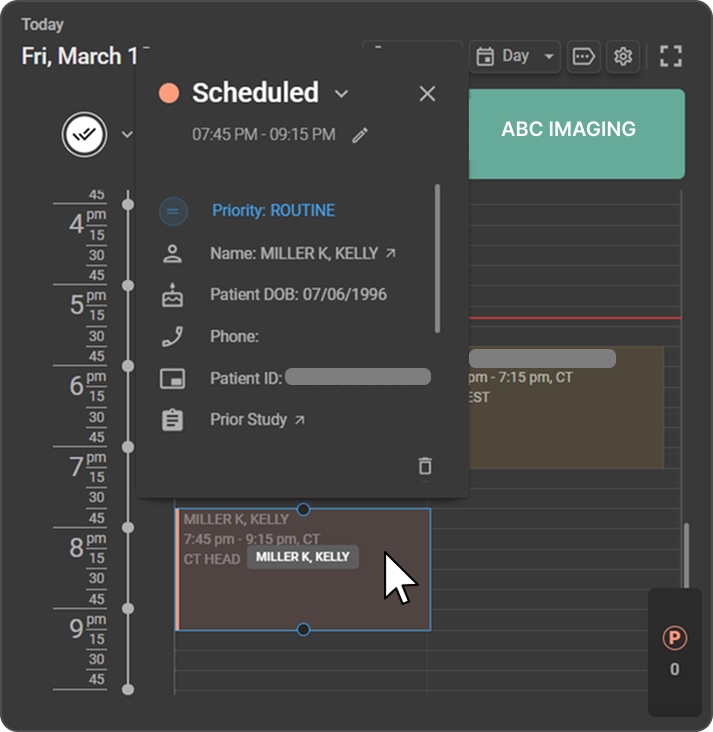
Expected result: The Appointment Details panel opens and shows the appointment's information.
Tip: Scroll down in the panel to see all the details.
The panel shows:
- Status: At the top of the panel.
- Time: The start and end time, with the Edit (pencil) icon.
- Priority: Such as ROUTINE.
- Patient details: The patient's name, date of birth, phone number, and patient ID.
- Study details: A Prior Study link, the study description, the modality, and the study's Workflow status.
- Referred By: The referring physician, if there is one.
- Delete icon: The trash icon, in the bottom-right corner.
Tip: To open the patient's full Study page, double-click the appointment card.
Edit an appointment
|
|
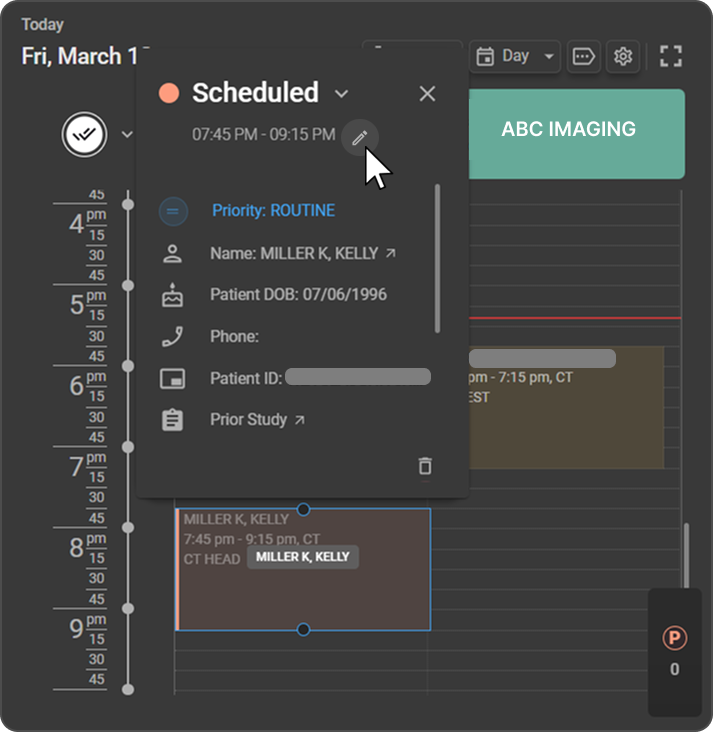
- Update the fields you need:
| Field | What you can change |
|---|---|
| Status | Select a new status. See Change an appointment's status. |
| Appointment Date (required) | Move the appointment to another date. |
| Start Time / End Time (required) | Change when the appointment starts and ends. |
| Priority | Click STAT, ASAP, Urgent, or Routine. |
| Patient Name | Read-only. You can't change it. |
| Referring Physician, Referring Organization, Consulting Physician | Add or change the physician and organization details. |
| Order (required) | Change the order. The order card shows its status and accession number. |
| Note | Add or change notes. |
- Click Update to save your changes, or click Cancel to discard them.
Expected result: The appointment shows your changes on the calendar.
Change an appointment's status
You change an appointment's status in the edit panel:
- Open the Appointment Details panel, then click the Edit (pencil) icon.
- In the Status field, select a new status.
- Click Update.
Note: You can't change the status from the Appointment Details panel itself, even though an arrow appears next to the status.
The dropdown lists Scheduled, Confirmed, Arrived, Ready for Scan, No Show, and Cancelled.
Two rules apply:
- Requested isn't available: You can't change an appointment back to Requested. The option is hidden in the dropdown.
- Completed is set automatically: Completed isn't in the dropdown. When the study's Workflow status is updated to Completed, Verified, To be Amended, Dictated, Transcribed, Signed, or Faxed, the appointment changes to Completed on its own.
Note: If you set the status to No Show or Cancelled, the appointment moves to the Parking Bay. See Use the Parking Bay.
For the full list of statuses, see Understand appointment statuses.
Edit a past appointment
- Not completed: You can edit a past appointment whose status isn't Completed, and move it to a date within the two-day window or later.
- Completed: You can edit a Completed appointment only if its date is within the two-day window.
For examples, see Managing Past Appointment Requests.
Move or resize an appointment
You can change an appointment's time, service, or length directly on the calendar.
Note: The two-day window applies to moving and resizing too. If you move a Completed appointment that's within the window, its status changes back to Scheduled.
Move an appointment
|
|
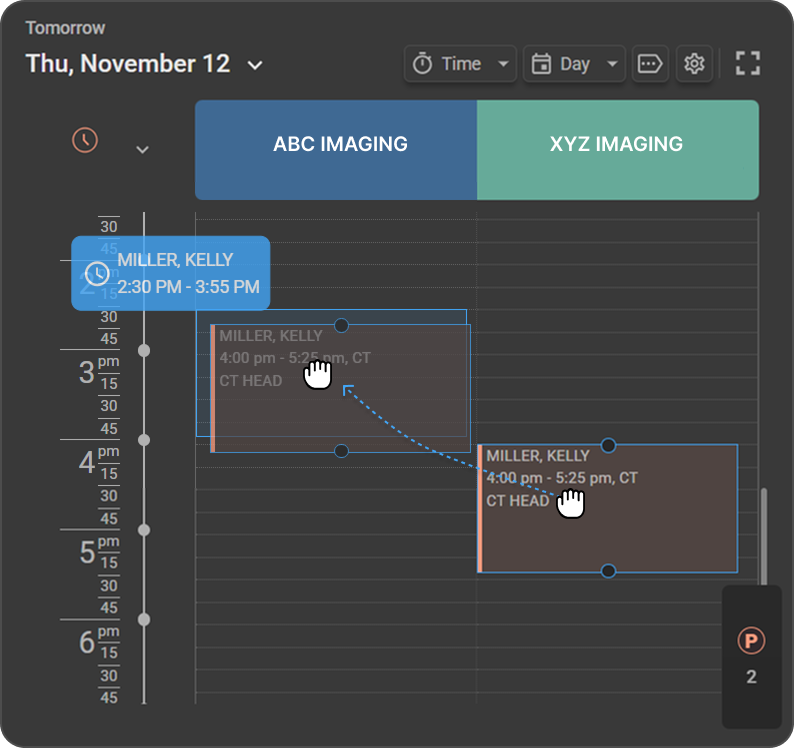
Expected result: The appointment moves to the new time or service.
Resize an appointment
|
|
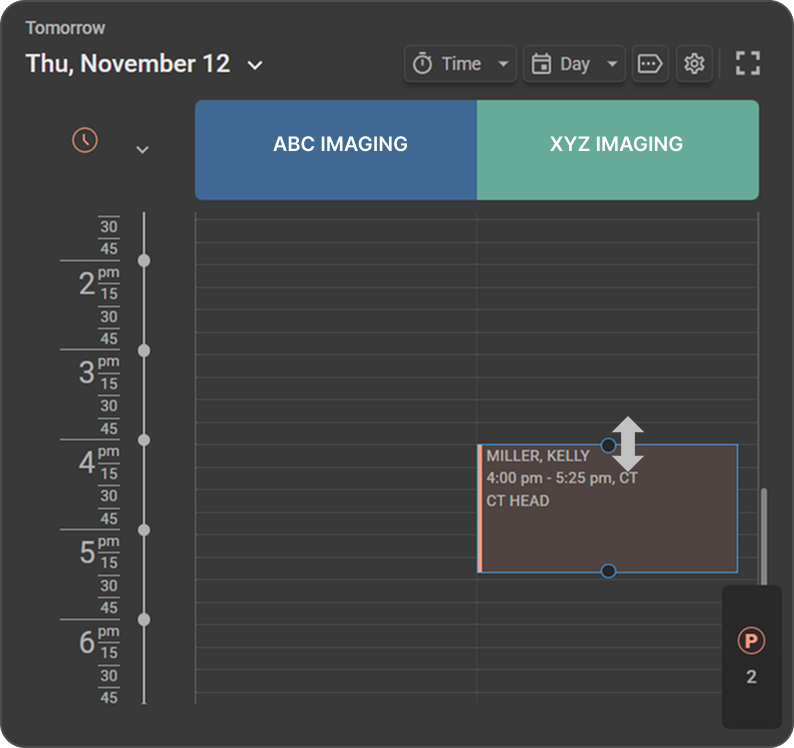
Expected result: The appointment's start or end time changes, and the block shows the new time range.
Delete an appointment
|
|
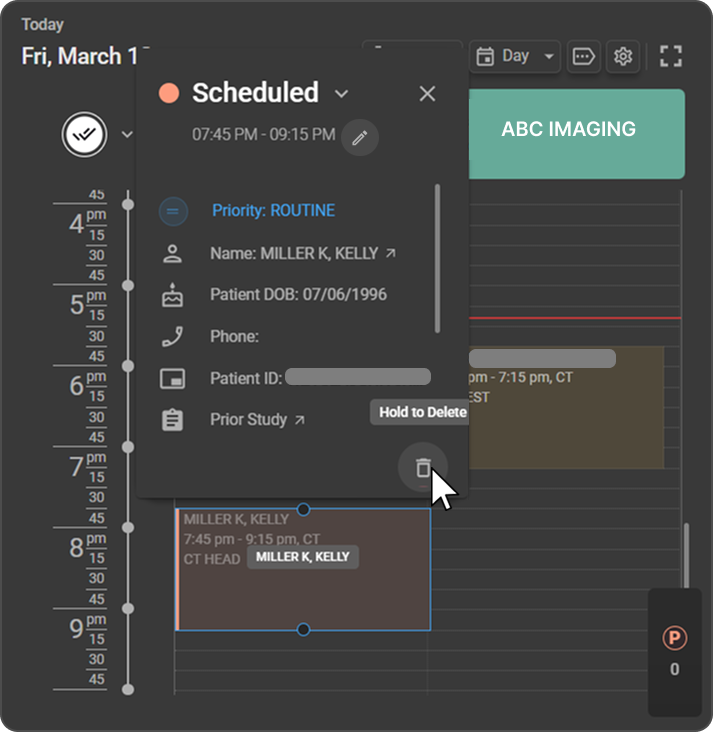
Expected result: The appointment is removed from the calendar.
The deletion happens right away, with no confirmation dialog. The study's status in the Worklist changes from Scheduled back to Ordered, or your organization's name for it, such as Ready to Be Scheduled.
Troubleshooting
You can't change the patient on an appointment
- Cause: Patient Name is read-only on existing appointments.
- Fix: Delete the appointment and request a new one for the correct patient. See Request an Appointment.
Requested or Completed doesn't appear in the status dropdown
- Cause: By design, you can't change an appointment back to Requested from the Scheduler. Completed is set automatically when the study's Workflow status is updated.
- Fix: No action is needed. To complete an appointment, update the study's Workflow status. See How statuses change automatically.
You can't edit a past appointment
- Cause: The appointment is Completed and its date is more than two days before today, or you tried to move it to a date outside the window.
- Fix: Choose a new date within the window, which is yesterday, the day before yesterday, or later.
Related articles
- How the Scheduler Works: Learn the appointment statuses and scheduling rules.
- Request an Appointment: Book a new appointment.
- Use the Parking Bay: Hold a study to reschedule it later.
- Worklist: Work with the study behind an appointment.