Request an Appointment
You can request an appointment in two ways. You can drag a study from the Worklist into the Scheduler, or you can create a new appointment directly in the calendar.
This article shows you both methods, the visual cues that help you place a study, and how the Scheduler decides how long an appointment lasts.
Before you begin
- Ordered studies only: You can schedule a study only when its Workflow status is Ordered, or your organization's name for it, such as Ready to Be Scheduled. See Only ordered studies can be scheduled. To create an order, see Create New Order.
- Healthcare service in your view: The service you want must appear as a column. See Choose Which Healthcare Services Appear in the Scheduler.
- Past dates: You can request appointments for past dates only within the two-day window. See Managing Past Appointment Requests.
Request an appointment from the Worklist
Use this method when the study is already in the Worklist.
-
In the Worklist, find the study you want to schedule.
-
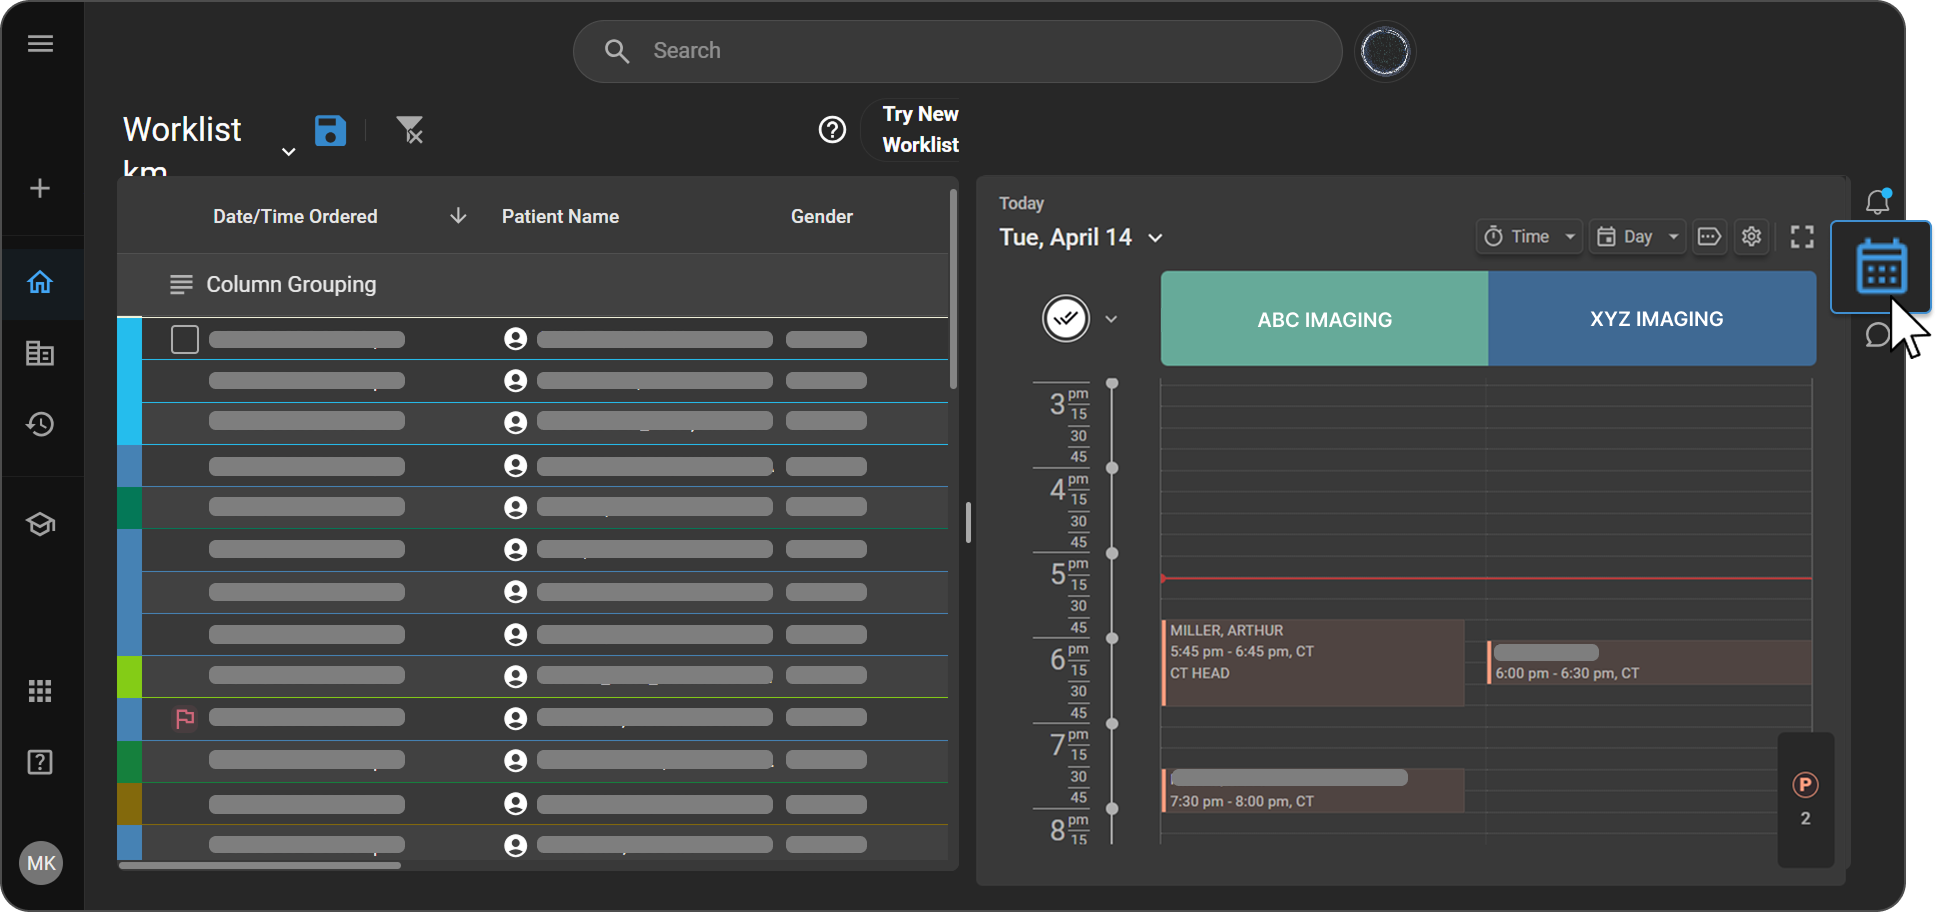
On the right-side navigation bar, click the Calendar icon to open the Scheduler.
-
Use the date selector at the top left of the Scheduler to go to the date you want. Then scroll to the time slot. See Go to a specific date.
-
Check that the healthcare service you need appears as a column. If it doesn't, click the Resource icon and add it. See Add or remove healthcare services.
-
Drag the study from the Worklist and hold it over the Scheduler. Watch the visual cues to find the right slot. See Use the drag-and-drop cues.
-
Drop the study onto the service column, at the time slot you want.
-
(Optional) To adjust the time, drag the appointment block up or down within the column.
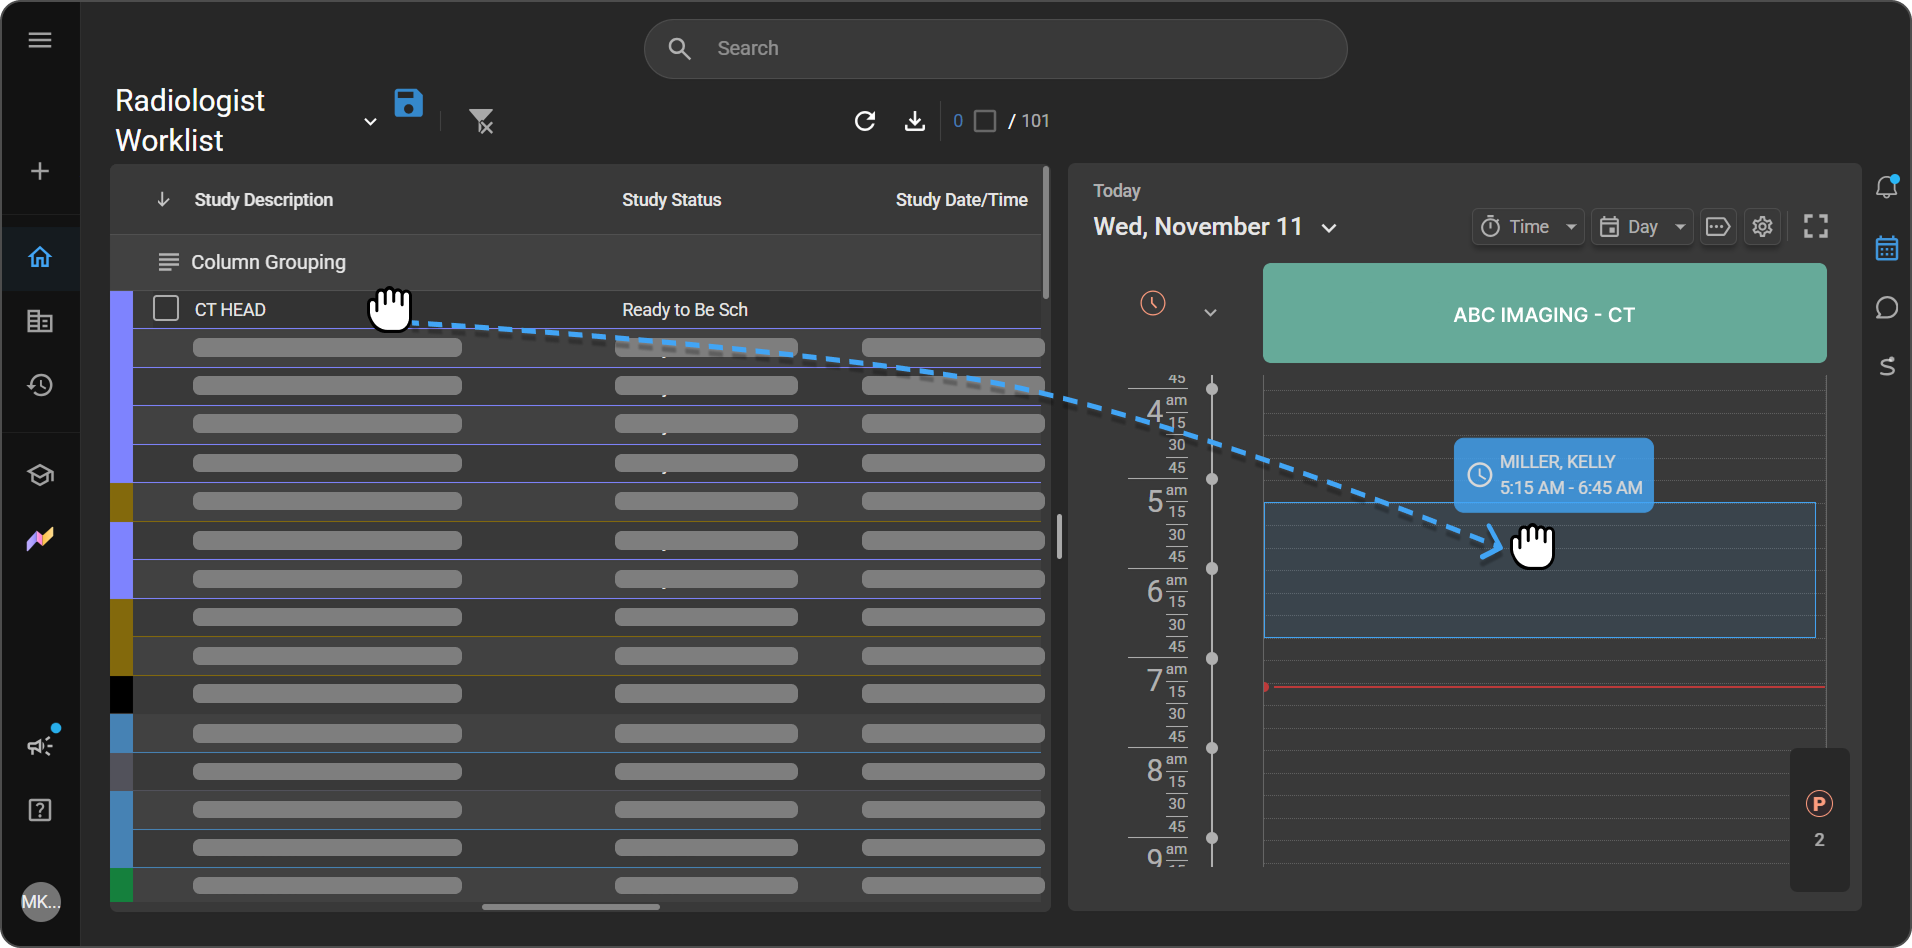
Expected result: The appointment appears on the calendar at the time and service where you dropped it. Its length is set as described in How appointment length is set.
Note: If the start time is in the past, the Appointment booking in the past dialog appears. It warns that notifications won't be sent to the patient. Click Book to continue, or Cancel to stop.
The new appointment's status is Scheduled, and its order's status changes from Ordered to Scheduled.
Tip: If the study already has an appointment, the Scheduler goes to that appointment's date instead of creating a new one.
Use the drag-and-drop cues
- Time on each cell: While you drag a study over the Scheduler, each cell shows its time. This helps you see which slot you're about to drop into.
- Preview card: A card follows your pointer with the patient's name and the appointment's start and end time, such as
8:00 AM - 9:30 AM. - Modality mismatch warning: If the study's modality doesn't match the healthcare service you're hovering over, a ban icon appears in the top-left corner of the appointment block. You can't drop the study there. Move it to a service with a matching modality.
Create an appointment from the calendar
Use this method when there's no Worklist entry for the appointment yet.
- On the right-side navigation bar, click the Calendar icon to open the Scheduler.
- Use the date selector to go to the date you want. See Go to a specific date.
- Check that the healthcare service you need appears as a column. If it doesn't, click the Resource icon and add it. See Add or remove healthcare services.
- Click the time slot you want, under the service's column. The New Appointment panel opens. Under Shown as, Appointment is selected. Keep it selected.
- Fill in the appointment details. Fields marked Required must be filled in:
| Field | What to enter |
|---|---|
| Appointment Date (required) | The date of the appointment. |
| Start Time / End Time (required) | When the appointment starts and ends. |
| Priority | Click STAT, ASAP, Urgent, or Routine. |
| Patient Name (required) | Search by name, phone number, or date of birth (MM/DD/YYYY). If no record is found, click + Add New. |
| Referring Physician | Search for and add the referring physician. |
| Referring Organization | Select the referring organization. |
| Consulting Physician | Search for and add the consulting physician. |
| Order (required) | Select an existing order, or create a new one by choosing a study set. See Create New Order. The selected order appears as a card with its status and accession number. To remove it, click the Delete (trash) icon on the card. |
| Note | Add any notes about the appointment. |
-
Click Create to save the appointment, or click Cancel to discard it.
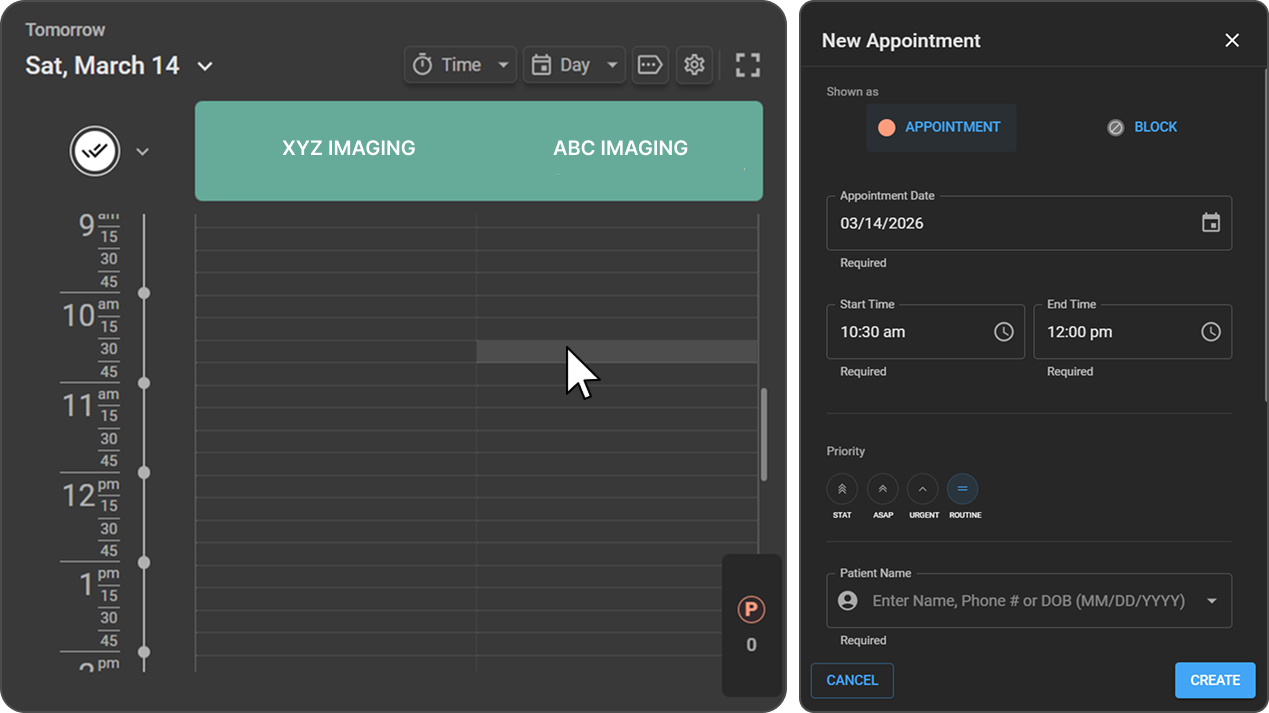
Expected result: The appointment appears in the calendar at the selected time, under the selected service.
The appointment block shows the patient's name, the start and end time, the modality, and the study description.
Note: If the start time is in the past, the Appointment booking in the past dialog appears. It warns that notifications won't be sent to the patient. Click Book to continue, or Cancel to stop.
The new appointment's status is Scheduled, and its order's status changes from Ordered to Scheduled.
Note: When you select an order, the Scheduler may adjust the appointment length to match the order set. A message under the Order field tells you, for example:
Appointment duration is adjusted to match the selected Order Set duration of 120 minutes. See How appointment length is set.
Tip: The New Appointment panel also lets you reserve time instead of booking an appointment. See Block Time on the Calendar.
How appointment length is set
When you drag a study from the Worklist, the Scheduler sets the appointment length in this order:
| Order | Length used | When it's used | Example |
|---|---|---|---|
| 1 (default) | The order set's duration | The study's order set has a duration of 10 minutes or more. | The CT Head order set has a duration of 90 minutes, so every CT Head appointment is 90 minutes. |
| 2 (fallback) | The healthcare service's default duration | The order set has no duration, or its duration is under 10 minutes. | The CT Head order set has a duration of 9 minutes, so the service's default duration is used. |
| 3 (last resort) | 10 minutes | Neither the order set nor the healthcare service has a valid duration, or both are under 10 minutes. | The CT Head order set has no duration and the service has no default, so the appointment is 10 minutes. |
The order set's duration also applies when you create an appointment from the calendar and select an order. A message under the Order field tells you when the length was adjusted.
To set a service's default duration, see Enter the service details.
Troubleshooting
"Appointment cannot be scheduled for this study" message
- Message:
Appointment cannot be scheduled for this study. Check its Workflow/Study status. - Cause: The study's Workflow status isn't Ordered, or your organization's name for it.
- Fix: Schedule only studies with a Workflow status of Ordered, or your organization's name for it.
A ban icon appears and you can't drop the study
- Cause: The study's modality doesn't match the healthcare service you're hovering over.
- Fix: Drop the study onto a service with a matching modality.
You can't request an appointment for a past date
- Cause: The date is more than two days before today.
- Fix: Choose today, yesterday, the day before yesterday, or a later date.
If you drag a study from the Worklist to a date outside the window, this message appears: Appointment can be scheduled only up to 2 days in the past.
The healthcare service you need isn't in the calendar
- Cause: The service isn't selected in the Resource panel, or it's unavailable that day in Day view.
- Fix: See Choose Which Healthcare Services Appear in the Scheduler.
Related articles
- How the Scheduler Works: Learn the scheduling rules and appointment statuses.
- View, Edit, and Delete Appointments: Manage an appointment after it's booked.
- Use the Parking Bay: Hold a study until you're ready to schedule it.
- Create New Order: Create the order you'll schedule.
- Add order sets: Set the durations that appointments use by default.