Create New Order
Overview
The Create New Order feature in OmegaAI allows authorized users to create one or more studies for existing or new patients. New patients can also be created directly through the New Order screen without needing to navigate elsewhere.
Note: You must have the required privileges to create new orders and new patients. Contact your system administrator if you do not have access. For more information, see User Access Control, Roles, and Privileges.
This section explains the step-by-step process to add a new order in OmegaAI, including:
- Selecting the Managing and Imaging Organization
- Selecting Patient and Physician details
- Setting the Order Priority
- Adding Order Sets and Order Notes
- Attaching supporting documents
Follow these detailed instructions to efficiently create a new medical imaging order.
Accessing Create New Order
- Log in to OmegaAI.
- From the left navigation panel, click the + Add New button.
- From the expanded menu, click Order.
- The Create New Order drawer will open.
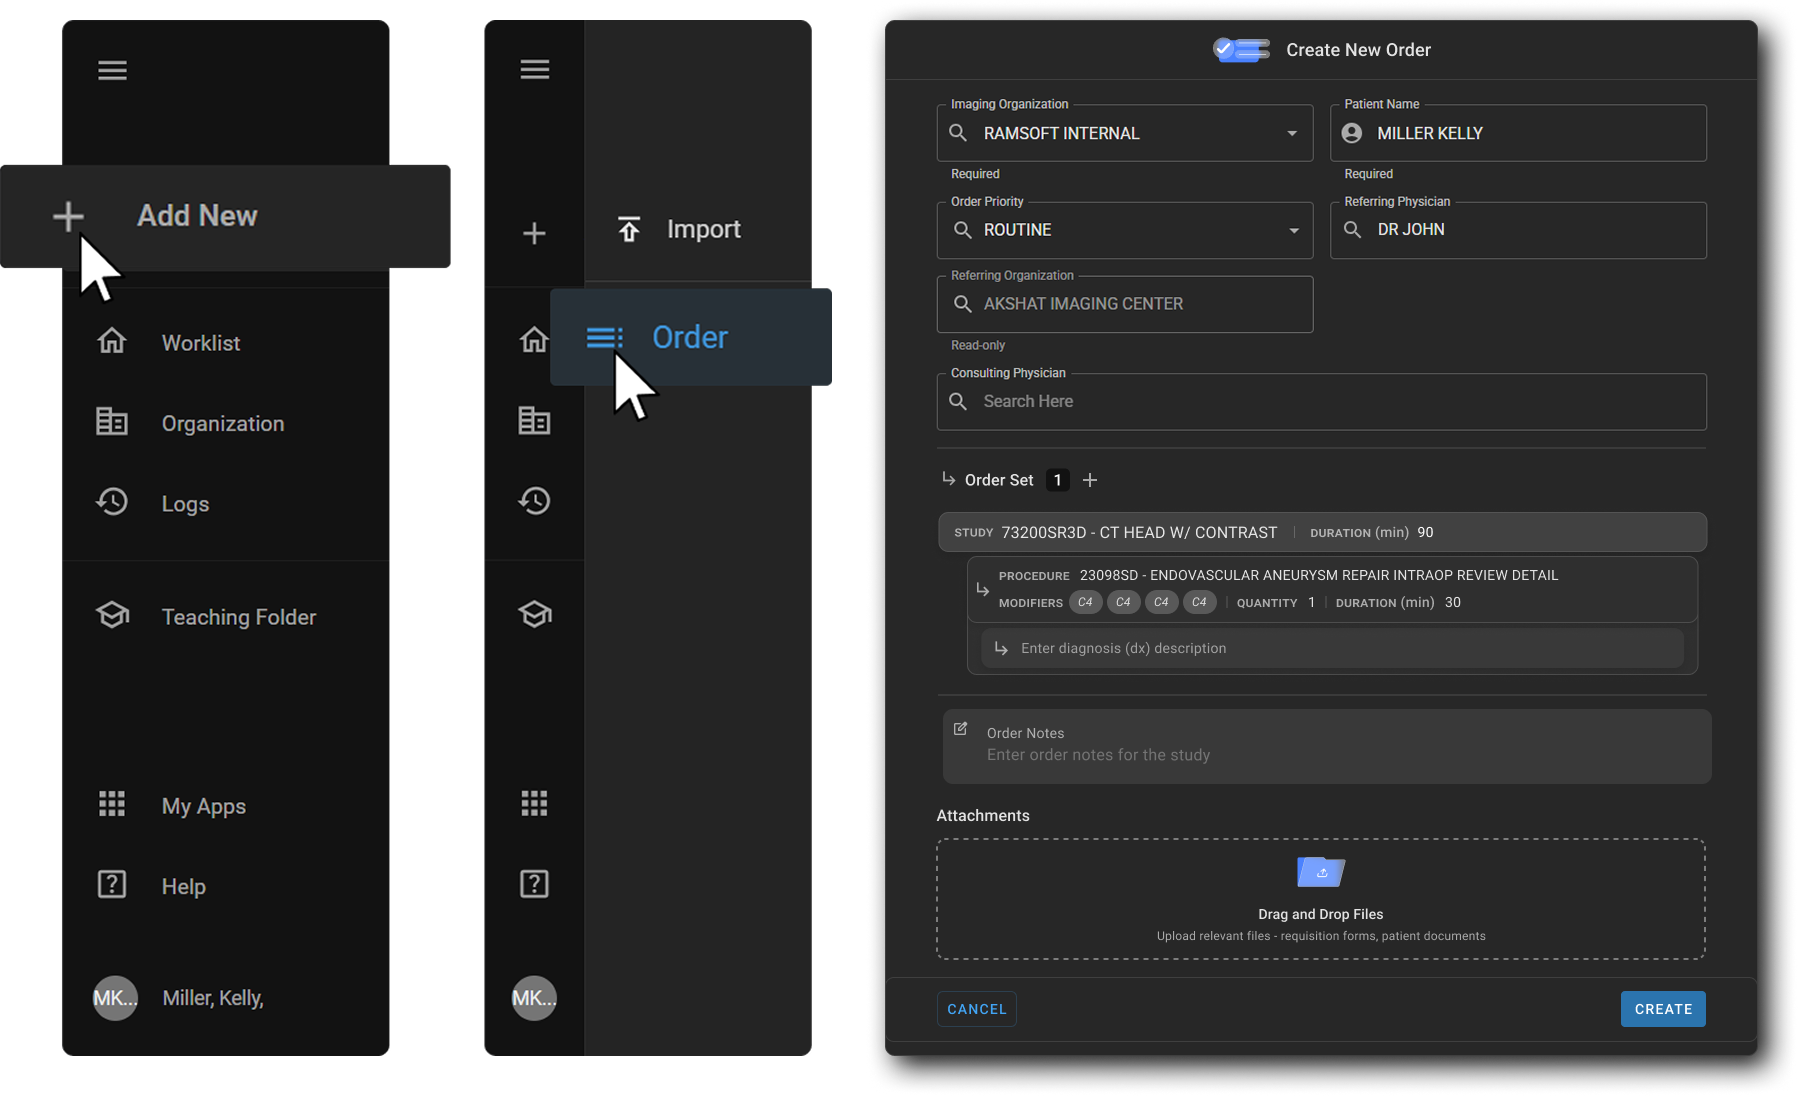
The Create New Order Form
The form is divided into the following sections:
1. Organization Details
| Field | Description |
|---|---|
| Imaging Organization | The facility where the imaging will be performed. Use the search box to find and select the appropriate organization. |
Note: Imaging Organization is a required field. The order cannot be created without selecting one.
2. Patient Information
| Field | Description |
|---|---|
| Patient Name | Search by patient name, phone number, or date of birth (MM/DD/YYYY). As you type, a dropdown displays matching patients with the following details: Patient Name, Gender, DOB, Phone Number, SSN, PID, Managing Org, and Address. An Edit action (pencil icon) is also available on each result — click it to update the patient's details without leaving the order workflow. If the patient does not exist, click + Add New at the top of the dropdown to create a new patient record. See Creating a New Patient below. See Editing a Patient below. |
| Order Priority | Sets the urgency of the order. Defaults to ROUTINE. Available options are ASAP, ROUTINE, STAT, and URGENT. |
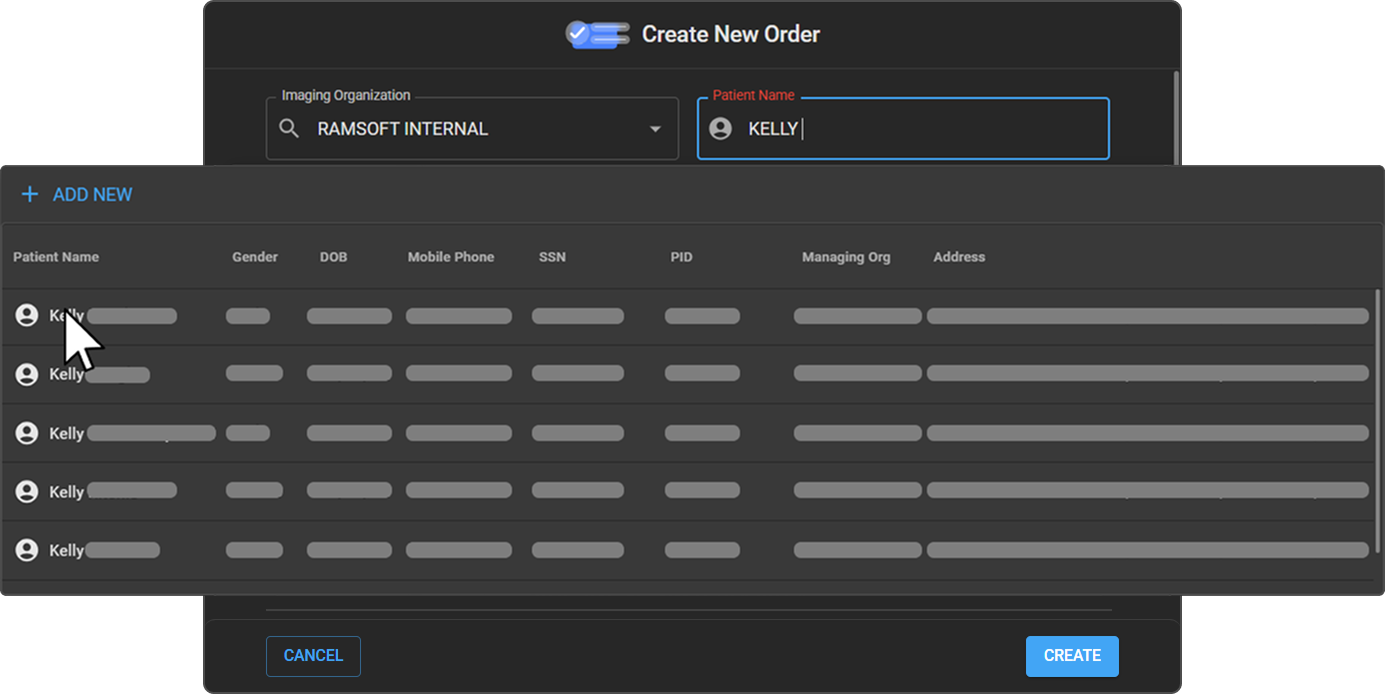
Note: Patient Name is a required field. The order cannot be created without selecting or creating a valid patient.
3. Physician Details
| Field | Description |
|---|---|
| Referring Physician | The physician referring the patient for imaging. As you type the name, a dropdown displays matching physicians with the following details: Physician Name, NPI, Specialty, Referring Org Name, and Physician Practice Address. Select the appropriate physician from the results. If no match is found, the dropdown displays No Rows. Click + Add New at the top of the dropdown to create a new physician record. See Creating a New Physician below. |
| Referring Organization | Auto-populated (read-only) based on the selected Referring Physician. |
| Consulting Physician | To give another physician access to the study, search and add them under the Consulting Physician section. The search dropdown displays the same physician details as the Referring Physician field. Multiple consulting physicians can be added to a single order. To remove a consulting physician, click the ✕ next to their name. If the physician does not exist, click + Add New at the top of the dropdown. See Creating a New Physician below. |
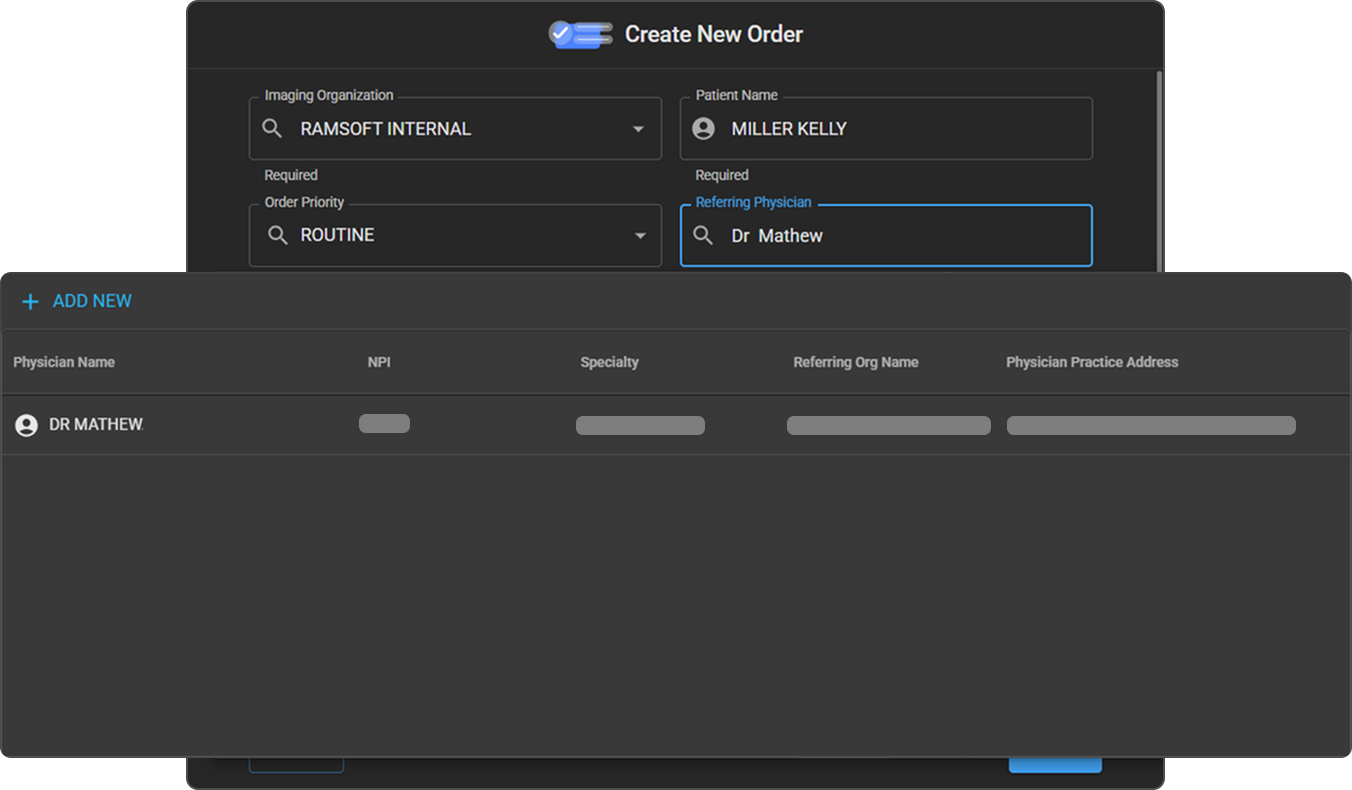
Note: The Referring Organization field is read-only and will populate automatically once a Referring Physician is selected.
4. Order Set
Use the Order Set section to add one or more imaging studies to the order.
Adding an Order Set:
-
Use the Search for order set code/description field to find and select a predefined order set.
-
If no matching results are found, the dropdown will display No options. Contact your administrator to create new order sets.
-
To add additional order sets, click the + icon next to Order Set.
-
The counter next to Order Set shows how many studies have been added.
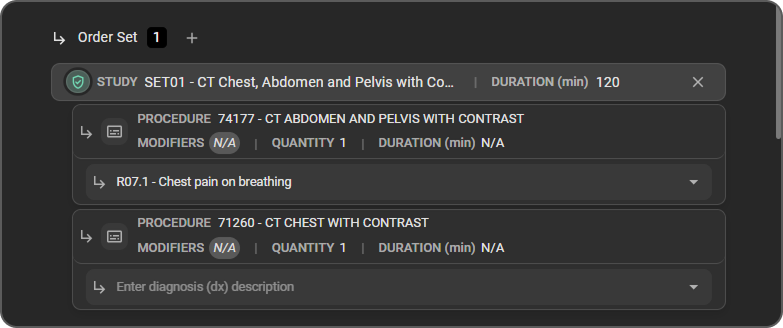
Note: If you select the same order set that was already placed for the same patient earlier that day, a notification will appear: "A similar order for this patient using this order set was entered earlier today by [username]." You can still proceed if clinically necessary.
Order Set Details:
Once an order set is selected, it expands to display:
- Study code and description and total Duration (min)
- One or more Procedures, each showing:
- Procedure code and description
- Modifiers, Quantity, and Duration (min)
- A diagnosis (dx) description field for each procedure
Adding a Diagnosis:
- Click the Diagnosis – Search for diagnosis code/description field under a procedure.
- Type a keyword to search for ICD diagnosis codes.
- Select the appropriate diagnosis from the dropdown.
- To add more than one diagnosis to a procedure, hover over the added diagnosis and click the + icon that appears.
- To remove a diagnosis, hover over it and click the ✕ icon that appears.
Removing a Procedure or Order Set:
- To remove an entire order set, click the ✕ icon on the study row.
Note: Order Set is a required field. At least one order set must be added before the order can be created.
Tip: Order Sets are pre-configured bundles of imaging procedures. To learn how to create a new Order Set, see RIS Settings – Order Sets .
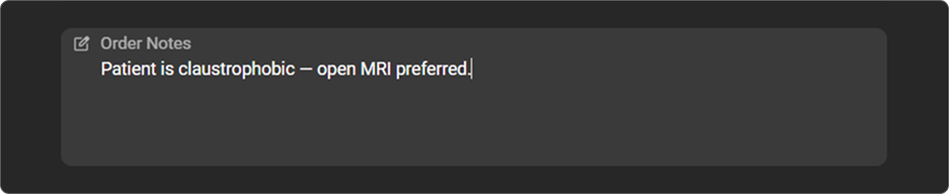
5. Order Notes
-
Use the Order Notes text area to enter any relevant clinical notes, instructions, or special considerations for this order.
6. Attachments
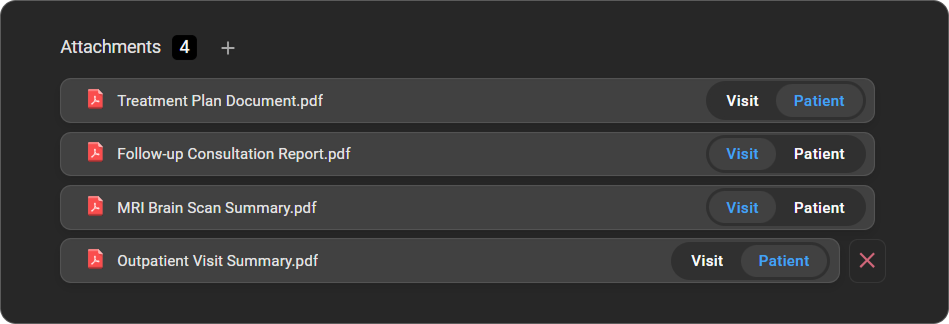
Use the Attachments section to upload supporting documents relevant to the order.
Uploading Files:
- Click inside the Drag and Drop Files area or drag files directly into it to upload documents.
- You can upload a single file or multiple files at a time.
- Each file is validated for supported formats: PDF, DOC, DOCX, TXT, JPEG, PNG, GIF, BMP, WEBP. If an unsupported file type is uploaded, the system displays the message: "Upload failed: This file type is currently not supported."
- The system prevents uploading duplicate files. If the same file is added again, it will be rejected.
- Long file names are truncated with an ellipsis. Hover over the file name to view the full name.
- To add more documents after the initial upload, click the + icon next to the Attachments header.
- The counter next to Attachments reflects the total number of uploaded files.
Classifying Attachments:
Once uploaded, each file can be classified as either a Visit or Patient document using the toggle buttons next to the filename:
| Classification | Description |
|---|---|
| Visit | Linked to the specific visit record and accessible to all studies under that visit. This is the default classification. |
| Patient | Linked to the patient record and remains visible and reusable for future visits and orders. |
Previewing an Attachment:
- To preview an uploaded file, click on the file name. A preview panel will open on the right side of the screen displaying the document.
- Use the controls at the bottom of the preview panel to zoom in, zoom out, navigate pages, download, or print the document.
- Click the ✕ at the top right of the preview panel to close it.
Note: Preview is not available for DOC and DOCX files.
Removing an Attachment:
-
Hover over any uploaded file to reveal the ✕ icon on the right.
-
Click the ✕ to remove the file from the order. If a preview is open when the file is removed, the preview will automatically close.
Submitting the Order
Once all required fields are filled in:
- Review all entered information for accuracy.
- Click the CREATE button (bottom-right) to submit the order.
- Click CANCEL to discard the form and return to the Worklist without saving.
Important: Fields marked Required must be completed before the order can be created. Incomplete forms will not be submitted.
After the Order is Created
Once the order is submitted successfully, a confirmation message will appear:
"Order created successfully. Please choose an option to proceed."
You will be presented with three options:
| Option | Description |
|---|---|
| View Order Details | Opens the Order details page where you can review the full order, including accession number, order status, study details, referring physician, and more. You can also edit the order from this page if required. |
| Create New | Closes the current confirmation and opens a new blank Create New Order drawer to immediately create another order. |
| Done | Closes the drawer and returns you to the Worklist. |

Tip: For a full walkthrough of the Order details page, including how to edit an order, see Visit/Order/Study Page | OmegaAI User Guide.
The new order will appear in the Worklist with a study status of ORDERED.
Creating a New Patient
If a patient does not exist in the system, you can create a new patient record directly from the Create New Order screen without navigating away.
Note: You must have the required privileges to create new orders and new patients. Contact your system administrator if you do not have access. For more information, see User Access Control, Roles, and Privileges | OmegaAI User Guide.
To access the Create New Patient form:
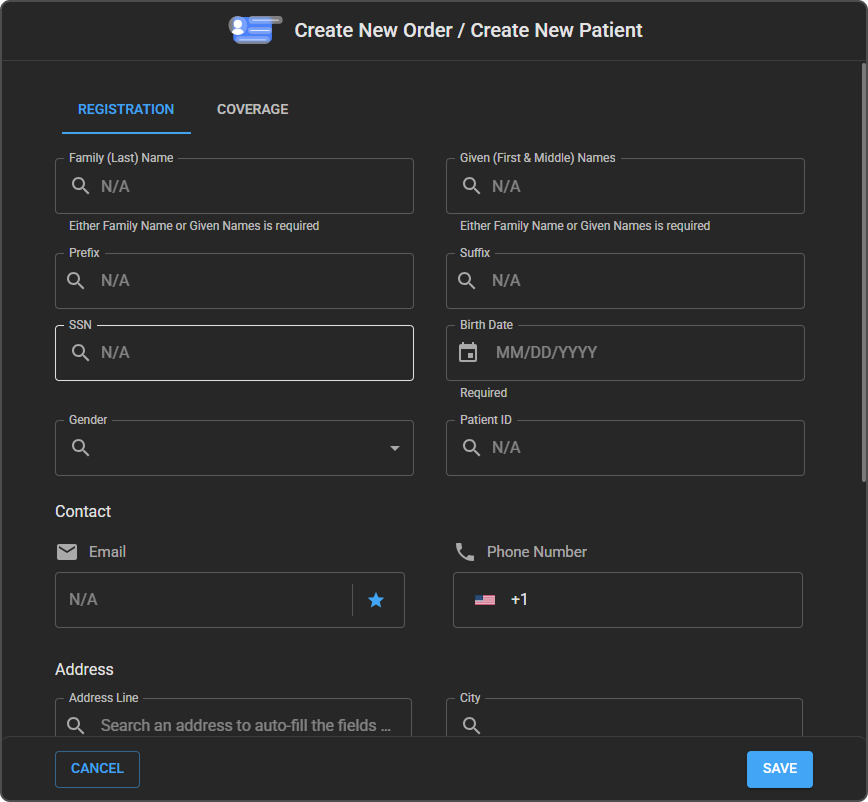
The form contains two tabs: Registration and Coverage. |
|
Registration Tab
Patient Name
| Field | Description |
|---|---|
| Family (Last) Name | The patient's last name. |
| Given (First & Middle) Names | The patient's first and middle names. |
| Prefix | Optional name prefix (e.g., Dr., Mr., Mrs.). |
| Suffix | Optional name suffix (e.g., Jr., Sr.). |
Note: Either Family (Last) Name or Given (First & Middle) Names is required.
Patient Details
| Field | Description |
|---|---|
| SSN | Social Security Number (optional). |
| Birth Date | Patient's date of birth in MM/DD/YYYY format. |
| Gender | Select the patient's gender from the dropdown. |
| Patient ID | A unique identifier for the patient. |
| Managing Organization | Auto-populated from the Imaging Organization of the order. This field cannot be edited. |
Note: Birth Date and Managing Organization are required fields.
Contact
| Field | Description |
|---|---|
| Patient's email address. | |
| Phone Number | Patient's phone number. Defaults to country code +1. |
Address
| Field | Description |
|---|---|
| Address Line | Search for an address to auto-fill the remaining fields. |
| City | Patient's city. |
| State/Province | Patient's state or province. |
| ZIP/Postal Code | Patient's ZIP or postal code. |
| Country | Patient's country. |
Tip: Use the Address Line search to auto-populate the city, state, ZIP, and country fields.
Notes
- Use the Patient Notes field to enter any relevant notes about the patient.
Coverage Tab
The Coverage tab allows you to add insurance coverage for the patient at the time of registration. Click + Add Coverage to add a coverage record. |
|
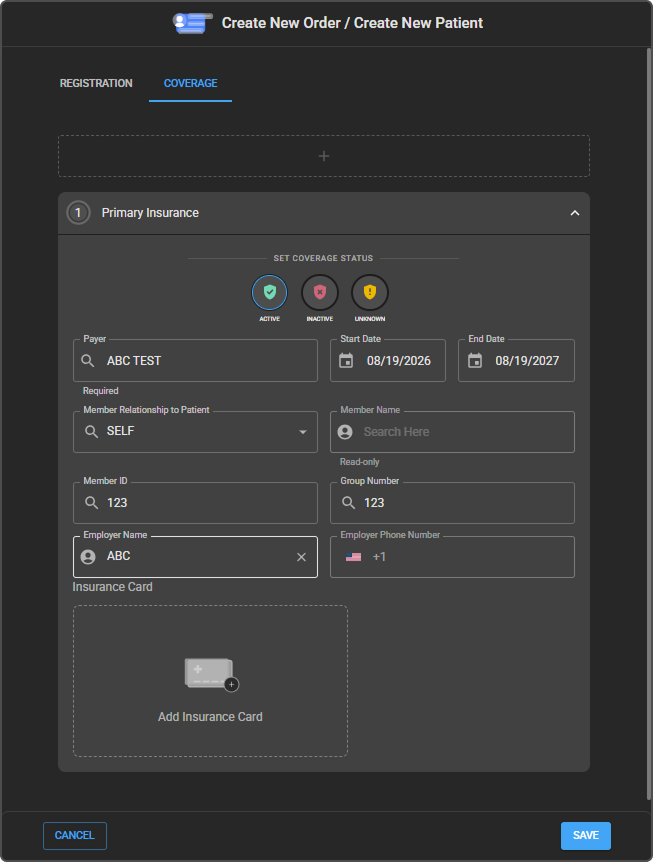
For detailed instructions on adding coverage, see Adding Coverage for a Patient.
Saving the New Patient
- Once all required fields are completed, click SAVE to create the patient record.
- The new patient will be automatically selected in the Patient Name field of the Create New Order form.
- Click CANCEL to discard the new patient form and return to the order.
Editing a Patient
If a patient's details need to be updated, you can edit their record directly from the Create New Order screen.
To edit an existing patient:
- In the Patient Name field, type the patient's name or details.
- From the search results, click the Edit (pencil) icon on the patient row.
- The Edit Patient drawer will open, pre-populated with the patient's existing details.
The Edit Patient form contains the same Registration and Coverage tabs as the Create New Patient form.
- Once all required fields are updated, click SAVE to apply the changes.
- After saving, you are returned to the New Order form with the updated patient details reflected.
- Click CANCEL to discard changes and return to the order.
Creating a New Physician
If a referring or consulting physician does not exist in the system, you can create a new physician record directly from the Create New Order screen without navigating away.
To access the Create New Physician form:
|
|
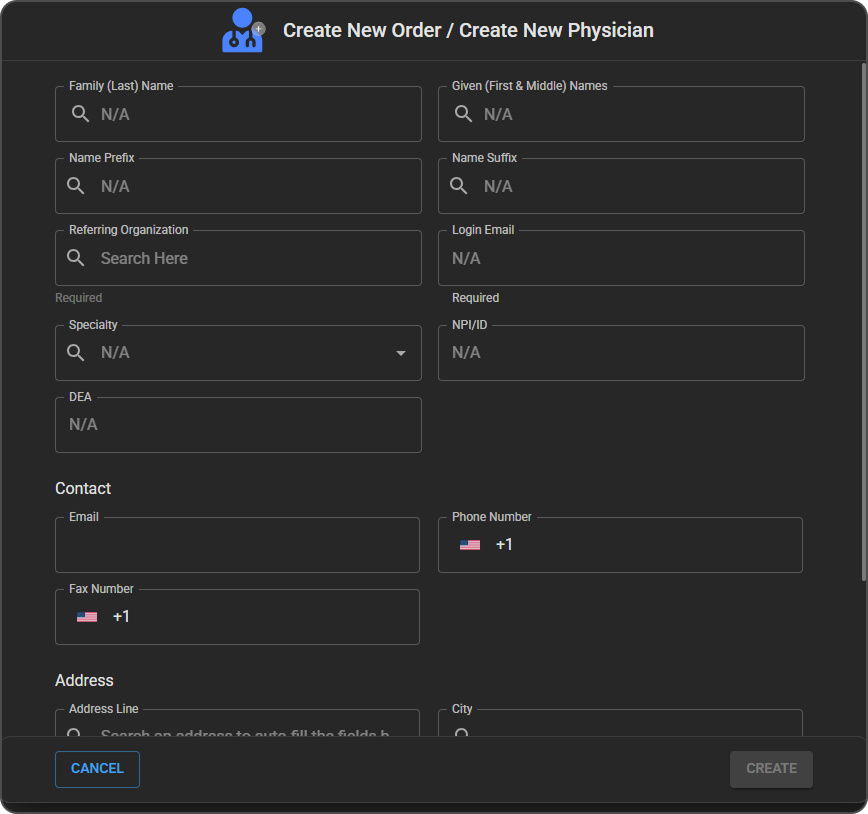
Physician Details
| Field | Description |
|---|---|
| Family (Last) Name | The physician's last name. |
| Given (First & Middle) Names | The physician's first and middle names. |
| Name Prefix | Optional name prefix (e.g., Dr.). |
| Name Suffix | Optional name suffix (e.g., MD, Jr.). |
| Referring Organization | The organization the physician is associated with. As you type, a dropdown displays matching organizations showing the Organization Name, NPI, and Organization Address. If no match is found, the dropdown displays No Rows. Click + Add New at the top of the dropdown to create a new referring organization. |
| Login Email | The physician's login email address. |
| Specialty | The physician's medical specialty. Select from the dropdown. |
| NPI/ID | The physician's National Provider Identifier or local ID. |
| DEA | The physician's Drug Enforcement Administration number (optional). |
Note: Referring Organization and Login Email are required fields.
Contact
| Field | Description |
|---|---|
| The physician's business email address. | |
| Phone Number | The physician's business phone number. Defaults to the country code based on your location. |
| Fax Number | The physician's business fax number. Defaults to the country code based on your location. |
Address
| Field | Description |
|---|---|
| Address Line | Search for an address to auto-fill the remaining fields. |
| City | Physician's practice city. |
| State/Province | Physician's practice state or province. |
| ZIP/Postal Code | Physician's practice ZIP or postal code. |
| Country | Physician's practice country. |
Tip: Use the Address Line search to auto-populate the city, state, ZIP, and country fields.
Saving the New Physician
- Once all required fields are completed, click CREATE to save the physician record.
- The new physician will be automatically selected in the respective field of the Create New Order form.
- Click CANCEL to discard the form and return to the order.