Import
Overview
The OmegaAI Import feature allows users to upload both DICOM and non-DICOM files directly through the web interface. This guide covers the full import workflow — from starting a new session and uploading files, to configuring import settings, monitoring progress, and resolving errors.
Supported file types:
- DICOM Objects
- JPEG
- PNG
- MP4
Step 1: Access the Import Page
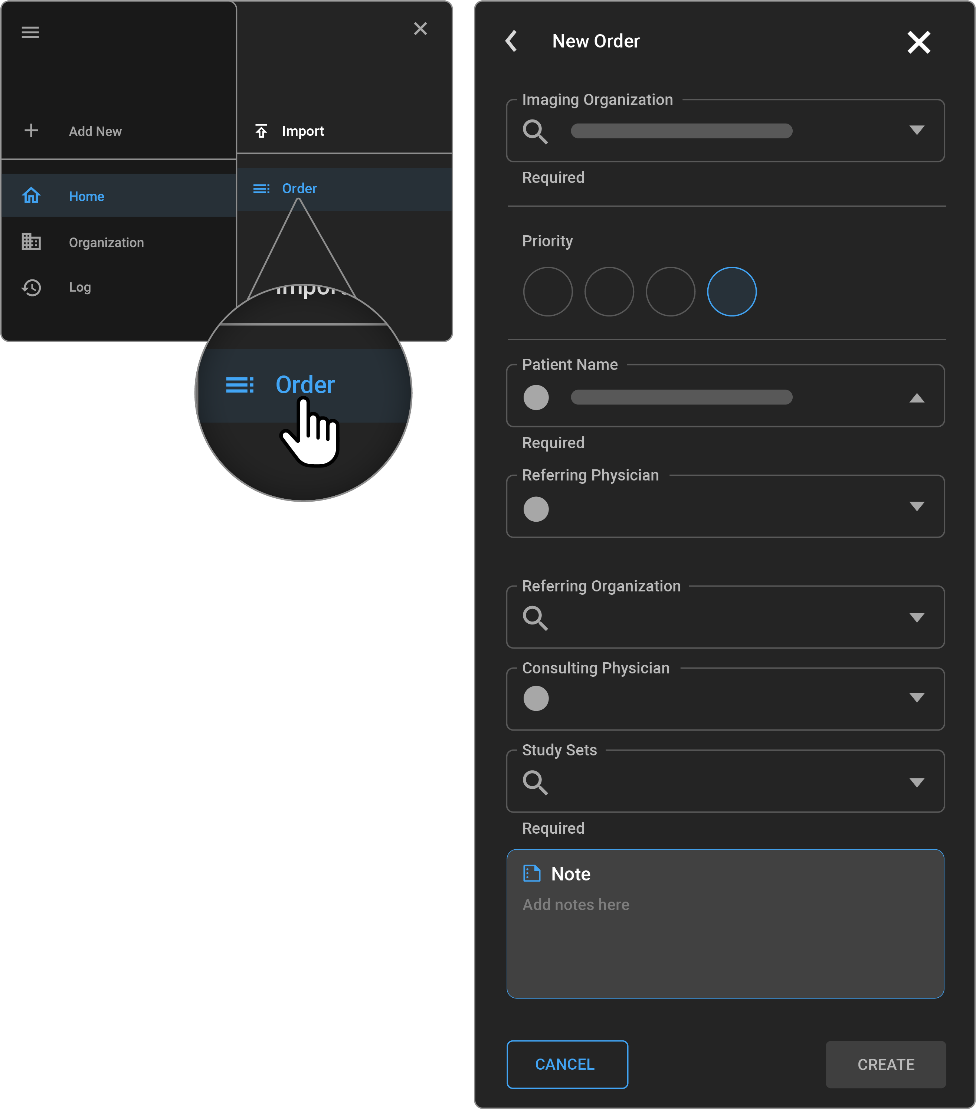
- In the left sidebar, click + Add New.
- A menu appears with two options — Import and Order. Select Import.
- The New Import page will open with a drop zone to upload files.

Step 2: Upload Files
On the New Import page, add files using one of the following methods:
- Drag & Drop — Drag a file or folder from your file explorer and drop it onto the dashed drop zone.
- Browse Files — Click "click to browse files" inside the drop zone and select your file(s).
Once files are added, the Import Details panel will open automatically on the right side of the screen.

Step 3: Configure Import Details
The Import Details panel contains three fields. Start typing in the Study field to search — a dropdown will display matching results including patient name, study type, accession number, organization, and date. Selecting a study will auto-populate the Managing Organization and Study Status fields.
| Field | Description | Required |
|---|---|---|
| Study | Search and select the patient study to associate with this import. For non-DICOM files, a study must be specified. | Optional |
| Managing Organization | The imaging organization managing this study. Auto-populated when a study is selected, but can also be entered manually. | Required |
| Study Status | The workflow status for the study (e.g., ORDERED, STARTED, COMPLETED). If not set, the status will default to Empty. | Optional |
Click ADD to confirm or CANCEL to discard.

Step 4: Review and Start the Import
After clicking ADD, the import staging screen displays:
- The import session (e.g., Import 1) is displayed in the header, alongside the associated study details shown as a button. Click the ✏ pencil icon to edit the study details before starting.
- Each uploaded file is listed as a row, annotated with its detected file type. When a folder is uploaded, each subfolder appears as a separate row with its folder name.
- The total number of queued items in the top right corner.
- Session tabs at the bottom of the screen represent each open import session, showing its current status.
Before starting:
- To remove a file or folder from the queue, hover over its row and click and hold the Delete option.
- Click ✕ CANCEL to cancel all operations and discard the session.
When ready, click ► START to begin the import.

Step 5: Monitor Import Progress
Once started, the screen updates in real time. Each item row displays its own upload progress and status:
| Status | Description |
|---|---|
| Ready | Queued, not yet started |
| Uploading – n% | Transfer in progress with per-item percentage shown |
| Completed | Upload successful |
| Failed | Upload encountered an error |
A progress bar at the bottom shows the overall upload percentage across all items. The bar turns amber if any item fails. Click ■ STOP at any time to halt the upload.

When the import finishes:
- Successful imports display a success message. Click ✕ CLOSE to close the session.
- Failed imports display a failure message. Click ERROR LOG to view error details or RETRY FAILED to re-attempt uploading the failed items without restarting the session.
Running Multiple Import Sessions
OmegaAI supports up to 3 concurrent import sessions. To start an additional import, simply repeat the steps above — each new import opens as a separate session (e.g., Import 1, Import 2, Import 3), with its own tab at the bottom of the screen.
Click any session tab to switch between sessions and monitor each one independently.

Once all 3 sessions are active, attempting to start a new import will show the following error:
"Max Import Session is 3. If you want to upload the new session, please delete the old ones"
To free up a slot, click ✕ CLOSE on one or more completed sessions, then retry.
Reviewing Import Progress via Task Logs
To check import status outside of an active session:
- Navigate to Task Logs from the sidebar.
- Filter the Status Reason column to view the status of your imports.

Handling Special File Types
DICOM SR Objects with Measurements
When importing DICOM files containing SR (Structured Report) objects with measurements:
- If no study is set, SR measurements will be displayed directly in the image viewer.
- If a study is set, SR objects will be converted into a PDF document and added to the study documents, and will not appear as measurements in the viewer.
Tip: Leave the Study field empty to keep measurements visible in the image viewer.

Troubleshooting
Managing Organization required This field cannot be left empty. If you attempt to proceed without it, a red validation message will appear below the field. Search for and select an organization before clicking ADD.
File not appearing after drop Ensure you are using a supported file format (DCM, JPEG, PNG, PDF, or MP4). Try using the "click to browse files" option as an alternative.
"Import Failed — One or more files you tried to upload are not supported" The file format is not accepted. Click CLOSE and retry using a supported format: DCM, JPEG, PNG, PDF, or MP4.
"Cannot Import Non-DICOM object without a study specified" A study is required when importing non-DICOM files (e.g., JPEG, PNG, PDF, MP4). Return to the Import Details panel, enter a study in the Study field, and retry.
Max Import Session error You have reached the 3-session limit. Click ✕ CLOSE on one or more completed sessions to free up a slot, then retry.
Upload is stuck or not progressing Click ■ STOP to cancel the upload. Check your internet connection and start a new import session with the same file.
Some files show "Failed" after upload Click ERROR LOG to view a full error report. Use RETRY FAILED to re-attempt uploading the failed files without restarting the entire session.
Creating a New Order
The purpose of creating a new order is to create one or more studies for existing or new patients. In addition, new patients can also be created via the New Order screen. Note that you must have the required privileges to be able to perform these tasks. This section explains the step-by-step process to add a new order in the OmegaAI software, including setting the imaging organization, attaching faxes, setting the order priority, and selecting patient and physician details. Follow these detailed instructions to efficiently create a new medical imaging order.
How to Add a New Order
-
Access the New Order Screen:
-
Click on the Plus Icon (+) located in the navigation bar on the left to access the New Order screen.
-
-
Set the Imaging Organization:
- Ensure the Imaging Organization is set correctly. This setting defaults to the organization selected during your last order creation.
-
Review and Attach Incoming Faxes (If available):
-
If you have Fast Fax Integration, a list of recent faxes will be displayed.
-
Click on a fax to review it. To attach it to the order, ensure it is selected (indicated by a check mark or the fax number).
-
-
Set the Order Priority:
- By default, the priority is set to Routine. Change it to Stat, ASAP, or Urgent if required by your specific workflow.
-
Enter Patient Information:
-
Search for the patient by their Name, Phone Number, or Date of Birth.
-
The search results will display relevant patient details along with the organization the patient record was created under.
-
-
Select the Referring Physician:
-
Enter the referring physicians information in the provided field if the order was referred to you.
-
The Referral Vision field will auto-populate based on the selected referring physician. This field shows the referral organization and adjusts if the physician is linked to multiple organizations.
-
-
Add a Consulting Physician (Optional):
- To give another physician access to the study, search and add them under the Consulting Physician section.
-
Attach Study Sets:
- Link the order to specific Procedure Codes by searching and selecting the appropriate study sets. Each list's top will indicate the organization the study sets belong to, allowing for correct selection if multiple options are available.
-
Add Order Notes:
- Utilize the Notes section to add any relevant details or special instructions related to the order.
-
Finalize the Order:
- Click Create to finalize and create the order, or click Cancel if you need to abandon the order creation process.
Creating a New Patient in OmegaAI
This guide provides detailed instructions on how to create a new patient record in OmegaAI. A new patient can only be added through the New Order screen. Users must have the appropriate privileges to create patient records.
Note: This process is restricted to patients associated with the Master Organization to which the user belongs.
Accessing the New Order Page
-
Location: Main navigation menu of OmegaAI.
-
Steps:
-
Click on the + icon, then select New Order. This action will navigate you to the New Order page.

-
Initiating New Patient Creation
-
Location: New Order page.
-
Steps:
-
Locate the Patient field and click on the + icon adjacent to it.
-
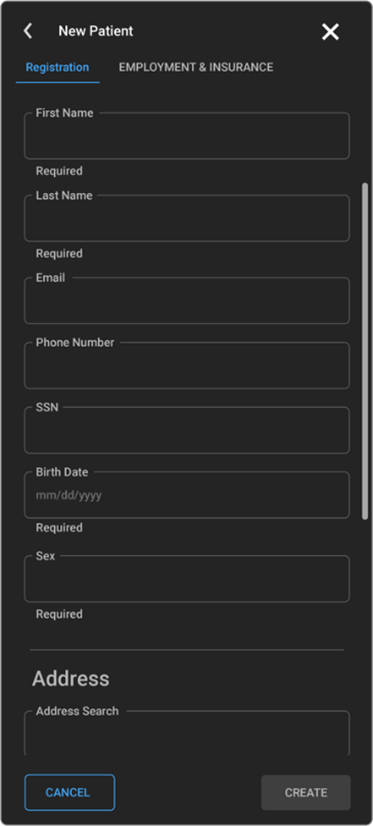
The New Patient page will appear.
-
Entering Patient Details
-
Required Fields:
-
First Name and Last Name: Enter patient's full name.
-
Sex: Select the patient's sex.
-
-
Optional Fields:
-
Email: Enter the patient's email address.
-
Phone Number: Provide a contact number.
-
Social Security Number (SSN): Enter if available.
-
Birth Date: Specify the patient's date of birth.
-
Address: Use the address search feature to auto-populate this field, or manually enter the patient's address.
-
-
Additional Information:
-
Managing Organization: Specify if different from the default.
-
Special Courtesy: Indicate any special courtesies applicable to the patient.
-
Adding Eligibility and Insurance Information
-
Location: Second tab on the New Patient page, labelled Eligibility and Insurance.
-
Steps:
-
Enter the patient's employment status and employer details.
-
Add insurance information by specifying one or multiple insurance payers.
-
Saving or Discarding the New Patient Record
-
To Save: Click Create on the top navigation bar to save the new patient record and exit.
-
To Cancel: Click Cancel to discard any changes and exit the New Patient creation process.
Usage Notes
-
Ensure all mandatory fields are filled out to avoid errors during the creation process.
-
Double-check the accuracy of all entered information, especially sensitive data like SSN and birth date.
-
Utilize the address search functionality to ensure address accuracy and save time.