Choose Which Healthcare Services Appear in the Scheduler
Each healthcare service you select appears as a column in your Scheduler calendar. You choose them in the Resource panel, which also lets you search, filter by your Worklist's modalities, and show or hide services that aren't available on a given day.
This article shows you how to choose healthcare services, use the Resource panel's toggles, and reorder the columns.
Before you begin
- Healthcare services: The services you want must already exist. See Create and Manage Healthcare Services.
- Scheduler open: Click the Calendar icon on the right-side navigation bar.
Add or remove healthcare services
-
In the top-right toolbar of the Scheduler, click the Resource icon. The Resource panel opens and lists all available healthcare services.
-
(Optional) To find a service, type in the Search field. You can search by name, modality, or organization.
-
Select the checkbox next to each service you want to see. Clear a checkbox to remove that service.
-
(Optional) To select or clear every service at once, use the All checkbox.
-
Click anywhere outside the panel to close it.
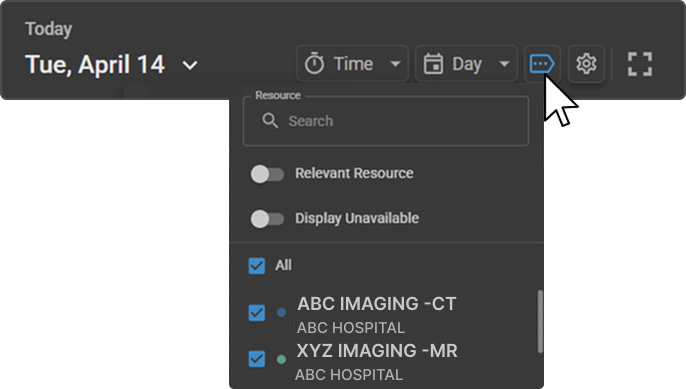
Expected result: The selected services appear as columns in the Scheduler.
Each service in the list shows its name, modality code, and organization. A colored dot shows the service's calendar color.
Note: If no services are selected, the calendar shows No resources selected. Select at least one service to see the scheduling timeline.
Show only services that match your Worklist
- Relevant Resource: Turn on the Relevant Resource toggle in the Resource panel. The list then shows only services whose modality matches the studies currently in your Worklist.
Show or hide unavailable services in Day view
In Day view, the Scheduler shows only the selected services that are available on the selected day. A service is unavailable on a day when it has no working hours that day. The Display Unavailable toggle lets you show those services too.
-
Make sure the Scheduler is in Day view. To switch views, click the view button in the toolbar, then select Day. See Switch between Day and Week views.
-
Click the Resource icon to open the Resource panel.
-
Below Relevant Resource, turn the Display Unavailable toggle on or off:
- Off (default): The calendar hides selected services that aren't available on the selected day.
- On: The calendar shows every selected service, including the ones that aren't available that day.
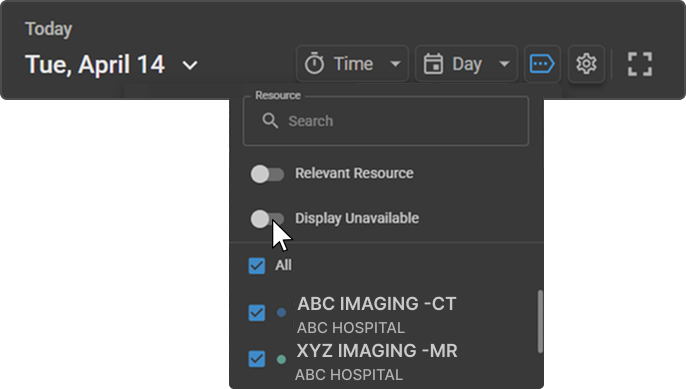
Expected result: The calendar columns update right away. With the toggle off, you see your selected services minus the ones that are unavailable that day.
Note: The Display Unavailable toggle doesn't change which services you selected. Hidden services stay listed and selected in the Resource panel. Your selection also stays the same when you change the date or turn the toggle on or off.
Note: The Display Unavailable toggle is available in Day view only. It doesn't appear in Week view or in full-screen Month view.
Reorder the columns
-
In the Scheduler, click and drag a healthcare service column header. While you drag, the column is highlighted with a blue border.
-
Release the header in the position you want.
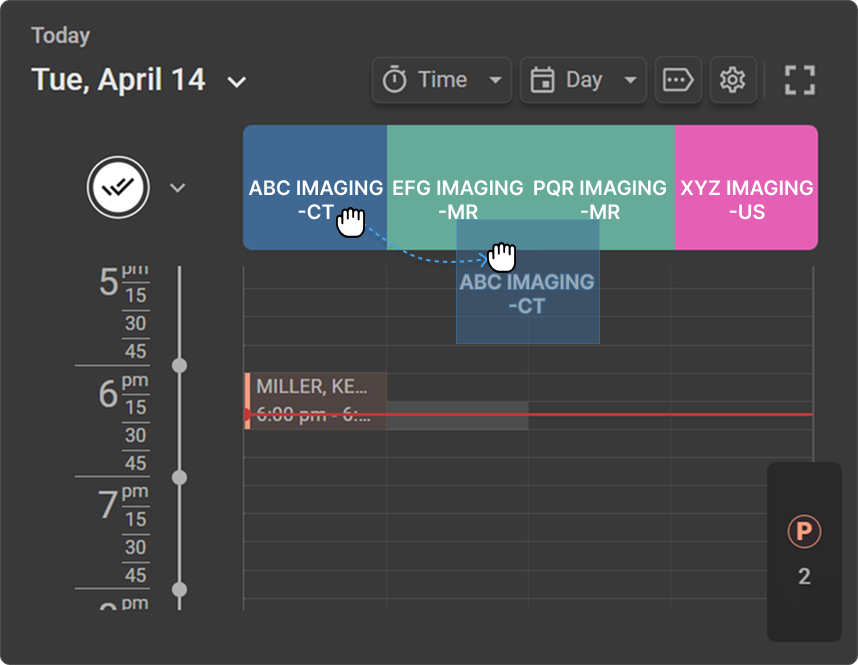
Expected result: The new column order is saved for your view.
Tip: To keep the column order with a worklist, save the worklist after you reorder the columns.
Troubleshooting
"None of selected resources available." appears in Day view
- Cause: You selected one or more services, but none of them is available on the selected day, and Display Unavailable is off.
- Fix: Turn on Display Unavailable to show the unavailable services. You can also select other services, or ask an administrator to check the services' working hours.
A selected service doesn't appear as a column in Day view
- Cause: The service has no working hours on the selected day, and Display Unavailable is off. The column may also be off the screen.
- Fix: Turn on Display Unavailable, or click the Next button on the right edge of the header to scroll through columns.
"No resources selected" appears
- Cause: No services are selected in the Resource panel.
- Fix: Open the Resource panel and select at least one service.
The list shows fewer services than expected
- Cause: Relevant Resource is on, so the list shows only services that match your Worklist's modalities.
- Fix: Turn off Relevant Resource.
Related articles
- Navigate the Scheduler: Switch views, dates, and time intervals.
- Request an Appointment: Book an appointment in a service column.
- Create and Manage Healthcare Services: Set up services and their working hours.