Solventum™ Fluency Direct™
Overview
Solventum™ Fluency Direct™ is a voice recognition solution that lets radiologists dictate diagnostic reports directly within the OmegaAI Document Viewer. This article covers installation, configuration, productivity tools, and a full voice command reference.
Getting Started
OmegaAI integrates with Solventum (M*Modal) Fluency Direct, enabling radiologists to dictate diagnostic reports by voice directly within the Document Viewer. This section walks through setting up Fluency Direct v14 on a workstation and getting it connected to OmegaAI.
Requirements
- Supported version: Fluency Direct v14.1.56 or later. Versions below v14 do not support the web connector required for OmegaAI integration and should not be used.
- PowerServer compatibility: Fluency Direct v14 is compatible with OmegaAI and PowerServer 6.7 only. It has not been validated for use with PowerServer 6.0.
- Browser: Google Chrome is recommended. Microsoft Edge and Firefox are also supported.
- Account name: You will need your site's account name during installation. This is provided by RamSoft during onboarding and is typically a short abbreviation of your site name.
- Region: Know whether your site is in the United States or Canada — this determines which configuration is applied during installation.
- Admin rights: Installation requires administrative rights on the workstation.
- M*Modal license: An M*Modal Fluency Direct license must be assigned to your account before use. Contact your RamSoft sales representative or RamSoft Support to request this.
Step 1 — Download and Install Fluency Direct v14
-
Download the Fluency Direct v14 installer package from:
- RamSoft Resources page: ramsoft.com/resources
-
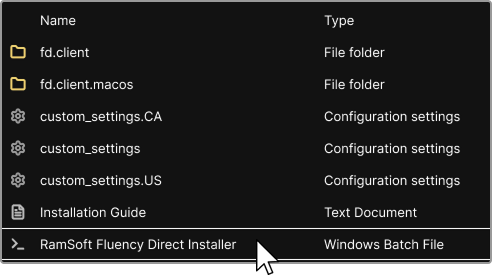
Extract the ZIP to a local folder and confirm the following files are present:
RamSoft Fluency Direct Installer.batcustom_settings.US.inicustom_settings.CA.inifd.client\Fluency.Direct.Client.Install.exe
cuidadoDo not proceed if any files are missing. A corrupted or incomplete archive will result in a broken installation. Re-download the ZIP if needed.
-
Right-click RamSoft Fluency Direct Installer.bat and select Run as administrator. Do not double-click — the script requires elevated privileges.
dicaIf User Account Control (UAC) prompts appear, confirm them to allow the script to proceed.
-
When prompted by the installer script, provide the following:
- Account name: Enter your site's account name exactly as provided by RamSoft Support. It is case-sensitive.
- Region: Enter
1for United States or2for Canada.
Example: Account:
DEMO_SITE| Region:1(United States)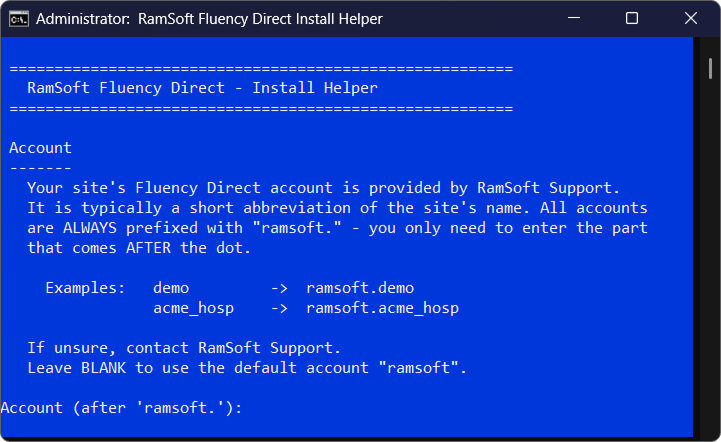
-
The script will automatically:
- Back up any existing
custom_settings.initocustom_settings.ini.bak - Create a new
custom_settings.inifrom the selected region template with the account name populated - Launch
fd.client\Fluency.Direct.Client.Install.exe
- Back up any existing
-
Follow the on-screen prompts in the Fluency Direct client installer to complete installation. Default settings can be accepted in most cases.
Step 2 — Enable the Fluency Direct Browser Extension
The Fluency Direct browser extension extends dictation functionality to web-based applications like OmegaAI. It is available for Fluency Direct v10.0.400 and above and is typically installed automatically by the Fluency Direct client installer.
The following browsers are supported:
- Chrome — M*Modal Fluency Direct Web Connector — Chrome Web Store
- Microsoft Edge — M*Modal Fluency Direct Web Connector — Microsoft Edge Add-ons
- Firefox — M*Modal Fluency Direct Web Extension — Firefox
Chrome is the only supported browser for Fluency Direct on macOS.
To confirm the extension is active:
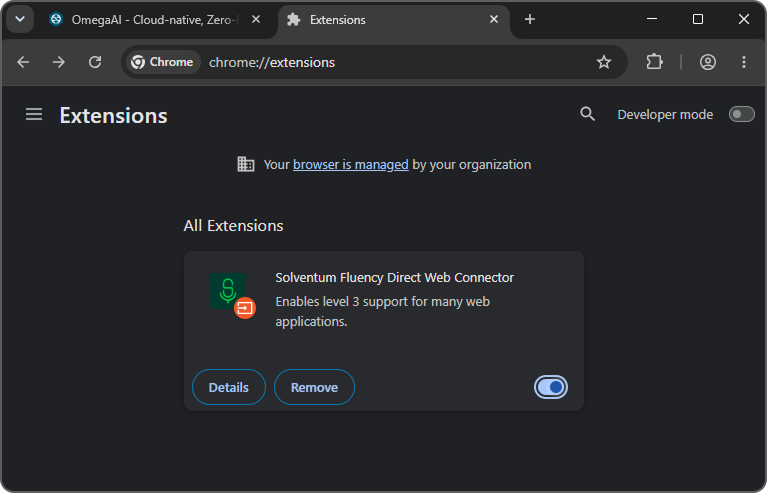
- Open your browser and navigate to the extensions page (e.g.
chrome://extensionsin Chrome oredge://extensionsin Edge). - Locate M*Modal Fluency Direct and confirm its toggle is switched On (blue).
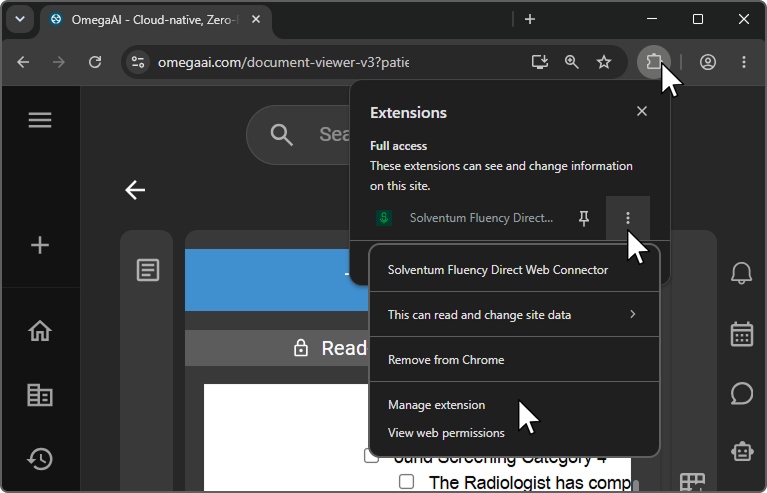
If the extension is not in the list, install it manually using the links above, or re-run the Fluency Direct installer (Step 1).
Step 3 — Assign the M*Modal License in Breeze
This step requires an admin user account in Breeze to enable the M*Modal license for the end user.
Log in to breeze.omegaai.com, find the site account, go to Third Party Licenses > Edit, add the user's email under MModal (create it with + if it doesn't exist), then click OK and Save.
Step 4 — Launch Fluency Direct and Verify the Connection
-
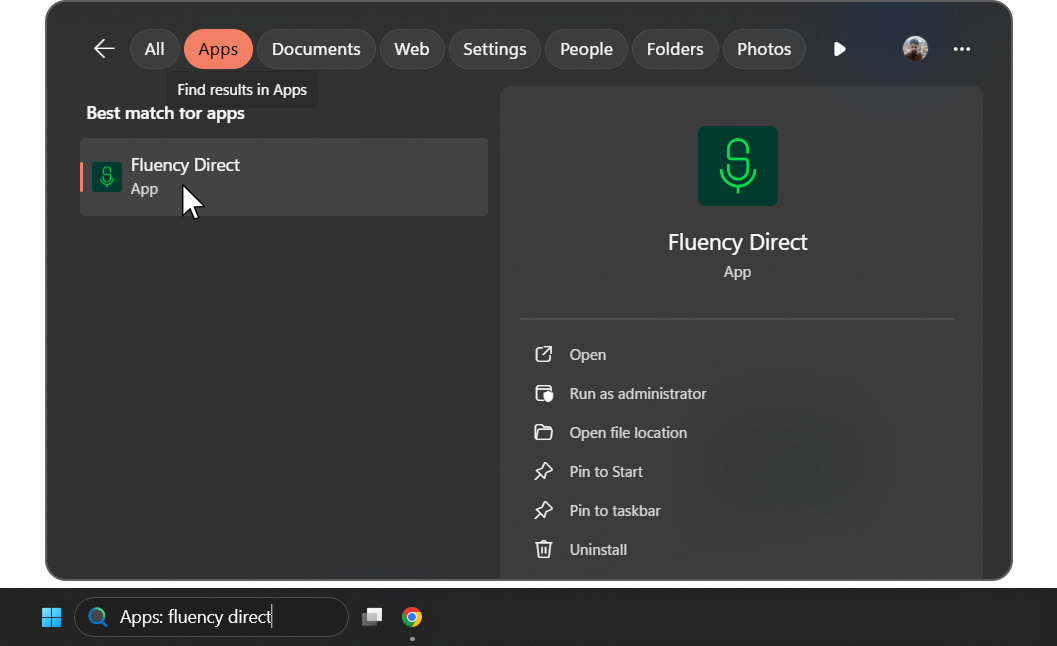
Launch Fluency Direct on the workstation — either via the desktop shortcut or Start > Fluency Direct. The Fluency Direct toolbar will appear on screen.
-
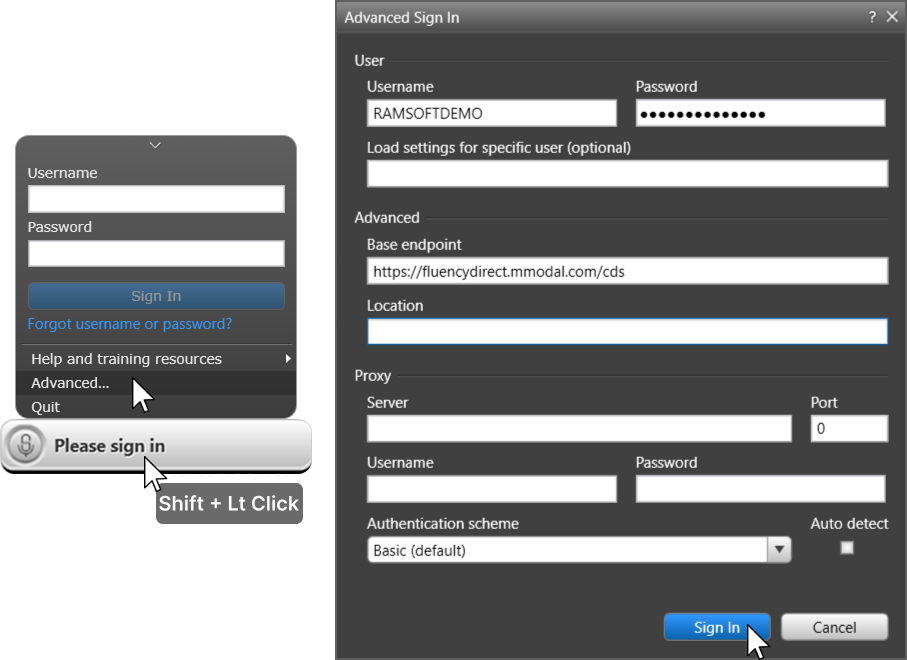
Left-click the toolbar to open the login prompt. Have the user enter their M*Modal account credentials.
cuidadoM*Modal credentials are case-sensitive. If login fails, verify Caps Lock is off and that the credentials are correct.
dicaAdvanced settings: To change the region or account without reinstalling, hold Shift and left-click the toolbar to access the Advanced Settings menu. This allows changing the base endpoint and account/location.
-
Once logged in (the user's name will appear on the Control Bar), open any study from the OmegaAI worklist and launch the Document Viewer. Once the Document Viewer is open, the Control Bar will automatically display the OmegaAI label, confirming Fluency Direct is targeted to the Document Viewer and ready for dictation.
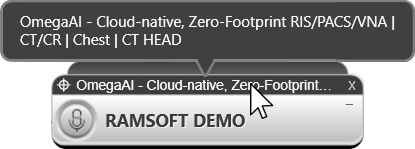
If the OmegaAI label does not appear:
- Confirm the M*Modal browser extension is enabled in Chrome (Step 2).
- Confirm the Breeze license is active for the user (Step 3) and that the email address is correct.
- Refresh all OmegaAI browser tabs, or log out and back in.
-
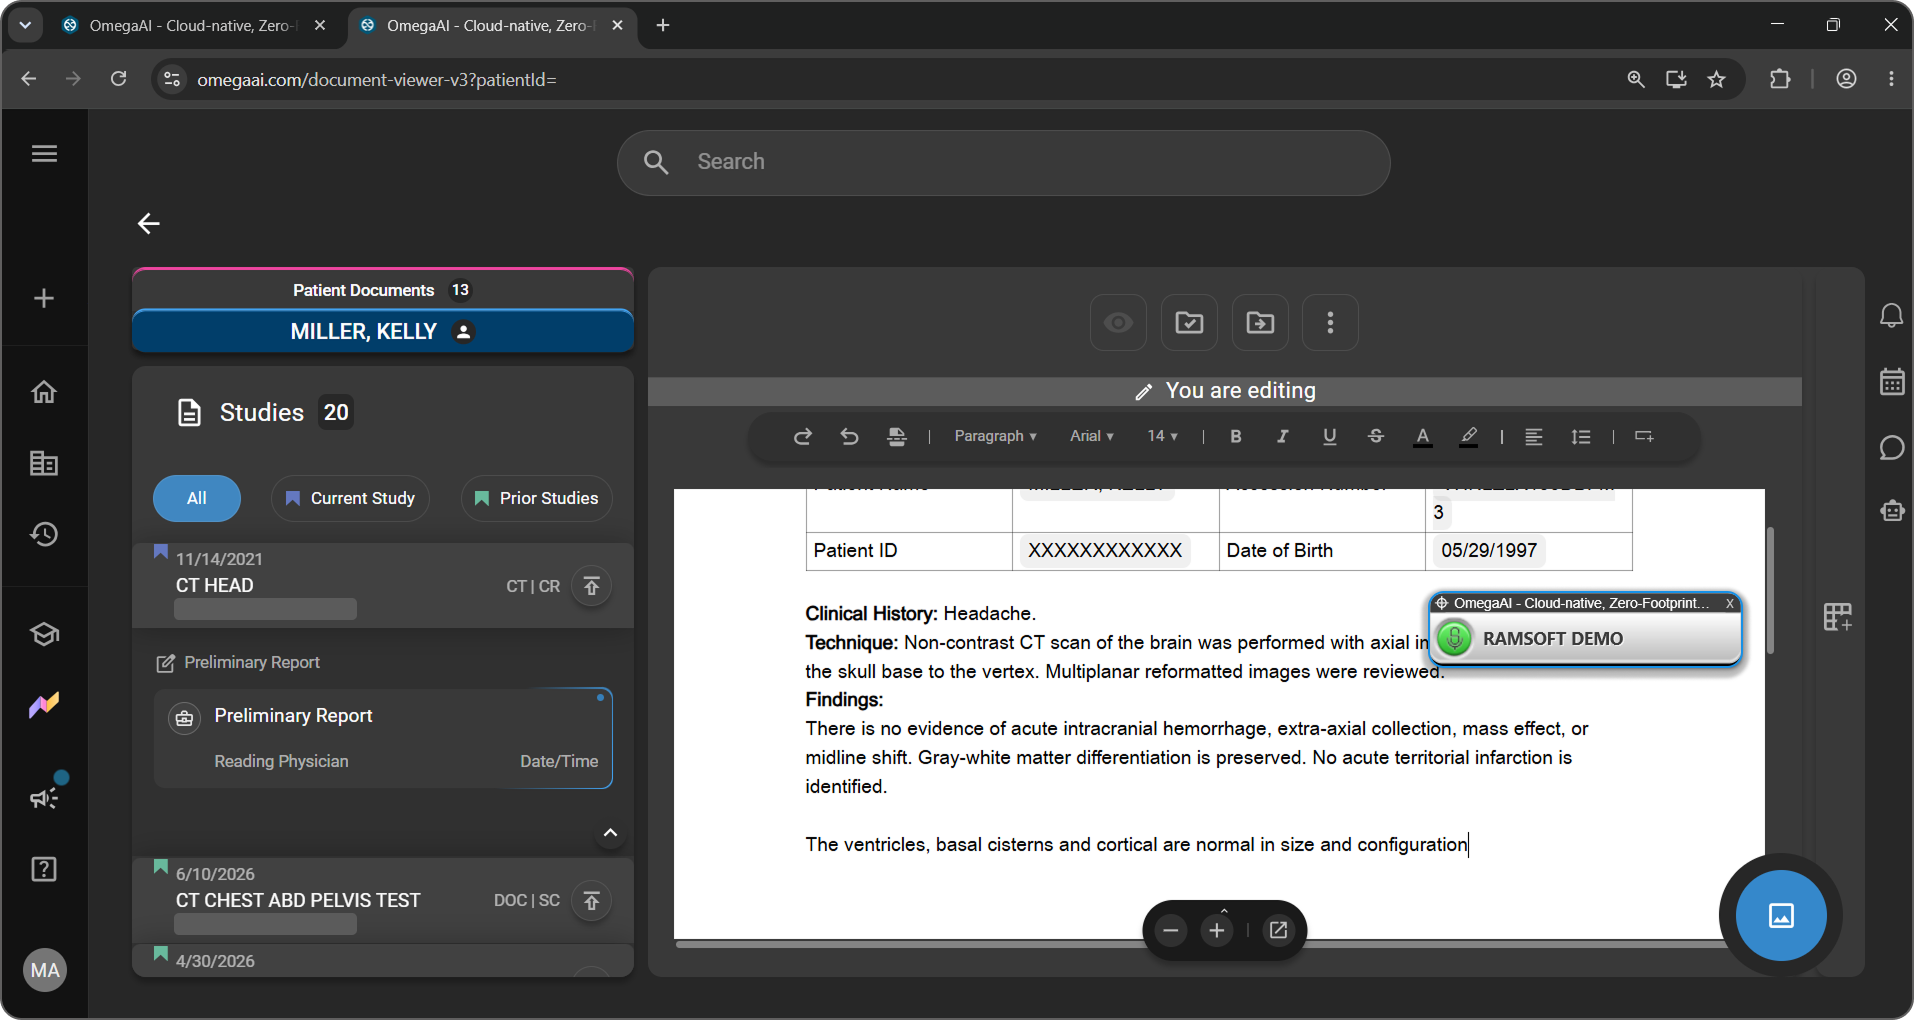
Click inside a field in the report and begin dictating. Transcribed text will appear at the cursor position in real time.
 dica
dicaIf the microphone is not detected, check Windows sound settings to confirm the correct input device is selected and not muted.
Configuration
The following sections cover settings you configure once during initial setup or when changing equipment.
Microphone Setup
The Microphone Setup dialog lets you configure your input device, assign a record button, and calibrate the microphone to your voice and environment.
Left-click the Fluency Direct Control Bar and select Microphone setup.
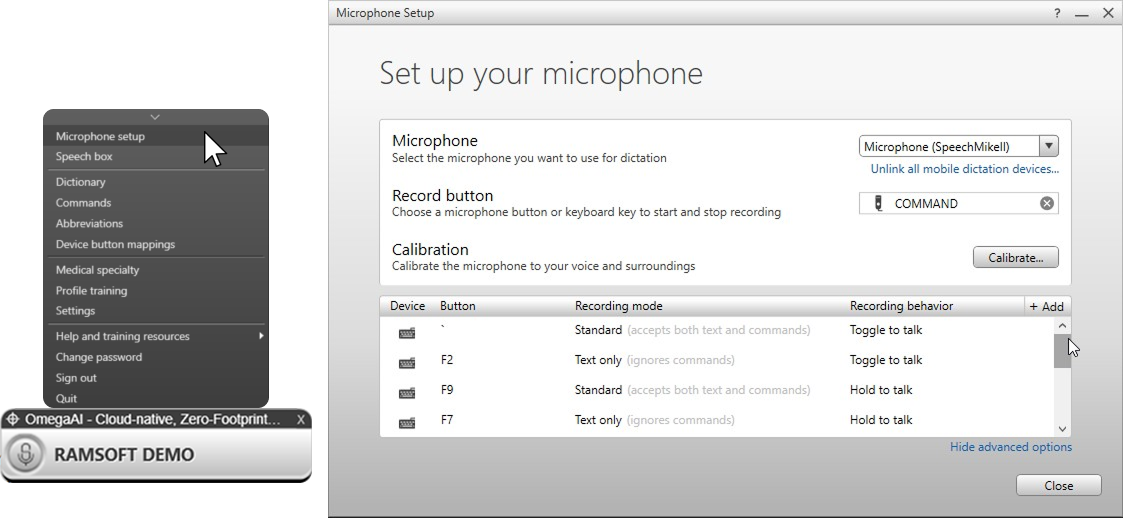
The dialog contains three settings:
- Microphone — Select the input device you want to use for recording from the dropdown.
- Record button — Assign a microphone button or keyboard key to start and stop recording.
- Calibration — Click Calibrate... to calibrate the microphone to your voice and surroundings.
Click Advanced to configure additional device button options (see Device Button Mappings).
For full guidance, see Microphone Setup — Solventum Help Library.
Medical Specialty
Setting your medical specialty helps Fluency Direct prioritize terminology relevant to your practice, improving recognition accuracy for specialty-specific language.
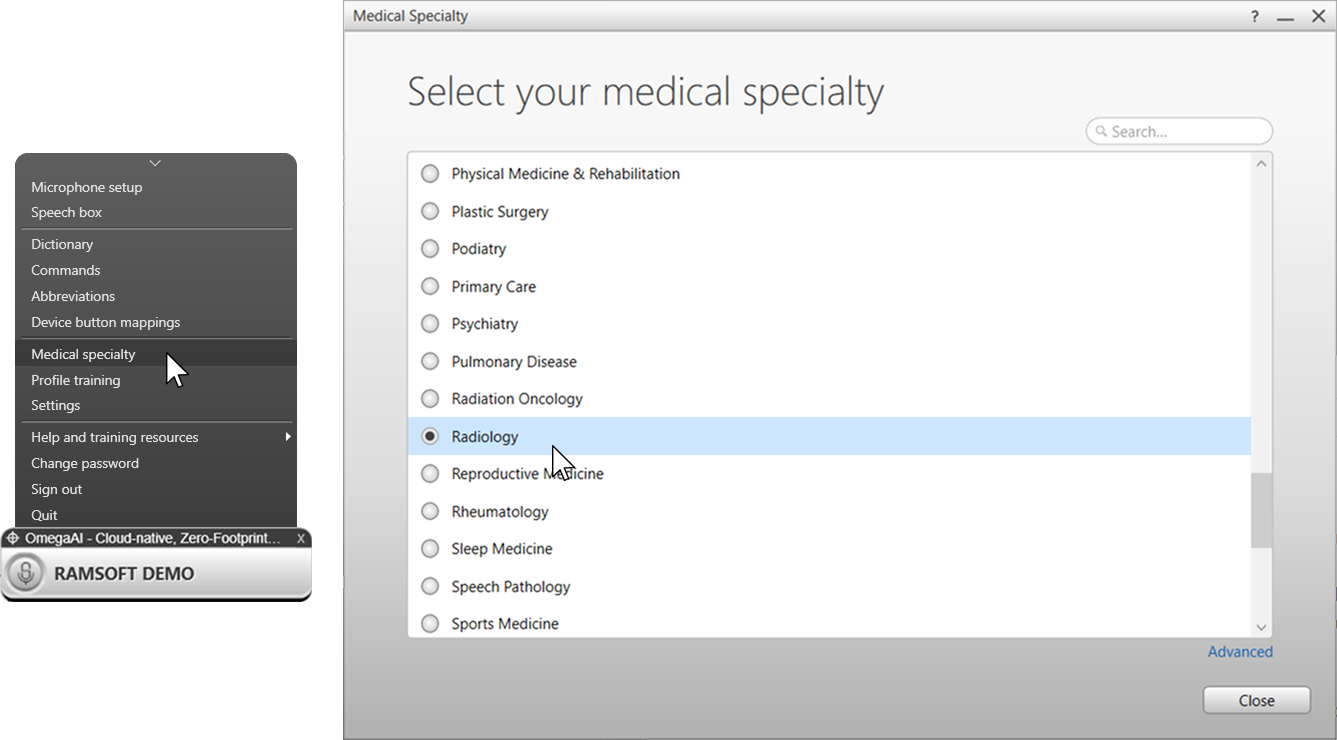
- Left-click the Fluency Direct Control Bar and select Medical specialty.
- Select your primary specialty from the list (e.g. Radiology).
- Click Save.
Radiologists should select Radiology as their primary specialty. This loads radiology-specific vocabulary — anatomical terms, imaging modalities, and common findings — into the active recognition model.
For more, see Medical Specialty — Solventum Help Library.
Profile Training
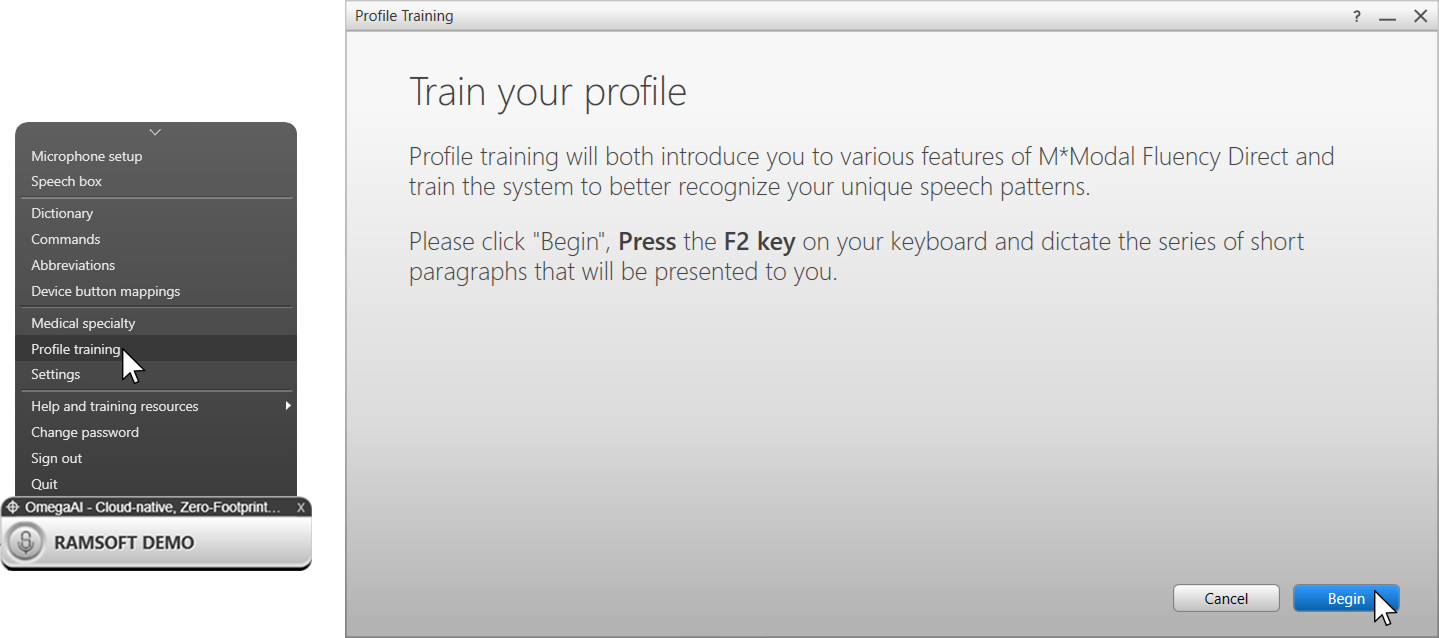
Profile Training introduces you to Fluency Direct features and trains the system to recognize your speech patterns. Left-click the Fluency Direct Control Bar, select Profile training, and click Begin. Dictate the short paragraphs presented — click Skip to advance, or Finish when done.
For more, see Profile Training — Solventum Help Library.
Settings
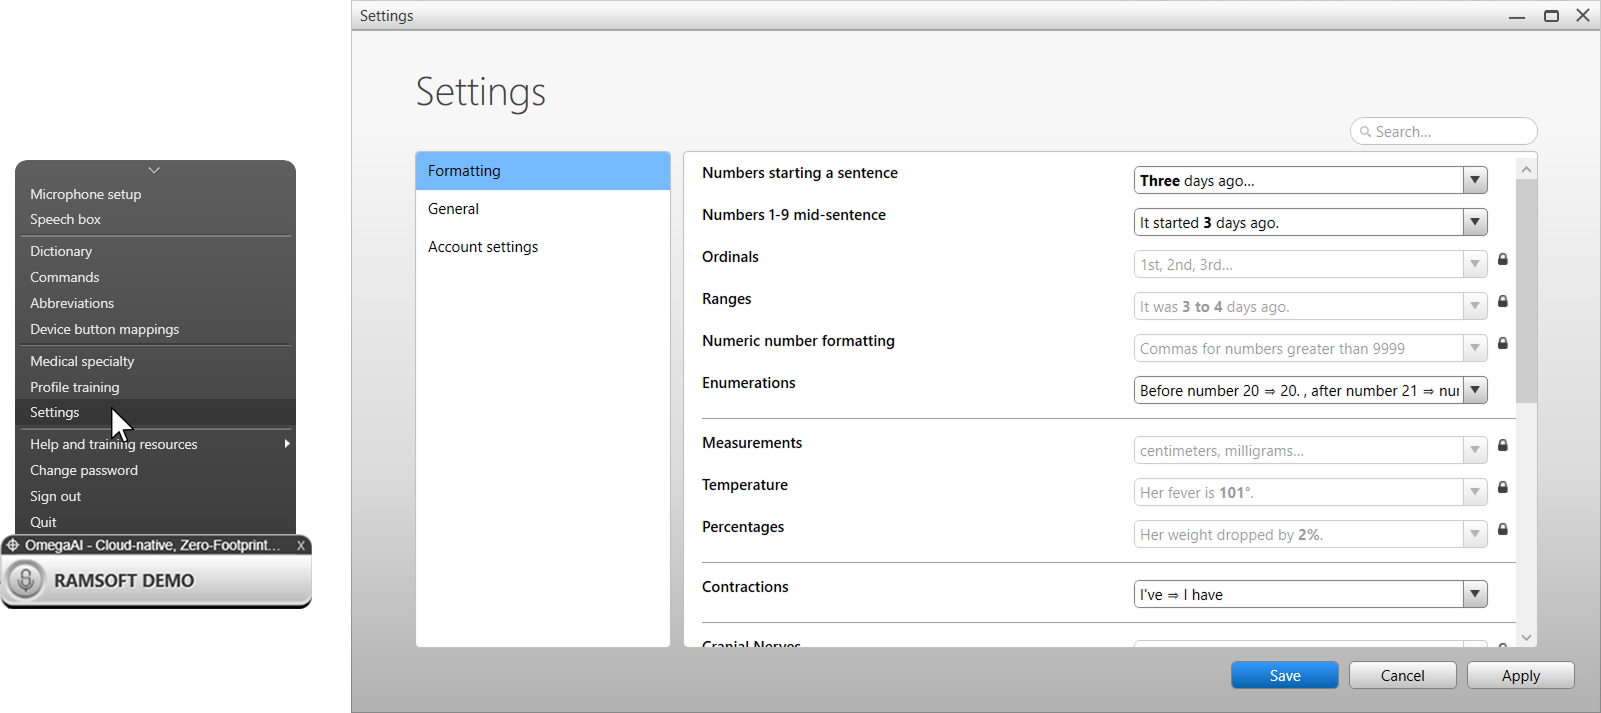
The Settings dialog contains three sections: Formatting, General, and Account settings. Left-click the Fluency Direct Control Bar and select Settings to open it.
Formatting
Controls how dictated content is transcribed — including number formatting (numerals vs. words, ordinals, ranges, enumerations), measurements, temperatures, percentages, dates, times, contractions, clinical notation (cranial nerves, liver segments, spine levels), and paragraph/list spacing. Settings marked with a lock icon are administrator-controlled and cannot be changed by the user.
General
- Text insertion interval — Controls how frequently words are inserted into the application (slider from frequent to less frequent).
- Window layout — Remembers the position and size of dialogs and the Control Bar. Options: Same across all computers or Per computer. Click Reset saved positions to restore defaults.
Account Settings
- Security question — The question used to verify your identity if you forget your password.
- Assign an answer to the security question — Not case-sensitive. Click Change... to update.
- Email address — Used internally to protect your account. Not shared or sold.
- Password — Click Change password to update your M*Modal account password.
For more, see Account Settings — Solventum Help Library.
Productivity Tools
The following tools help you work faster and more efficiently during dictation. They are built up over time and can be customized to your workflow.
The Speech Box
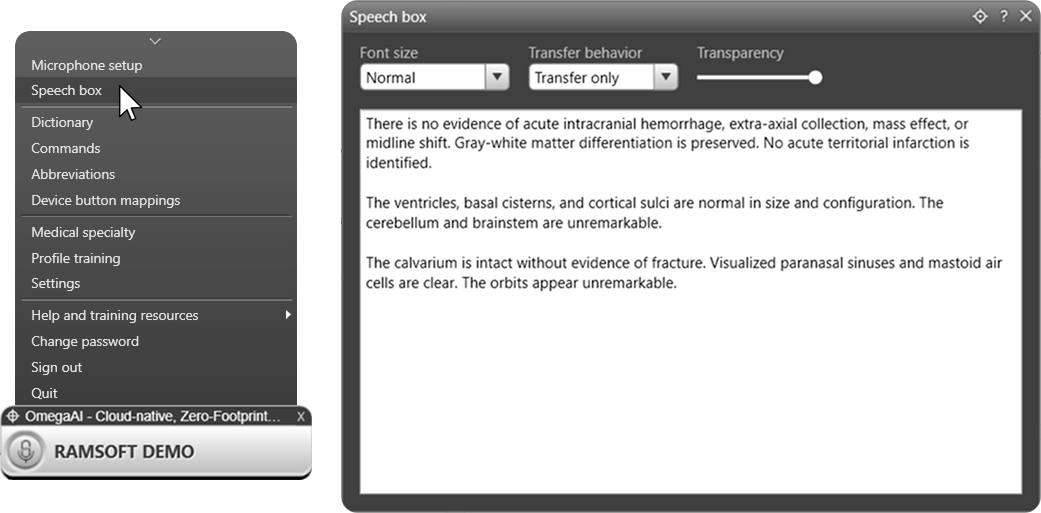
The Speech Box is an integrated dictation panel that lets you dictate text and transfer it to any application. It is useful when an application does not have full support for Fluency Direct navigation, editing, and formatting commands, or when you want to collect dictation in one place while browsing other windows. In this mode, dictation can be targeted to the Speech Box regardless of which window is active on the desktop.
In OmegaAI, dictation is transcribed directly into the Document Viewer. The Speech Box is not required for standard OmegaAI workflows.
Dictionary
The Fluency Direct dictionary lets you add words that are not recognized correctly — such as medical terminology, physician names, facility names, medications, or specialty-specific terms. Words are organized into categories to improve recognition accuracy.
To open the Dictionary, left-click the Fluency Direct Control Bar and select Dictionary.
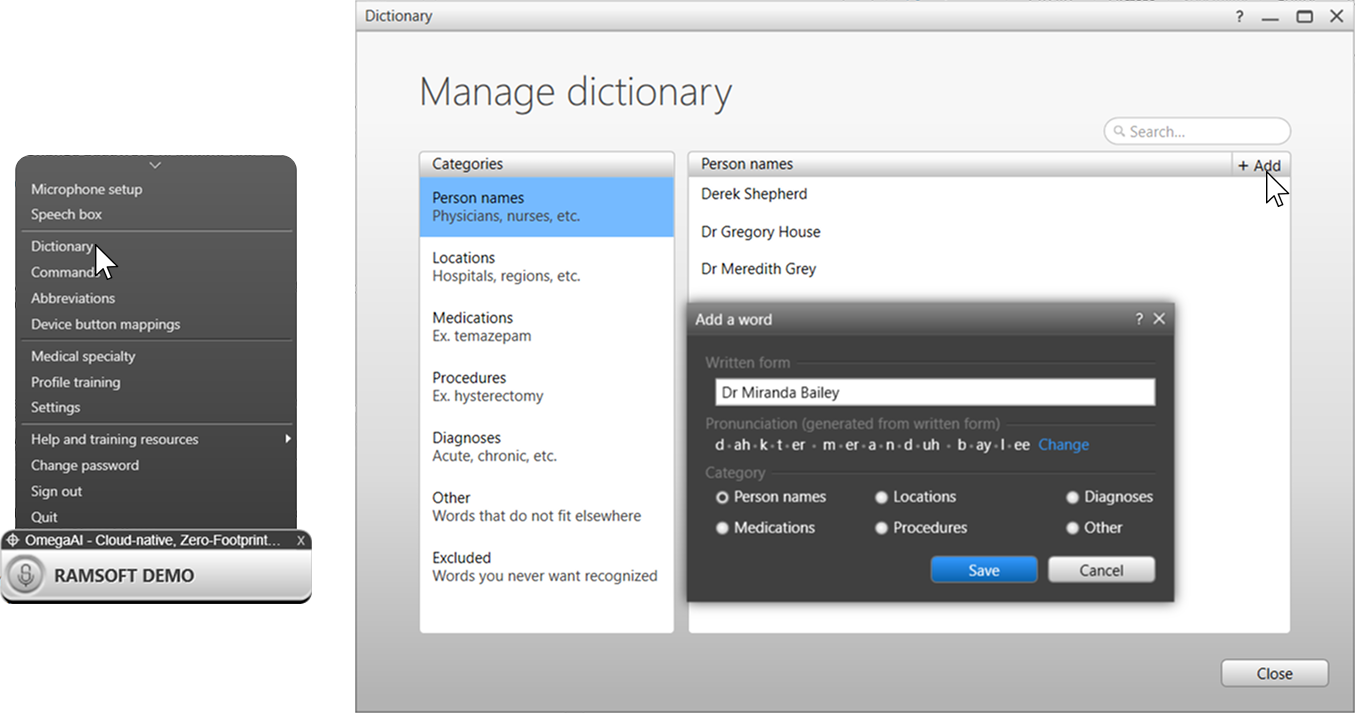
The dialog has two panels — Categories (left) and the word list for the selected category (right). The following categories are available:
- Person names — Physicians, nurses, and other personnel
- Locations — Hospitals, regions, and facility names
- Medications — Drug names (e.g. temazepam)
- Procedures — Procedure names (e.g. hysterectomy)
- Diagnoses — Acute, chronic, and other diagnostic terms
- Other — Words that do not fit elsewhere
- Excluded — Words you never want recognized
Adding a Word
- Select a category from the left panel.
- Click + Add to open the Add a word dialog.
- Under the Written form tab, enter the word exactly as it should appear in the transcription. The pronunciation is generated automatically — click Change to edit it if needed.
- Optionally, click the Spoken form tab to specify how the word sounds rather than how it is spelled. This is useful for acronyms or unusual names (e.g. the spoken form of AAA is triple A).
- Optionally, click the Record pronunciation tab, press your assigned record button, and dictate the word to record a custom pronunciation sample.
- Click Save.
Use the Search field at the top right to check whether a word already exists before adding a duplicate.
For full guidance, see Dictionary — Solventum Help Library.
Abbreviations
Abbreviations let you dictate a short phrase that automatically expands into longer text. This is useful for standard report phrases, facility names, or frequently used findings.
To open Abbreviations, left-click the Fluency Direct Control Bar and select Abbreviations.
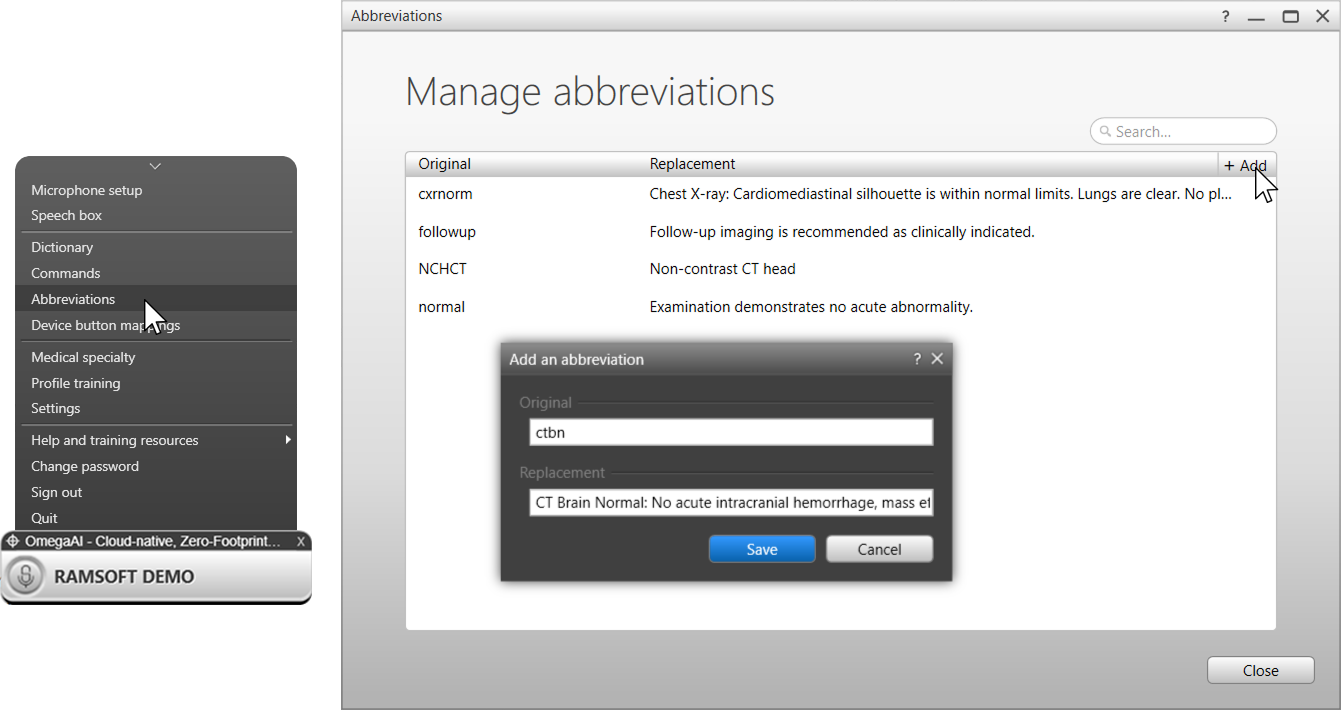
The dialog lists all existing abbreviations with two columns — Original (the short phrase you dictate) and Replacement (the full text that is inserted).
Adding an Abbreviation
- Left-click the Fluency Direct Control Bar and select Abbreviations.
- Click + Add.
- In Original, enter the short phrase you will say (e.g. UMC).
- In Replacement, enter the full text to be inserted (e.g. University Medical Center).
- Click Save.
Use abbreviations for boilerplate report sections such as normal study templates, standard impression statements, or frequently dictated facility and procedure names.
For more, see Abbreviations — Solventum Help Library.
Commands
Commands let you create custom voice-triggered actions — such as inserting text, sending keystrokes, or running scripts — and organize them into groups. Commands are more powerful than abbreviations and support multi-step workflows.
To open Commands, left-click the Fluency Direct Control Bar and select Commands.
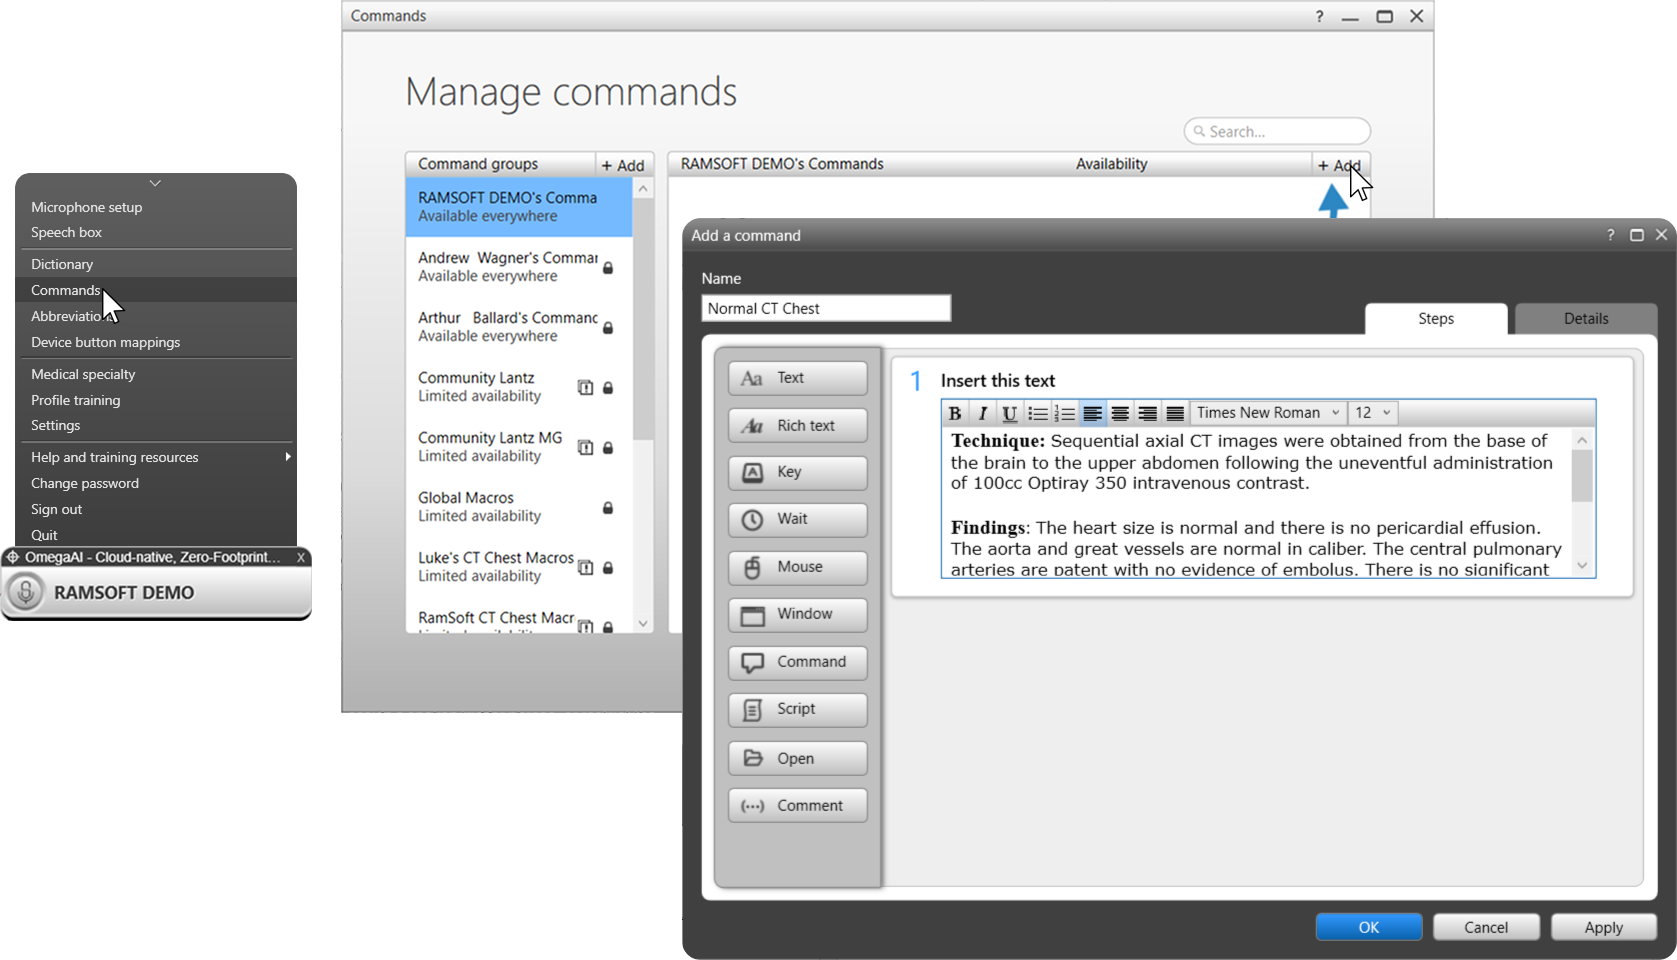
The dialog has two panels:
- Command groups (left) — Lists all available command groups. Your personal commands appear at the top (e.g. RAMSOFT DEMO's Commands — Available everywhere). Shared or site-level groups are listed below with Limited availability.
- Commands (right) — Lists all commands in the selected group. Click + Add to add a command to the group.
Adding a Command
-
Select your personal command group from the left panel.
-
Click + Add on the right panel to open the Add a command dialog.
-
Enter a Name for the command — this is the phrase you will say to trigger it (e.g. Insert chest normal).
-
Under the Steps tab, drag or click a step type to build the command:
Step type Description Text Inserts plain text at the cursor position Rich text Inserts formatted text Key Sends a keyboard key or shortcut Wait Adds a pause between steps Mouse Performs a mouse action Window Brings a specific window into focus Command Calls another existing command Script Runs a custom script Open Opens a file or application Comment Adds a note to the command (not executed) -
Click OK to save.
Use the Details tab to set availability, assign a spoken trigger phrase, or restrict the command to a specific application.
For full details, see Commands — Solventum Help Library.
Device Button Mappings
Device button mappings let you assign microphone buttons or keyboard keys to trigger specific actions in Fluency Direct — such as starting recording, running a command, or sending a keystroke.
To open Device Button Mappings, left-click the Fluency Direct Control Bar and select Device button mappings.
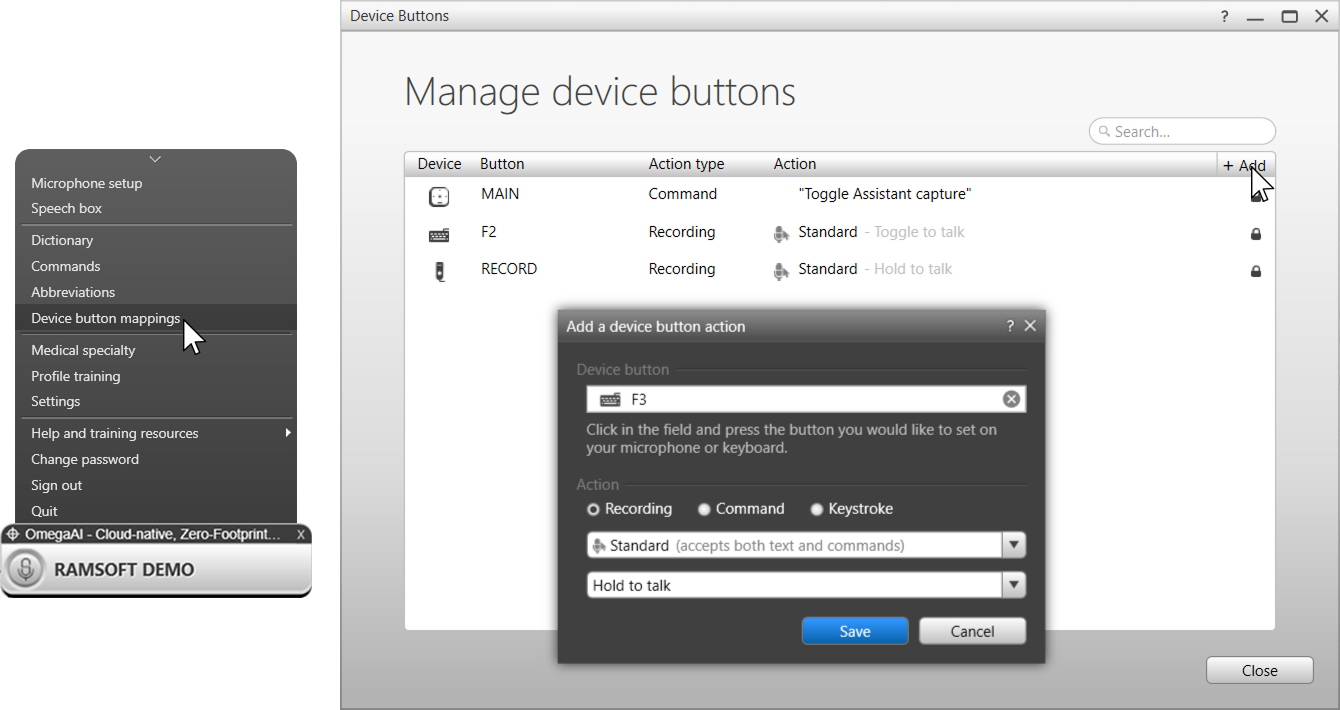
The dialog lists all configured button assignments with four columns:
| Column | Description |
|---|---|
| Device | The physical input device (microphone or keyboard) |
| Button | The button or key assigned |
| Action type | The type of action — Recording, Command, or Keystroke |
| Action | The specific action triggered |
Adding a Device Button Action
- Left-click the Fluency Direct Control Bar and select Device button mappings.
- Click + Add to open the Add a device button action dialog.
- Click inside the Device button field and press the button or key you want to assign on your microphone or keyboard.
- Under Action, select one of the following:
- Recording — Starts or stops dictation. Choose a recording mode (Standard — accepts both text and commands) and a recording behavior (Hold to talk or Toggle to talk).
- Command — Triggers a Fluency Direct voice command. Start typing to choose from suggestions.
- Keystroke — Sends a keyboard shortcut (e.g.
CTRL+S) to the desktop or active window.
- Click Save.
Use Hold to talk for short commands or corrections where you want precise control over when recording starts and stops. Use Toggle to talk for longer dictation passages.
For more, see Device Button Mappings — Solventum Help Library.
Account Management
The following options are available from the Fluency Direct Control Bar menu:
- Change password — Updates your M*Modal account password.
- Sign out — Signs out the current user from Fluency Direct. Use this when switching users on a shared workstation.
- Quit — Closes the Fluency Direct application entirely.
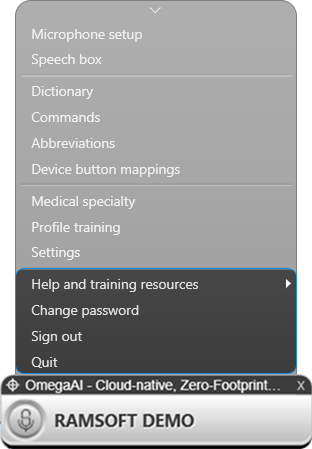
To switch accounts without reinstalling, hold Shift and left-click the Control Bar to access the Advanced Settings menu and change the account or region.
Help and Training Resources
Left-click the Fluency Direct Control Bar and select Help and training resources for access to in-application help, tutorials, and Solventum support content.
For the full online documentation, visit the Solventum™ Fluency Direct™ Help Library.
Troubleshooting
| Issue | Resolution |
|---|---|
| OmegaAI label not showing on the Control Bar | Confirm the M*Modal browser extension is enabled in Chrome. Refresh all OmegaAI tabs or log out and back in. |
| Cannot log in to Fluency Direct | Credentials are case-sensitive — verify Caps Lock is off. Confirm the M*Modal license is active in Breeze. |
| Fluency Direct shows Offline / 404 error | This may indicate a server migration issue. Contact RamSoft Support to verify your account endpoint is correctly configured. |
| Microphone not detected | Check Windows Sound settings. Confirm the correct input device is selected and not muted. |
| Poor recognition accuracy | Run Profile Training. Ensure Medical Specialty is set to Radiology. Recalibrate the microphone in Microphone Setup. |
| Extension not in browser list | Install the extension manually from the Chrome Web Store or Edge Add-ons (see Getting Started). |
| Dictation not appearing in Document Viewer | Confirm the cursor is placed inside a report field before dictating. Check that the OmegaAI label is visible on the Control Bar. |
Voice Commands Reference
The following commands have been verified to work with the OmegaAI Document Viewer.
Selection
| Command | Alternate phrase(s) | Action |
|---|---|---|
| select <word/text> | select all | Selects the specified word, phrase, or all text in the document |
| select next word | select next sentence / paragraph | Selects the next word, sentence, or paragraph from the cursor position |
| select next <N> words | select next <N> sentences / paragraphs | Selects the specified number of words, sentences, or paragraphs forward |
| select previous word | select previous sentence / paragraph | Selects the previous word, sentence, or paragraph from the cursor position |
| select previous <N> words | select previous <N> sentences / paragraphs | Selects the specified number of words, sentences, or paragraphs backward |
| unselect that | unselect text / clear that | Clears the current text selection |
Correction
| Command | Alternate phrase(s) | Action |
|---|---|---|
| correct <word/text> | correct that / correct selection | Opens the correction menu for the specified word or current selection |
| choose one / two / three… | choose option one / two / three… | Selects a numbered option from the correction menu |
| spell | spell mode / switch to spell mode / spelling mode | Switches to spelling mode for letter-by-letter dictation |
Deletion
| Command | Alternate phrase(s) | Action |
|---|---|---|
| delete that | delete selection | Deletes the current selection |
| delete next word | delete previous word | Deletes the word immediately after or before the cursor |
| delete <N> words | delete next/previous <N> words | Deletes the specified number of words forward or backward |
| delete sentence | delete current / next / previous sentence | Deletes the current, next, or previous sentence |
| delete paragraph | delete current / next / previous paragraph | Deletes the current, next, or previous paragraph |
Editing & Formatting
| Command | Alternate phrase(s) | Action |
|---|---|---|
| undo that | scratch that / undo command / undo last command | Reverses the last dictation or edit action |
| cut that | cut selection | Cuts the current selection to the clipboard |
| copy that | copy selection | Copies the current selection to the clipboard |
| paste that | paste selection | Pastes clipboard content at the cursor position |
| lowercase that | lowercase selection | Converts the selected text to lowercase |
| uppercase that | uppercase selection | Converts the selected text to uppercase |
| capitalize that | cap that | Capitalizes the first letter of the selected text |
| all caps on | all caps off / caps on / caps off | Toggles all-caps dictation mode on or off |
| bold that | bold selection | Applies bold formatting to the selected text |
| italicize that | italicize selection | Applies italic formatting to the selected text |
| underline that | underline selection | Applies underline formatting to the selected text |
Navigation & Scrolling
| Command | Alternate phrase(s) | Action |
|---|---|---|
| scroll up | Scrolls the document view upward | |
| scroll down | Scrolls the document view downward | |
| scroll to cursor | Scrolls the view to the current cursor position | |
| insert before <text> | Moves the cursor to immediately before the specified text | |
| insert after <text> | Moves the cursor to immediately after the specified text | |
| new line | next line | Inserts a line break at the cursor position |
| new paragraph | next paragraph | Inserts a paragraph break at the cursor position |
| go to beginning of sentence | jump to… / move to… / place cursor at… | Moves the cursor to the beginning of the current sentence |
| go to beginning of paragraph | jump to… / move to… / place cursor at… | Moves the cursor to the beginning of the current paragraph |
| go to beginning of document | jump to… / move to… / place cursor at… | Moves the cursor to the start of the document |
| go to end of sentence | jump to… / move to… / place cursor at… | Moves the cursor to the end of the current sentence |
| go to end of paragraph | jump to… / move to… / place cursor at… | Moves the cursor to the end of the current paragraph |
| go to end of document | jump to… / move to… / place cursor at… | Moves the cursor to the end of the document |
Field Navigation
Field navigation commands work with square bracket [ ] fields, not OmegaAI custom fields.
| Command | Alternate phrase(s) | Action |
|---|---|---|
| next field | go to / jump to / move to next field | Moves the cursor to the next [ ] field in the document |
| previous field | go to / jump to / move to previous field | Moves the cursor to the previous [ ] field in the document |
| first field | go to / jump to / move to first field | Moves the cursor to the first [ ] field in the document |
| last field | go to / jump to / move to last field | Moves the cursor to the last [ ] field in the document |
Target & Playback
| Command | Alternate phrase(s) | Action |
|---|---|---|
| set target | set dictation target / set target window | Sets the active dictation target to the current window or field |
| clear target | cancel target / remove target / stop using target | Removes the current dictation target |
| playback dictation | Plays back the most recent dictation audio |
Punctuation & Symbols
| Command | Alternate phrase(s) | Action |
|---|---|---|
| colon | Inserts a colon ( : ) | |
| semi colon | Inserts a semicolon ( ; ) | |
| open parentheses | open paren / left paren / left parentheses / open brackets | Inserts an opening parenthesis ( |
| close parentheses | close paren / right paren / right parentheses / close brackets | Inserts a closing parenthesis ) |
| open quotation | open quote / open quotation marks / open inverted commas | Inserts an opening quotation mark ( " ) |
| period | full stop | Inserts a period ( . ) |
| slash | stroke | Inserts a forward slash ( / ) |
| question mark | Inserts a question mark ( ? ) | |
| exclamation mark | Inserts an exclamation mark ( ! ) | |
| comma | Inserts a comma ( , ) |
Related Articles
For topics not covered in this article, refer to the Solventum™ Fluency Direct™ Help Library.