Window Level and Display Presets
Overview
The Window Level tool controls the brightness and contrast of medical images by adjusting the window center (level) and window width. It is one of the most frequently used tools in diagnostic imaging, allowing radiologists to optimize image display for specific tissue types, anatomical regions, or pathological findings. Clamped Window Level, covered later in this article, is a bounded variant of the same tool for CT, NM, and PT studies.
OmegaAI ships a set of built-in display presets for each modality — CT, MR, MG, CR/DX, US, PT, and NM — so you can jump straight to an optimized view instead of adjusting manually every time. Both Window Level and Clamped Window Level share this same preset menu. You can also create your own organization-level custom presets.
How to Access
- From the Image Control Wheel — right-click on the viewport and select Window Level, or add it via Customize Wheel if not already available.
- From the toolbar — add via Customize Toolbar, then click Window Level.
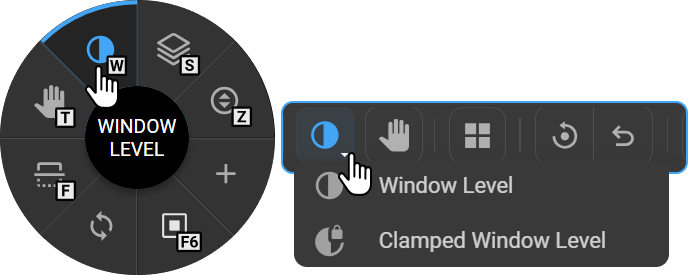
Hotkey: W
How to Use
- Select Window Level from the Image Control Wheel, Toolbar, or press W.
- Click and hold the left mouse button on the image.
- Move the mouse horizontally to adjust contrast.
- Move the mouse vertically to adjust brightness.
- Release the mouse once the image is optimized.
Window Level Presets
Left-clicking while the Window Level tool is active opens the Presets menu. OmegaAI automatically detects the modality of the loaded series and displays only the presets relevant to that modality — CT, MR, MG, CR/DX, US, PT, and NM each have their own preset list — along with any organization-level custom presets for that modality.
Within each modality, presets appear in a consistent order: Auto and/or DICOM Default first, followed by the modality-specific presets, followed by Invert last.
|
|
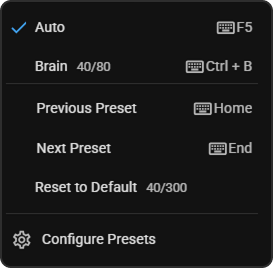
Reset to Default vs. DICOM Default: DICOM Default is a selectable preset available in the MR, MG, CR/DX, US, PT, and NM lists. Reset to Default is a separate utility action available for every modality — including CT, which has no DICOM Default preset of its own — that re-applies the window/level values from the image's DICOM header on demand.
System vs. custom presets
Each modality ships with a set of built-in system presets. These are read-only — their values can't be edited or deleted — but their keyboard shortcut can still be reassigned (see Assigning a Keybind to a Preset below). Organization-level custom presets you create are fully editable and deletable.
CT Presets
| Preset | Window Width / Window Level | Hotkey |
|---|---|---|
| Auto | (histogram-based) | F5 |
| Brain | 80 / 40 | 1 |
| Stroke | 40 / 40 | 2 |
| Subdural | 200 / 75 | 3 |
| Bone | 2000 / 500 | 4 |
| Lung | 1500 / −600 | 5 |
| Mediastinum | 350 / 40 | 6 |
| Soft Tissue | 400 / 50 | 7 |
| Abdomen | 350 / 50 | 8 |
| Liver | 160 / 60 | 9 |
| CTA Vascular | 600 / 170 | — |
| Seeds | 400 / 800 | — |
| Invert | — | — |
MR Presets
MR presets auto-window the image to different percentile ranges of its pixel values, rather than using fixed numbers.
| Preset | Behavior | Hotkey |
|---|---|---|
| DICOM Default | Uses the DICOM header's window/level values | 1 |
| Auto 98th | Auto-windows to the 2nd–98th percentile of pixel values | 2 |
| Auto 95th | Auto-windows to the 5th–95th percentile of pixel values | 3 |
| Auto 90th | Auto-windows to the 10th–90th percentile of pixel values | 4 |
| Full Dynamic Range | Spans the image's full min-to-max pixel range | 5 |
| Invert | — | — |
MG Presets
| Preset | Window Width / Window Center | Hotkey |
|---|---|---|
| DICOM Default | (from DICOM header) | 1 |
| Enhanced Contrast | 4000 / 2000 | 2 |
| Implant | 8000 / 4000 | 3 |
| Invert | — | — |
CR/DX Presets
| Preset | Behavior | Hotkey |
|---|---|---|
| DICOM Default | Uses the DICOM header's window/level values | 1 |
| Optimized | Auto-windows based on the image histogram | 2 |
| Full Dynamic Range | Spans the image's full min-to-max pixel range | 3 |
| Invert | — | — |
US Presets
| Preset | Behavior | Hotkey |
|---|---|---|
| DICOM Default | Uses the DICOM header's window/level values | 1 |
| Optimized | Auto-windows based on the image histogram | 2 |
| Full Dynamic Range | Spans the image's full min-to-max pixel range | 3 |
| Invert | — | — |
For ultrasound screen captures without embedded window/level information, OmegaAI automatically applies Full Dynamic Range in place of Optimized.
PT Presets (SUV-aware)
When a PT study includes SUV (Standardized Uptake Value) calibration data, the preset menu shows SUV-scaled presets, each pairing a display range with a color palette. The on-image overlay for PT studies shows the applied SUV range and preset name, e.g. L0 U10 (SUV Hot Body), instead of the standard W{width} C{level} format.
| Preset | SUV Range | Color Palette | Hotkey |
|---|---|---|---|
| SUV Hot Body | 0–10 | Hot Iron | 1 |
| SUV Hot Metal Blue | 0–10 | Hot Metal Blue | 2 |
| SUV Rainbow | 0–10 | Rainbow | 3 |
| SUV Grayscale | 0–10 | Grayscale | 4 |
| DICOM Default | (from DICOM header) | — | 5 |
| Auto | (2nd–98th percentile) | — | F5 |
| Invert | — | — | — |
If a PT study has no SUV calibration data, presets are unavailable and the menu instead displays: "PET display presets unavailable. SUV calibration data missing — image uses raw counts." Only Configure Presets remains accessible in this case.
To learn more about PET-CT review, see PET-CT Fusion Mode.
NM Presets
| Preset | Color Palette | Hotkey |
|---|---|---|
| DICOM Default | — | 1 |
| Nuclear Hot Iron | Hot Iron | 2 |
| Nuclear Rainbow | Rainbow | 3 |
| Hot Metal Blue | Hot Metal Blue | 4 |
| Nuclear Grayscale | Grayscale | 5 |
| Inverted Gray | Inverted Gray | 6 |
| Invert | — | — |
Sigmoid Adjustment
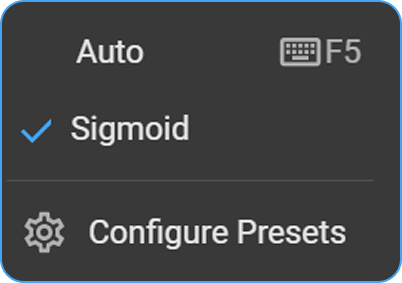
Available for MG, DX, and CR modalities only. Left-click the image while Window Level is active to access this option.
Sigmoid adjustment applies nonlinear scaling for more precise brightness and contrast control, particularly in areas with high-density variation. It is especially useful in soft tissue imaging, where fine contrast control helps highlight subtle density differences. |
|
DICOM Window/Level Warning Indicator
OmegaAI always checks the window/level values embedded in each image's DICOM header. In most cases where those values are missing, invalid, or clearly out of range, OmegaAI silently substitutes an automatically calculated window/level — no warning is shown, since the correction is unambiguous.
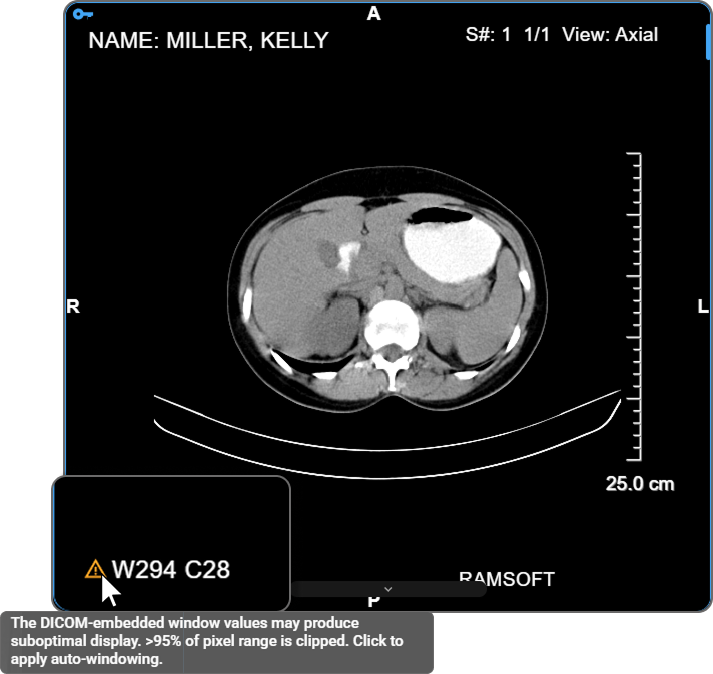
If the embedded values are technically valid but would still produce a clinically unreadable image — for example, more than 95% of the pixel range clipped to black or white, or fewer than 5 distinguishable gray levels — OmegaAI instead shows an amber warning icon next to the W/C overlay text in the bottom-left corner of the image, so you can decide whether to keep or correct the display.
Hovering over the icon shows a tooltip explaining the specific issue, for example:
"The DICOM-embedded window values may produce suboptimal display. >95% of pixel range is clipped. Click to apply auto-windowing."
Clicking the icon replaces the current window/level with an automatically calculated value, and the warning icon disappears once applied.
The warning icon is not shown in Blume, shared study views, or focus mode.
Creating a Custom Preset
- While the Window Level tool is active, right-click on the image to open the Window Level Presets menu and select Configure Presets.
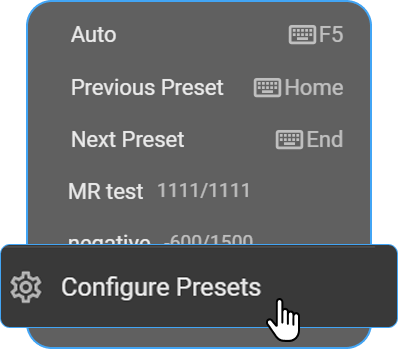
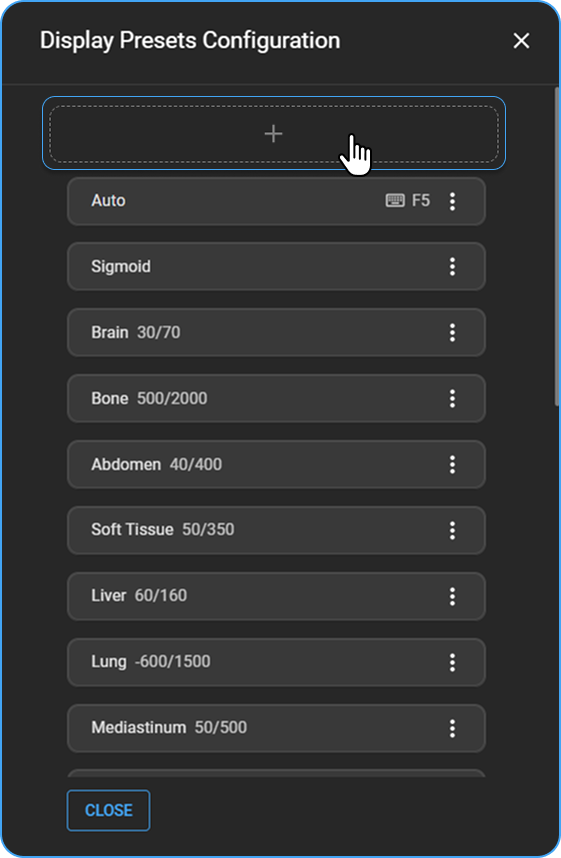
- The Display Presets Configuration panel opens on the right side of the screen, listing all existing presets for the current study's modality.
- Click the + button to add a new preset.
-
Enter a descriptive preset name.
-
Select the imaging modality the preset applies to (e.g., CT, MR).
-
Enter the Window Level (WL) value — controls the brightness of the image (center of the grayscale range).
-
Enter the Window Width (WW) value — controls the contrast (range of intensities displayed).
For PT studies, these fields are labeled SUV Min and SUV Max instead, and are converted automatically to window width/level values on save.
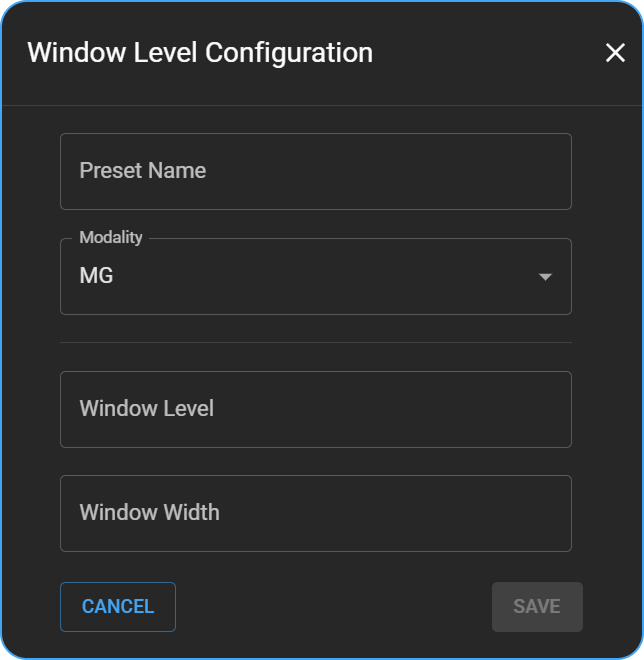
- Click Save to add the new preset to the list.
Assigning a Keybind to a Preset
- Open the Display Presets Configuration panel.
- Locate the preset you want to assign or modify.
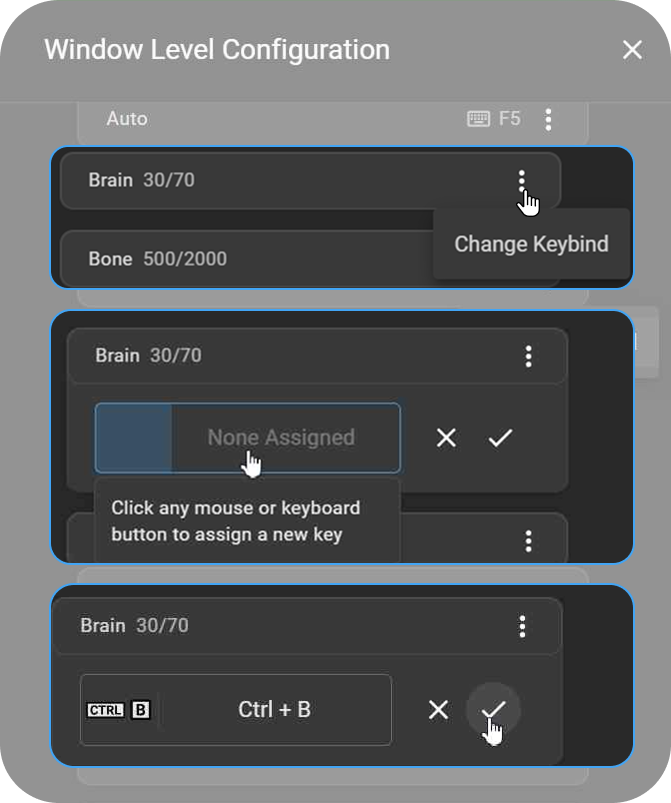
- Click the ⋮ menu next to the preset and select Change Keybind.
- A keybind entry box appears under the preset.
- Press the desired key or key combination on your keyboard.
- Click ✓ to save the new keybind, or × to cancel.
The preset is updated with your custom keybind for quick access during image review. Hotkeys are specific to each modality, so the same key can be reused across different modalities (for example, 1 for CT Brain and 1 for MR DICOM Default) without conflict — but a key already in use within the same modality can't be assigned to a second preset there. Reassigning a keybind on a system preset does not make it editable or deletable; it remains a system preset.
Deleting a Preset
Only custom presets can be deleted. System presets cannot be removed, regardless of whether their keybind has been changed.
- Open the Display Presets Configuration panel.
- Locate the custom preset you want to remove.
- Click the ⋮ menu next to the preset.
- Select Delete — the preset is immediately removed from the list.
Clamped Window Level
The Clamped Window Level tool is a specialized variant of Window Level that applies fixed upper and lower intensity bounds. This bounded approach prevents extreme brightness or contrast values, making it particularly useful for modalities where controlled intensity mapping is important, such as CT, NM, and PET studies.
Supported modalities: CT, NM, PET-CT (CT component only), PT
How to Access
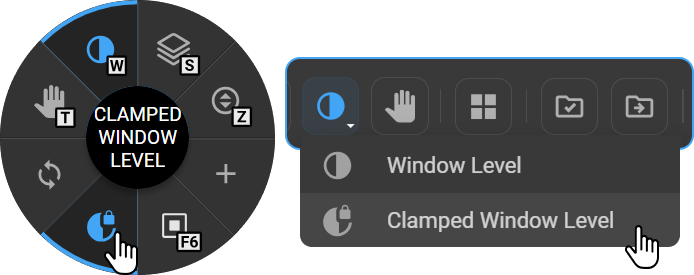
- From the Image Control Wheel — right-click on the viewport and select Clamped Window Level, or add it via Customize Wheel if not already available.
- From the toolbar — add via Customize Toolbar, then click Clamped Window Level.
Key Features
-
Clamped Adjustment — Brightness and contrast range is bounded within defined limits.
- Lower Bound (L): 0 (default)
- Upper Bound (U): WL + (WW / 2)
-
Shared Presets Menu — Clamped Window Level uses the same modality-aware Presets menu as the standard Window Level tool, including the SUV-aware color palette presets for PT studies (see PT Presets above). A separate color-map selector bar is no longer used.
-
Preset & Hanging Protocol Compatibility — Fully supports existing Window Level presets and maintains consistent display behavior across different layouts and multi-monitor setups.
-
Specialized Cursor — When the Clamped Window Level tool is active, the cursor changes to a dedicated icon with a rotation arrow, distinguishing it from the standard Window Level cursor.

How to Use
- Open any supported study (CT, NM, PET-CT, or PT).
- Select Clamped Window Level from the Image Control Wheel or Toolbar.
- Click and hold the left mouse button on the image.
- Move the mouse left or right to adjust the Upper Bound (U).
- Release the mouse once the image is optimized.