Homepage
Overview
The OmegaAI homepage serves as the central hub for accessing and managing imaging workflows within the platform. It provides a structured interface that enables users to quickly navigate between key modules, monitor study activity, and perform essential tasks efficiently.
From the homepage, users can access the worklist, manage organizational settings, review system logs, and utilize communication and scheduling tools. The layout is designed to support seamless daily operations, with intuitive navigation panels, a dynamic worklist view, and powerful search capabilities that streamline access to studies, patients, and system resources.
This guide outlines the key components of the homepage and explains how to use them effectively to optimize your workflow within OmegaAI.
Left-Side Navigation Panel
The left-side navigation panel gives you quick access to all major areas of OmegaAI. Click the hamburger icon at the top left to expand or collapse the panel at any time.

Main Options
-
Add New: Create a new order or import studies into the system. See Import & New Order for more details.
-
Worklist: Your primary working view. Returns you to the main list of studies. See Worklist Guide for more details.
-
Organization: Manage organisational settings. Access depends on your user permissions. See Adding & Managing Organizations for more details.
-
Logs: View audit documents, task logs, and system activity history. See Logs Help Article for more details.
-
Teaching Folder: Browse cases saved for educational and training purposes. See Teaching Folder for more details.
-
Root: Access Root-level features and analytics. Visibility depends on your user permissions. See Root Business Analytics and Reporting for more details.
Lower Section
-
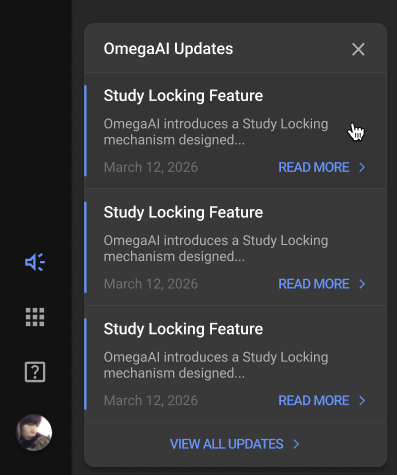
Updates: The Updates feature provides:
- Notifications for newly released features
- Quick access to recent product announcements
- Direct links to detailed help articles and documentation
More Details:
-
No New Updates: When there are no newly released features, the Updates icon appears without any notification badge.
-
New Updates Available: When new features or announcements are released, a circular notification indicator appears on the Updates icon.
-
Opening the Updates Panel:
To view feature announcements
-
Click the Updates icon from the sidebar.
The Updates panel opens and displays the latest 3 feature announcements ordered from newest to oldest, as well as provides links to relevant help articles.
-
-
Help: Opens the help manual for guidance and support.
-
User Profile: Shown at the bottom of the panel with your name and initials. Click to manage your account settings and customise your workstation. See User Profile for more details.
Worklist
The central area of the homepage displays the worklist, which is crucial for daily operations.
Worklist Header
The worklist name is displayed at the top left. The following controls are available in the header:

-
Try New Worklist toggle: Switch between the legacy and updated worklist experience.
-
Refresh icon (↻): Reloads the worklist to pull in the latest studies and status updates.
-
Download Data (↓): Exports the current worklist data in CSV or Excel format.
-
Study counter (e.g. 4 / 52): Shows how many studies are selected out of the total currently loaded. Use the checkbox on each row to select individual studies. Click the check mark in the header to deselect all selected studies.
-
Help with New Worklist (?): Click to open the New Worklist | OmegaAI User Guide page for detailed guidance on the new worklist experience.
Selecting and Creating a Worklist
Click the dropdown arrow next to the worklist name to open the worklist panel. From here you can search by worklist name, user, or role, and filter by User Worklist or Role Worklist. Select any worklist from the list to switch to it — a check mark indicates the currently active worklist.

To create a new worklist, click one of the options at the bottom of the panel:
- Create User Worklist — Creates a worklist specific to an individual user.
- Create Role Worklist — Creates a worklist assigned to a role within your organisation.
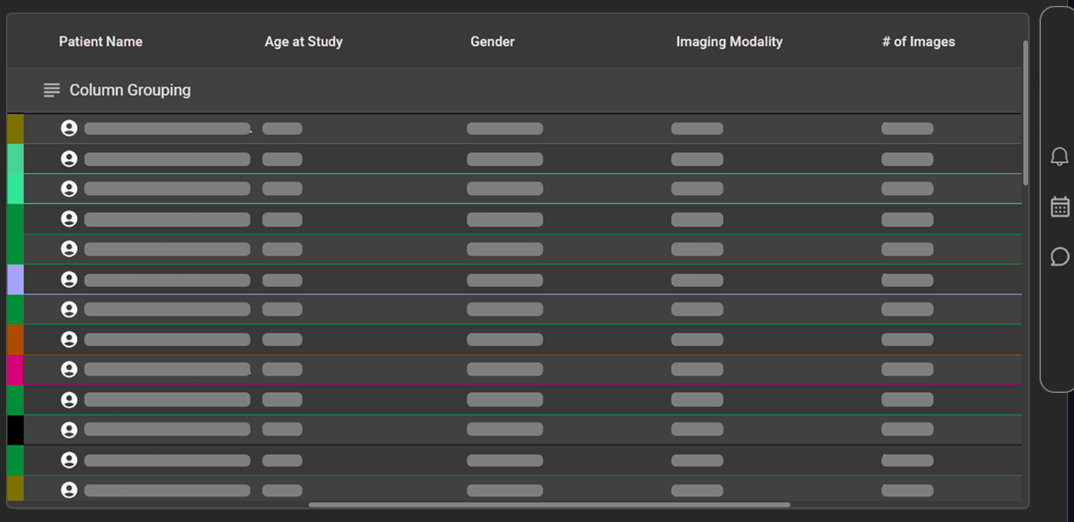
Column Grouping
Drag any column header into the Column Grouping area at the top of the table to group rows by that field. For example, grouping by Accession # will collapse rows into expandable groups for easier review. See the Worklist Guide for more details.
Using Global Search
The Global Search feature in OmegaAI provides search functionality that caters to various user needs. Located at the top centre of the page, it also has built-in voice recognition that can be used to execute commands. See Global Search | OmegaAI User Guide for full details.
Click the Search bar to open the search panel. From here you can:
- Filter by type — Select from Study, Patient, User, Organization, or DICOM to narrow your search.
- Emergency Access — Click this option to gain expedited access to patient studies in critical situations.
- Recently Viewed — Quickly return to records you have recently opened.
- Recently Searched — Revisit previous search terms for faster access.
Updates
Unread Updates
Newly released updates that have not yet been viewed are marked with a blue unread indicator inside the Updates panel.
When the user opens the Updates panel:
- The notification badge on the sidebar icon is cleared.
- Previously unread posts are marked as viewed.
Previously Viewed Updates
Updates that were already viewed:
- Continue to appear in the panel
- Do not display unread indicators
Note: Users can revisit previous announcements at any time.
Partial Read Behaviour
After opening the Updates panel:
- The sidebar notification badge disappears.
- Individual update entries that were previously unread may still remain visually distinguishable inside the panel.
This allows users to identify which announcements were newly released during their last session.
Viewing Detailed Help Articles
Each update post includes a link to additional documentation and release details.
To access more information:
- Open the Updates panel.
- Select an update post.
- You will be redirected to the OmegaAI Help Blog.
Notification Persistence
The notification system remembers whether updates have been viewed.
If a user does not open the Updates panel:
- The notification indicator continues to appear across future sessions.
Once the Updates panel is opened:
- The notification badge is cleared automatically.
Right-Side Navigation Panel
Additional tools and features are accessible via the icons on the right-side navigation panel.
| Notifications: Click the bell icon to access your notifications and system alerts. See Notifications for more details. Scheduler: Click the calendar icon to view and manage schedules. See Scheduler for more details. Chat: Click the chat icon to communicate with other users within the system. See Using Chat for more details. |  |