Using the Worklist Screen
This article explains how to work with studies once you have a worklist open in OmegaAI: reading a study's status, priority, and other at-a-glance indicators; selecting one or more studies; grouping studies by column; and using the right-click menu to act on selected studies.
Before you begin
- You need an open worklist. See Worklist Overview for how to open and switch worklists.
- Some actions described in this article — deleting a study, viewing audit logs — depend on your assigned permissions. See Worklist Overview: Permissions and access.
Read the study status color bar
Every row in the worklist shows a solid color bar along its far-left edge. This bar indicates the study's current status.
- The bar stays visible on the left edge even when you scroll the worklist horizontally.
- The bar updates automatically the moment a study's status changes — you don't need to refresh the worklist.
- Hovering over the bar shows the exact status as a tooltip (for example,
Status: Exam Completed).
Note: The color assigned to each status is configurable per organization. The colors in the table below may not match what you see if your administrator has customized them. A custom status that hasn't been assigned a color yet shows as a plain black bar.
Tip: Hover over any status bar to confirm exactly what it means, rather than relying on memorized colors. This is especially useful for a custom status or one your organization has recolored.
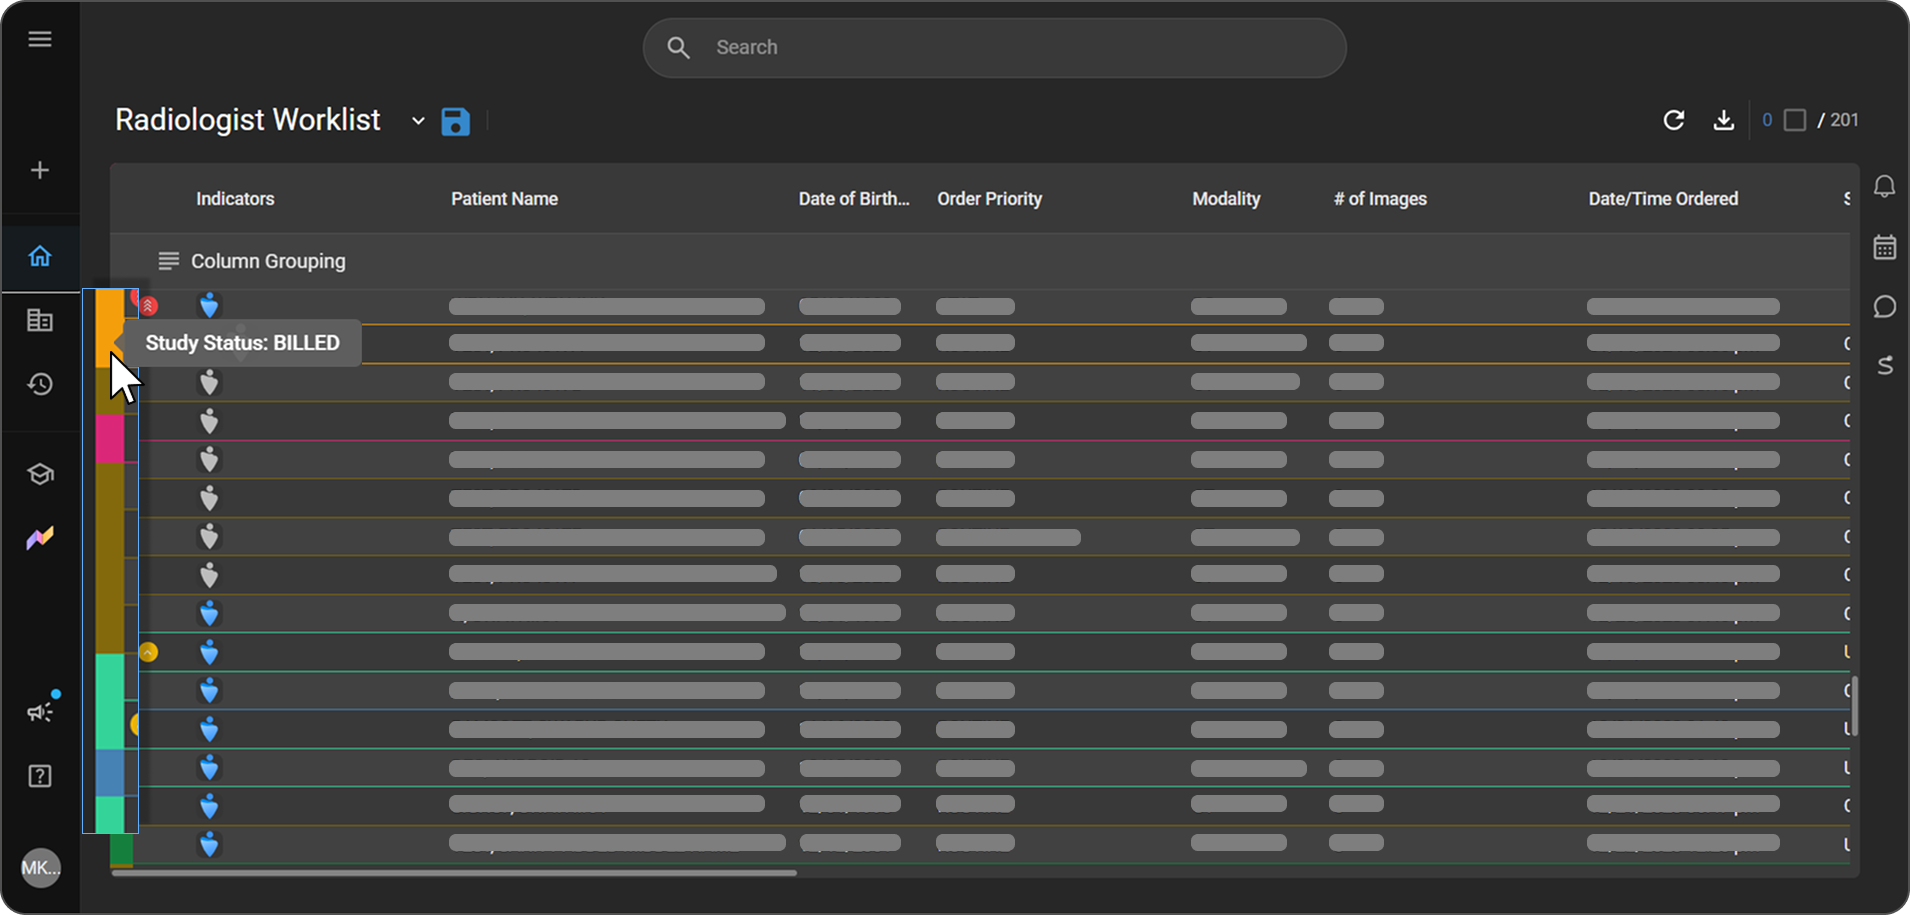
To change a study's status, see Update the study status in the right-click menu, below. See Study Status on the OmegaAI help site for how administrators configure and customize statuses.
View and change a study's priority
Each study's priority shows as a small colored chip in its own unlabeled column, pinned to the left edge of every row (immediately to the right of the study status color bar, and before the Indicators column). This chip:
- Stays visible even when you scroll the worklist horizontally.
- Cannot be hidden, reordered, or resized.
- Tints the row's text to match the chip's color, so a high-priority row stands out even when you're not looking directly at the chip.
| Priority | Chip color | Row text tint |
|---|---|---|
| STAT | Red | Light pink |
| ASAP | Orange | Light orange |
| Urgent | Yellow | Light yellow |
| Routine | No chip shown (blank cell) | None (default color) |
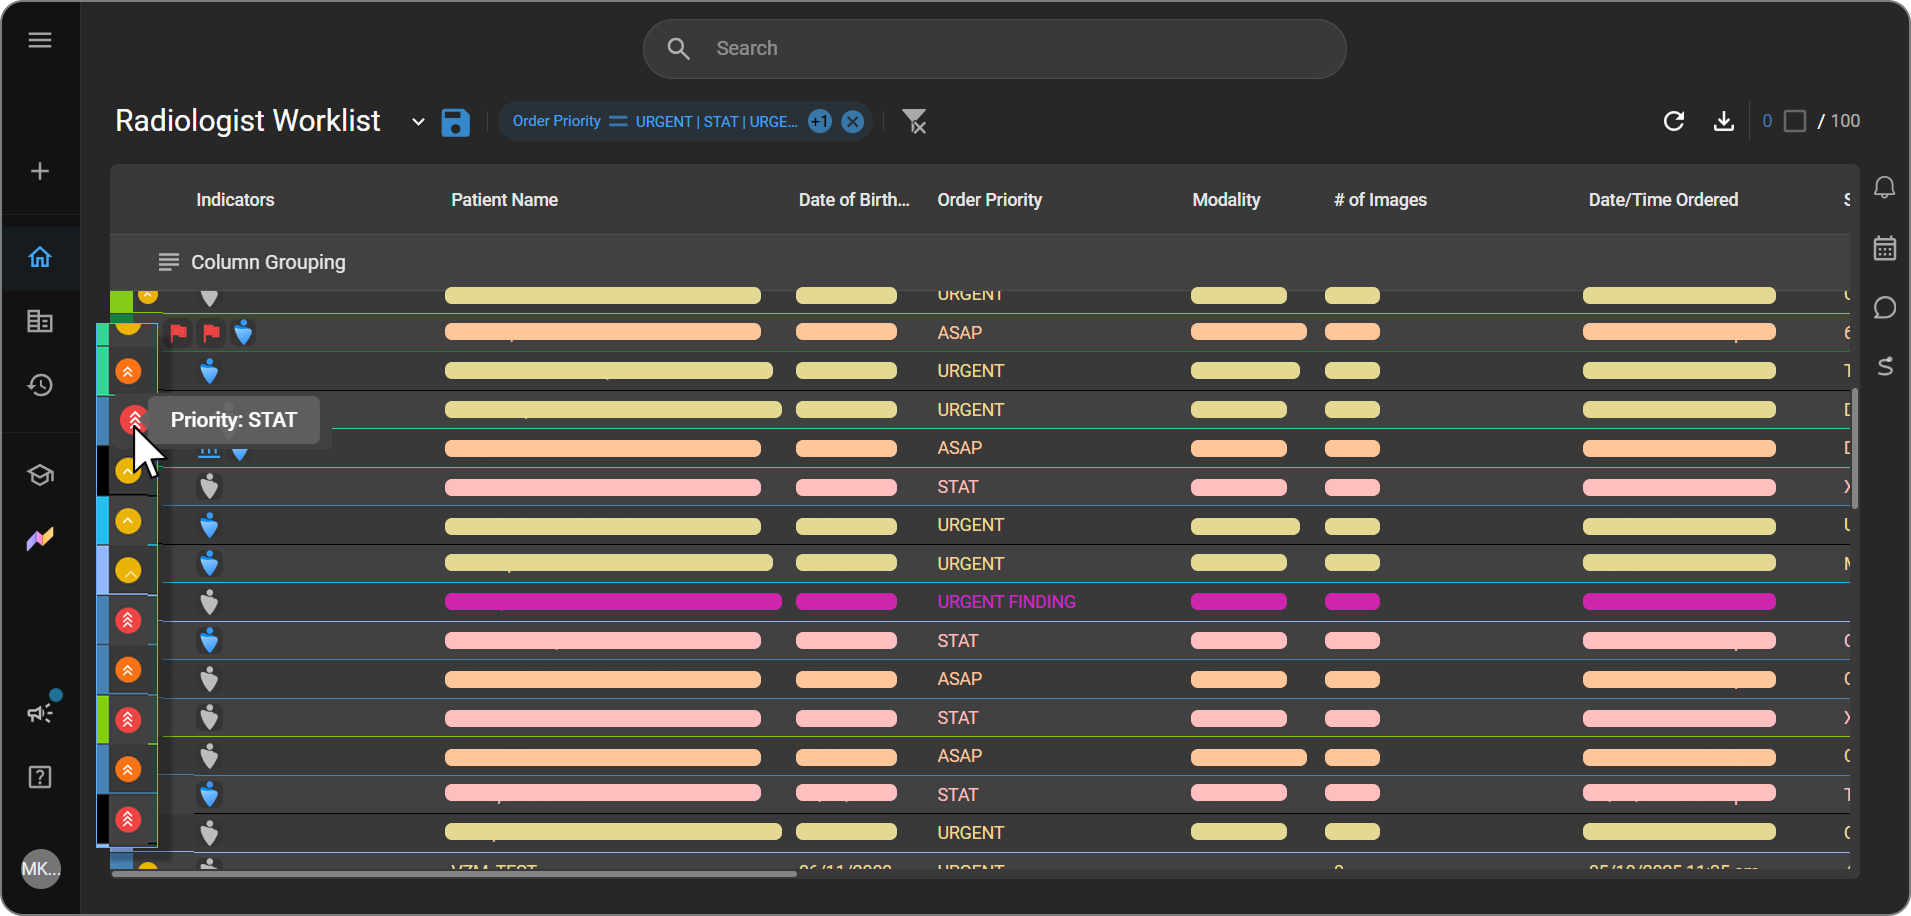
Note: Your organization can also define custom priorities that nest underneath one of the four standard priorities above (for example, Urgent Finding, nested under Urgent) — each with its own name, icon, color, and sort order. An administrator manages these from the Order Priorities page under organization settings; the four standard priorities themselves are fixed there and can't be removed. If you see a priority value not listed in this article, it's most likely one of these organization-specific custom priorities.
Change a study's priority
|
|
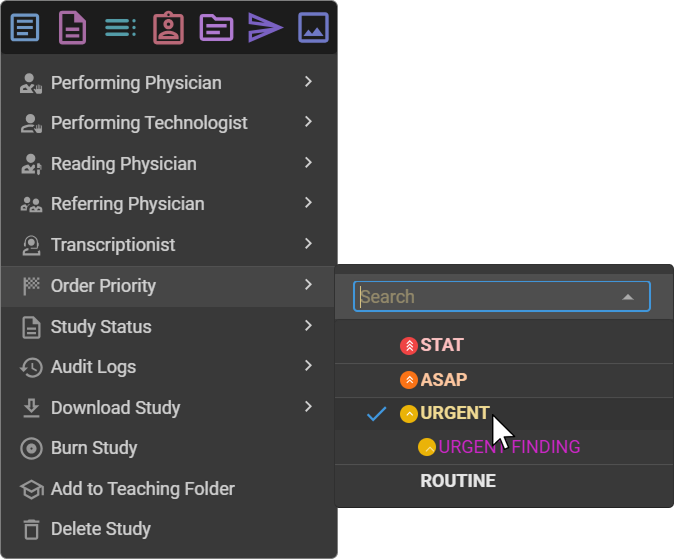
Expected result: The study's priority updates immediately. The priority chip, the row's text tint, and the Order Priority column all reflect the new value.
Understand the Indicators column
Each row also has an Indicators column showing icons for study- or patient-level conditions worth knowing at a glance. Hover over an icon to see a tooltip identifying what it represents.
The Indicators column bundles several distinct indicator types together. Eligibility, Prior Authorization, Charge Posting, and Blume Patient Portal Status must each be individually enabled before they appear in the column and its filter (see Enable an indicator type, below).
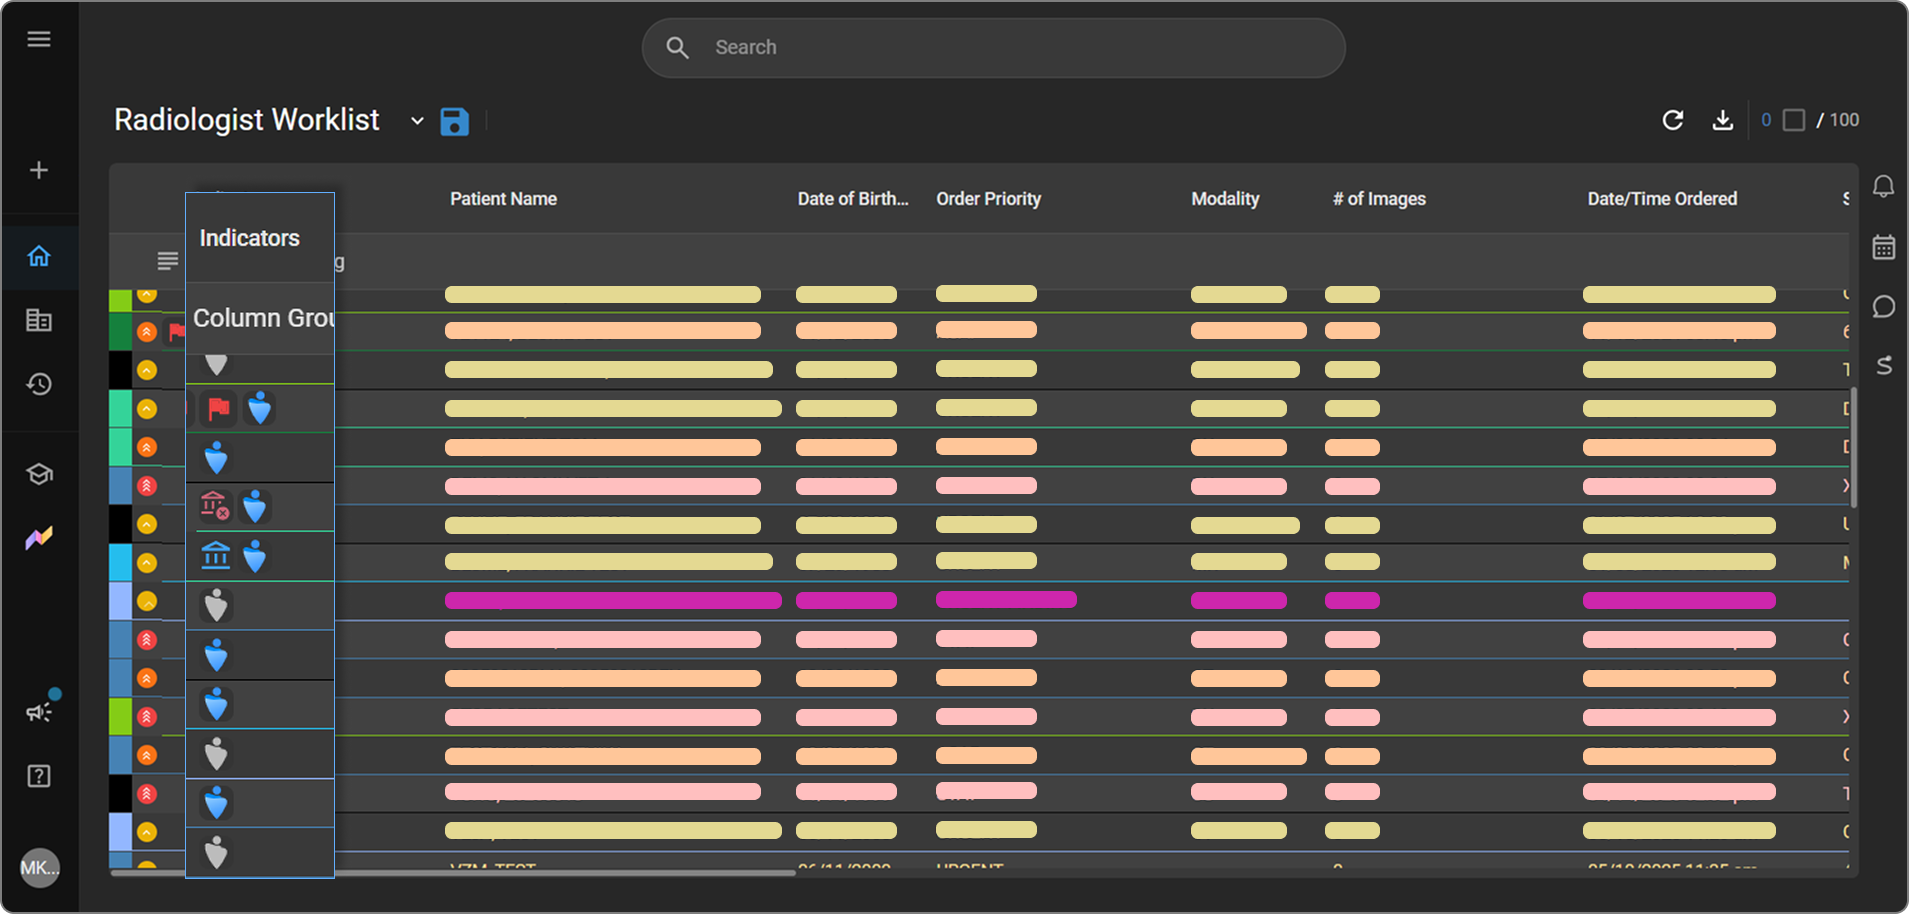
Enable an indicator type
|
|
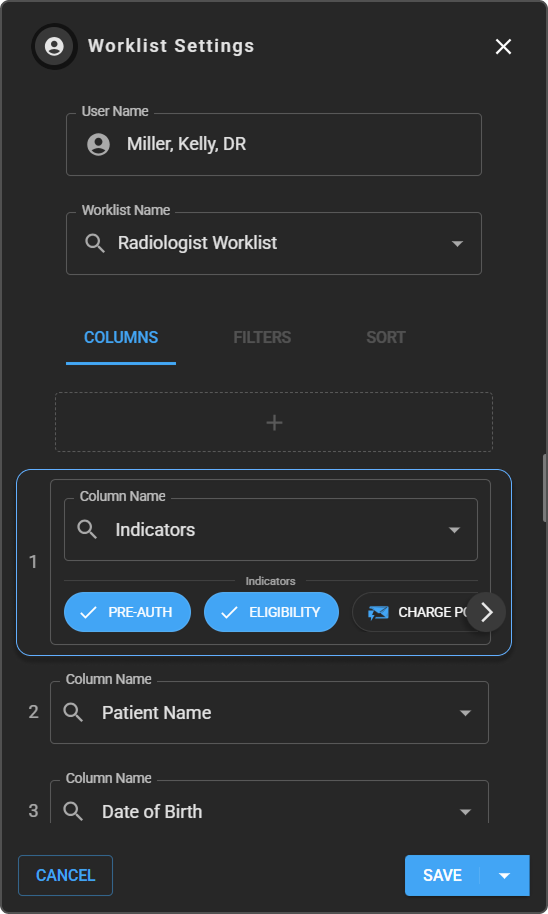
See Customizing a Worklist: Manage columns for adding and configuring columns generally.
Filter by indicator
Click the Indicators column header to filter by indicator, the same way as any other column. See Filter by a column in Customizing a Worklist. |
|
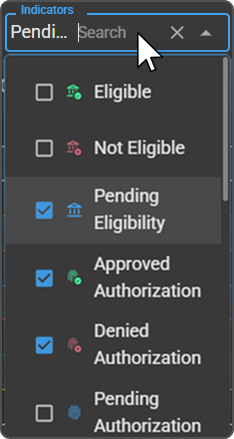
The filter options are:
| Indicator type | Filterable values |
|---|---|
| Eligibility | Eligible, Not Eligible, Pending Eligibility |
| Prior Authorization | Approved Authorization, Denied Authorization, Pending Authorization |
| Charge Posting | Charge Posted, Charge Post Failed, Charge Post Pending |
| Critical Findings | Critical Findings (flag present or not present) |
| Blume Patient Portal Status | Blume Active, Blume Invite Sent, Blume Invite Error, Blume Invite Not Sent |
Note: Prior Authorization is labeled Pre-Auth in the Indicators column's toggle chips (see Enable an indicator type), and Prior Authorization as the panel title (see Prior authorization). All three names refer to the same feature.
Eligibility
Each study's insurance eligibility shows as an icon in the Indicators column:
|
|
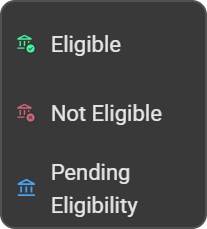
Hover over the icon for a tooltip confirming the state (Eligible, Not Eligible, or Pending Eligibility). Clicking the icon opens the same Prior Authorization panel described below .
Prior authorization
To open a study's authorization details, click the study's Approved, Denied, or Pending Authorization icon in the Indicators column. This opens a Prior Authorization panel for that study. Clicking an Eligibility icon (Eligible, Not Eligible, or Pending Eligibility) opens this same panel. |
|
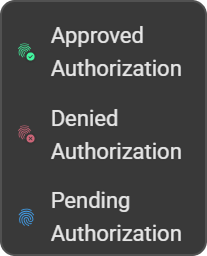
To open a study's authorization details, click the study's Approved, Denied, or Pending Authorization icon in the Indicators column. This opens a Prior Authorization panel for that study. Clicking an Eligibility icon (Eligible, Not Eligible, or Pending Eligibility) opens this same panel. |
|
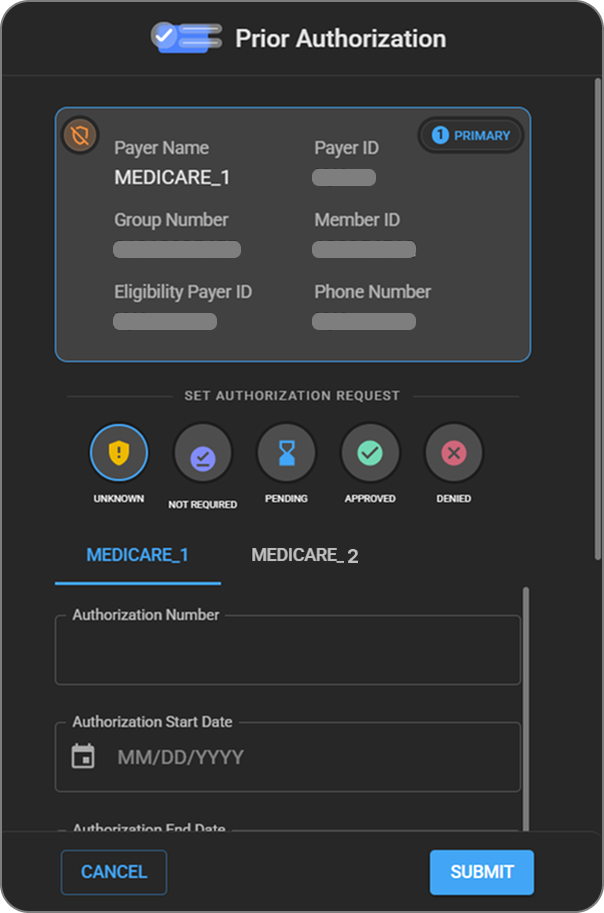
For the full procedure — selecting an insurance tab when a patient has more than one coverage, reviewing the auto-populated payer details, setting the authorization status, and filling in the authorization fields — see Adding Prior Authorization to a Patient Study on the OmegaAI help site.
Note: Only Approved, Denied, and Pending appear as filterable options in the Indicators column filter. Unknown and Not Required do not show an icon in the worklist row, so there is nothing to filter on for those two statuses.
Charge posting
Each study's charge-posting status shows as an icon in the Indicators column, using the same color convention as Eligibility and Prior Authorization. All three states use an envelope (mail) icon, distinguished by color:
|
|
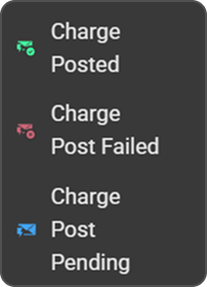
Hover over the icon for a tooltip confirming the state. As with Eligibility, clicking the icon does not open a panel — charge-posting status is not set from the worklist.
See Post a Charge on the OmegaAI help site for how a charge is posted in the first place.
Critical findings
A study can be flagged to indicate it has a critical finding. |
|

- Default state: every study starts with no critical finding set (no flag).
- Who can set or change it: only the study's assigned Reading Physician — not the Referring Physician — and only when their role has the Misc. Critical Findings permission enabled.
- Who can view it: anyone with access to the worklist, regardless of role or permissions, once the flag is set.
- Where it appears: as a red flag icon in the Indicators column, and separately next to the row checkbox at the left edge (its original location before it was added to the Indicators column). A study with a critical finding can show the flag in both places at once.
- Filtering: the Indicators filter can target flagged and unflagged studies separately. Critical Findings is not checked by default in the filter.
Blume Patient Portal status
The Blume indicator shows whether the study's patient has a Blume Patient Portal account, so you don't have to open the patient record to check. All four states use the Blume Patient Portal icon, distinguished by color:
|
|
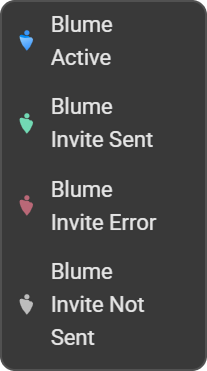
Hover over the icon for a tooltip confirming the state (Active, Invite Sent, Invite Not Sent, or Invite Error).
As with the other indicator types, Blume must be enabled in the Indicators column's toggle chips before Blume Status becomes sortable or filterable (see Enable an indicator type). Once enabled, the worklist can be filtered by Blume Status the same way as any other column. See Filter by a column in Customizing a Worklist.
To resend a Blume invitation:
|
|
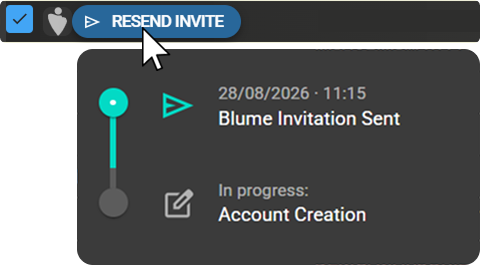
Expected result: OmegaAI resends the Blume invitation to the patient. Invitations can only be resent one at a time from the worklist — there is no bulk-resend option.
Select studies
Select a single study
- Hover over the study's row to reveal a checkbox on the left edge, before the first column.
- Select the checkbox.
Expected result: The checkbox stays selected and the row stays highlighted even after you move the mouse away.
Select multiple studies
| Method | How |
|---|---|
| Select another checkbox | Select the checkbox of another study to add it to your selection. Repeat for each additional study. |
Ctrl+Click | Hold Ctrl while clicking worklist rows to add or remove individual studies from your selection, one at a time. |
Shift+Click | Hold Shift while clicking a worklist row to select every row between the first one you selected and the one you just clicked. |
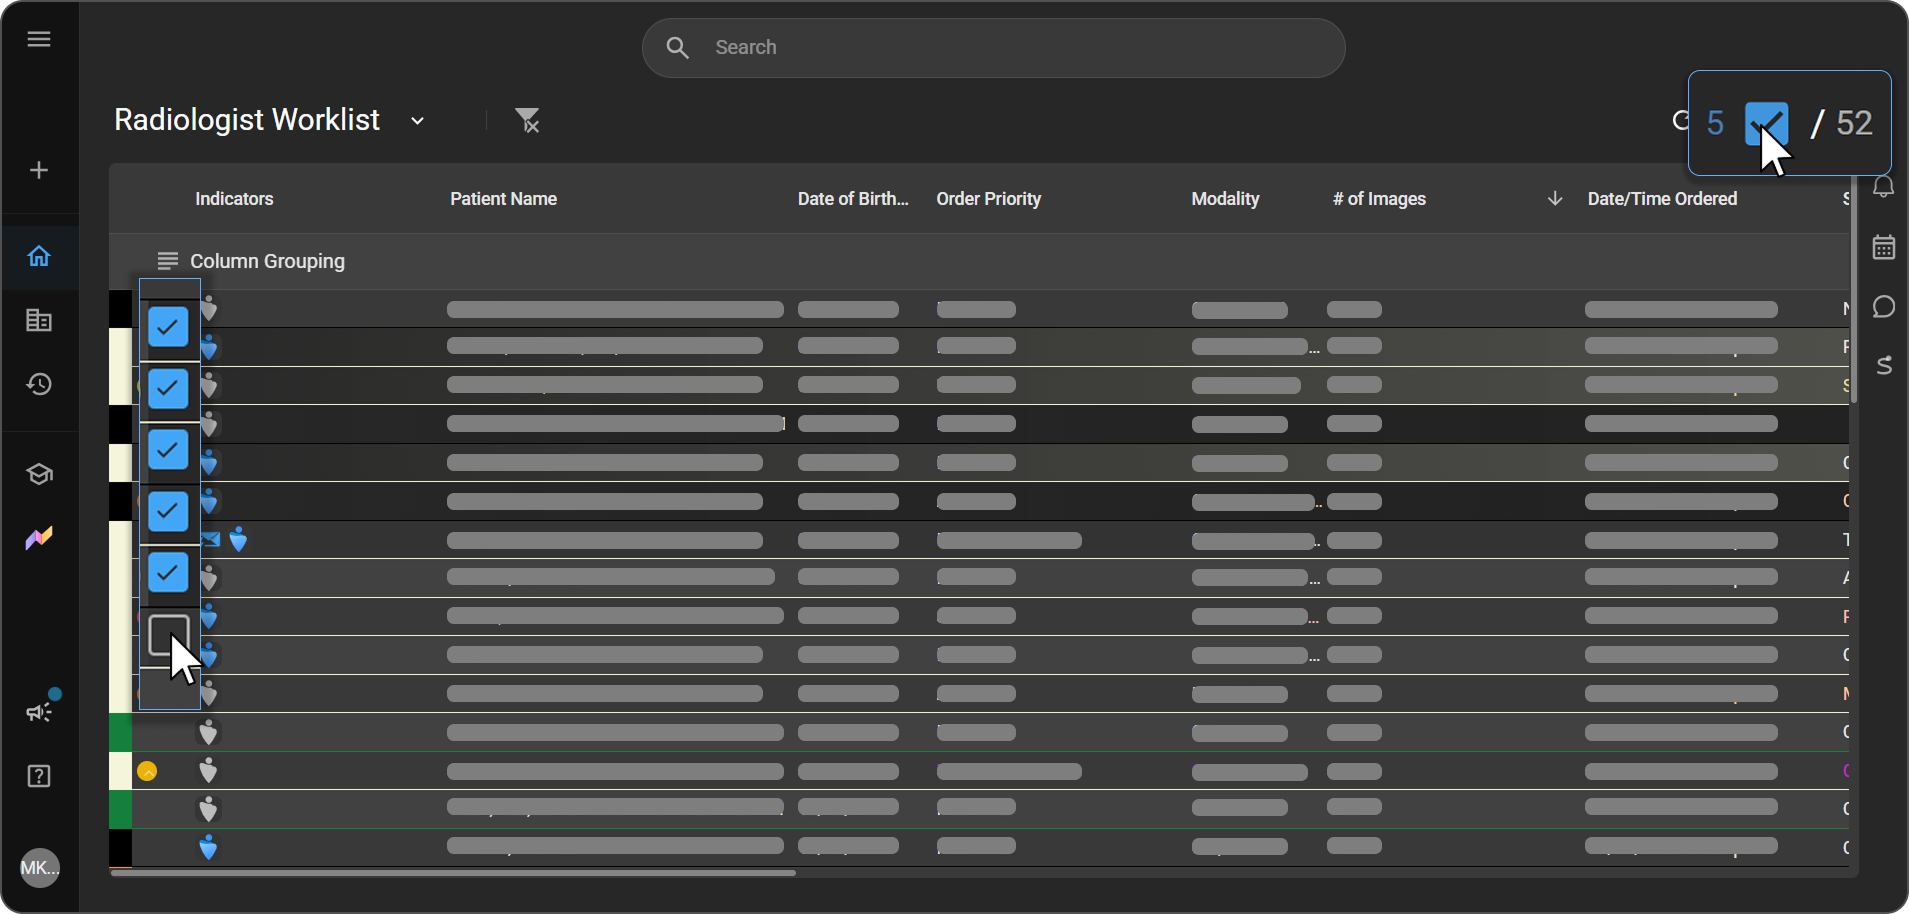
Select or view all studies
The number of studies currently selected appears next to the refresh and download icons at the top of the worklist, alongside the total (for example, 4 / 50). Select the checkbox next to that count to deselect every selected study at once.
Group studies by column
- Drag a column header — for example, Modality or Study Status — into the Column Grouping row at the top of the worklist.
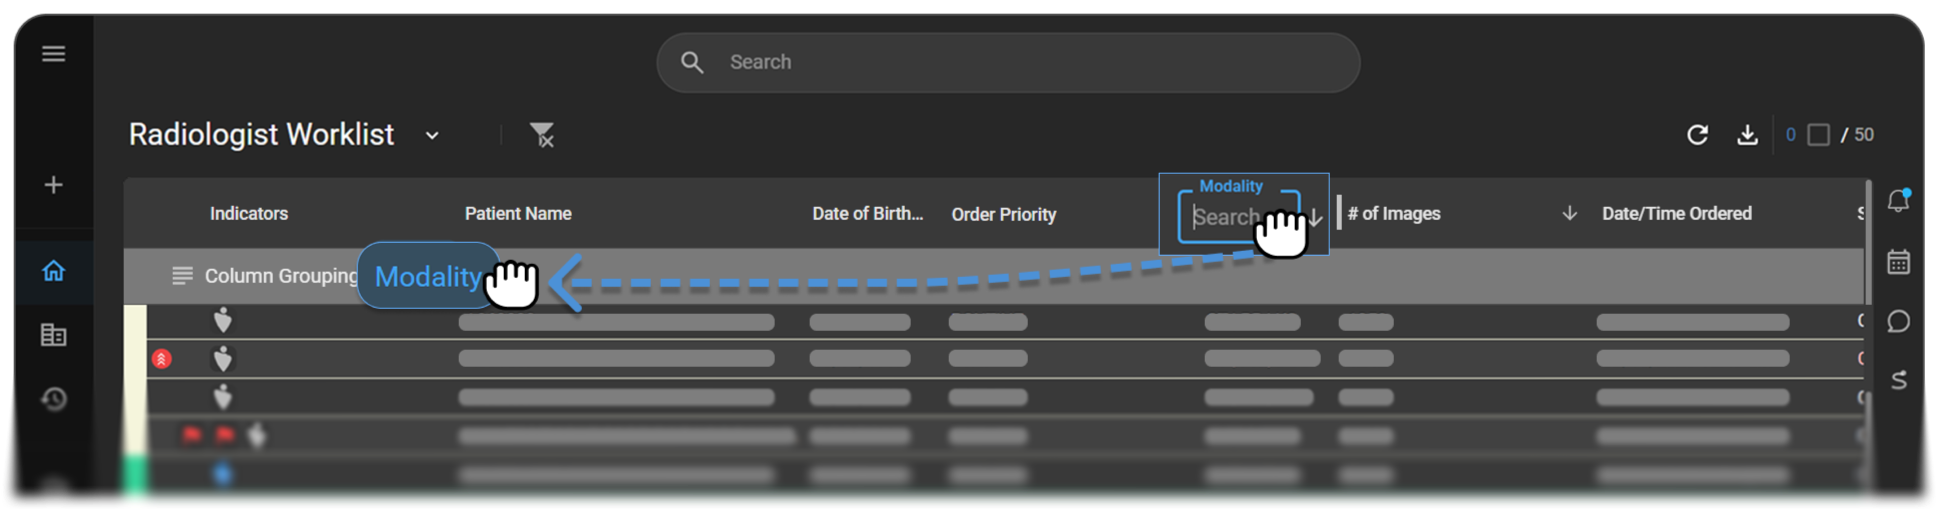
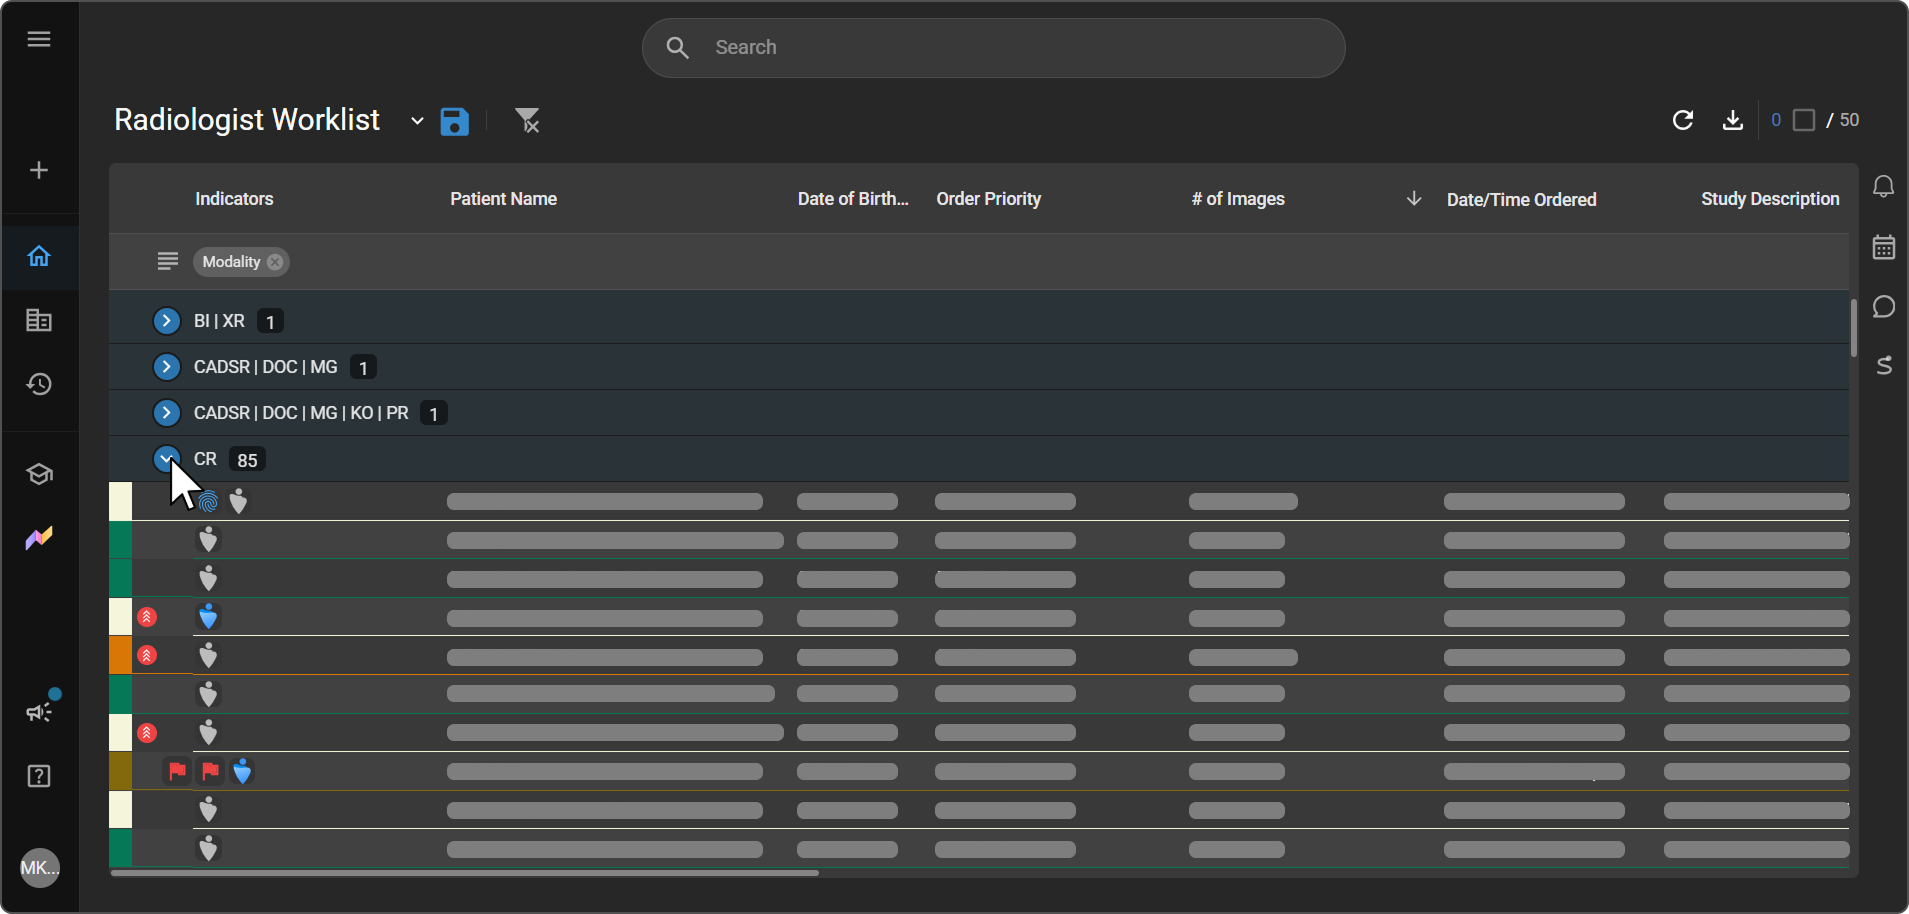
Expected result: The studies reorganize into collapsed groups by that field's value. The grouped column disappears from the table itself, since its value now appears as each group's heading instead. The field you grouped by appears as a removable label in the Column Grouping row.
- Each group appears as a single collapsed row showing its value and a count of the studies inside it (for example,
CT 2). - Click the arrow on a group to expand it and reveal its individual studies, or collapse the group again to hide them.
- To remove the grouping, click the × on the label in the Column Grouping row to return to the normal list.
For more on customizing which columns appear, filtering, and sorting, see Customizing a Worklist.
Use the right-click menu
Open the menu
Right-click a selected study to open a menu with two parts: a row of quick-access icons, and below that, a list of actions.
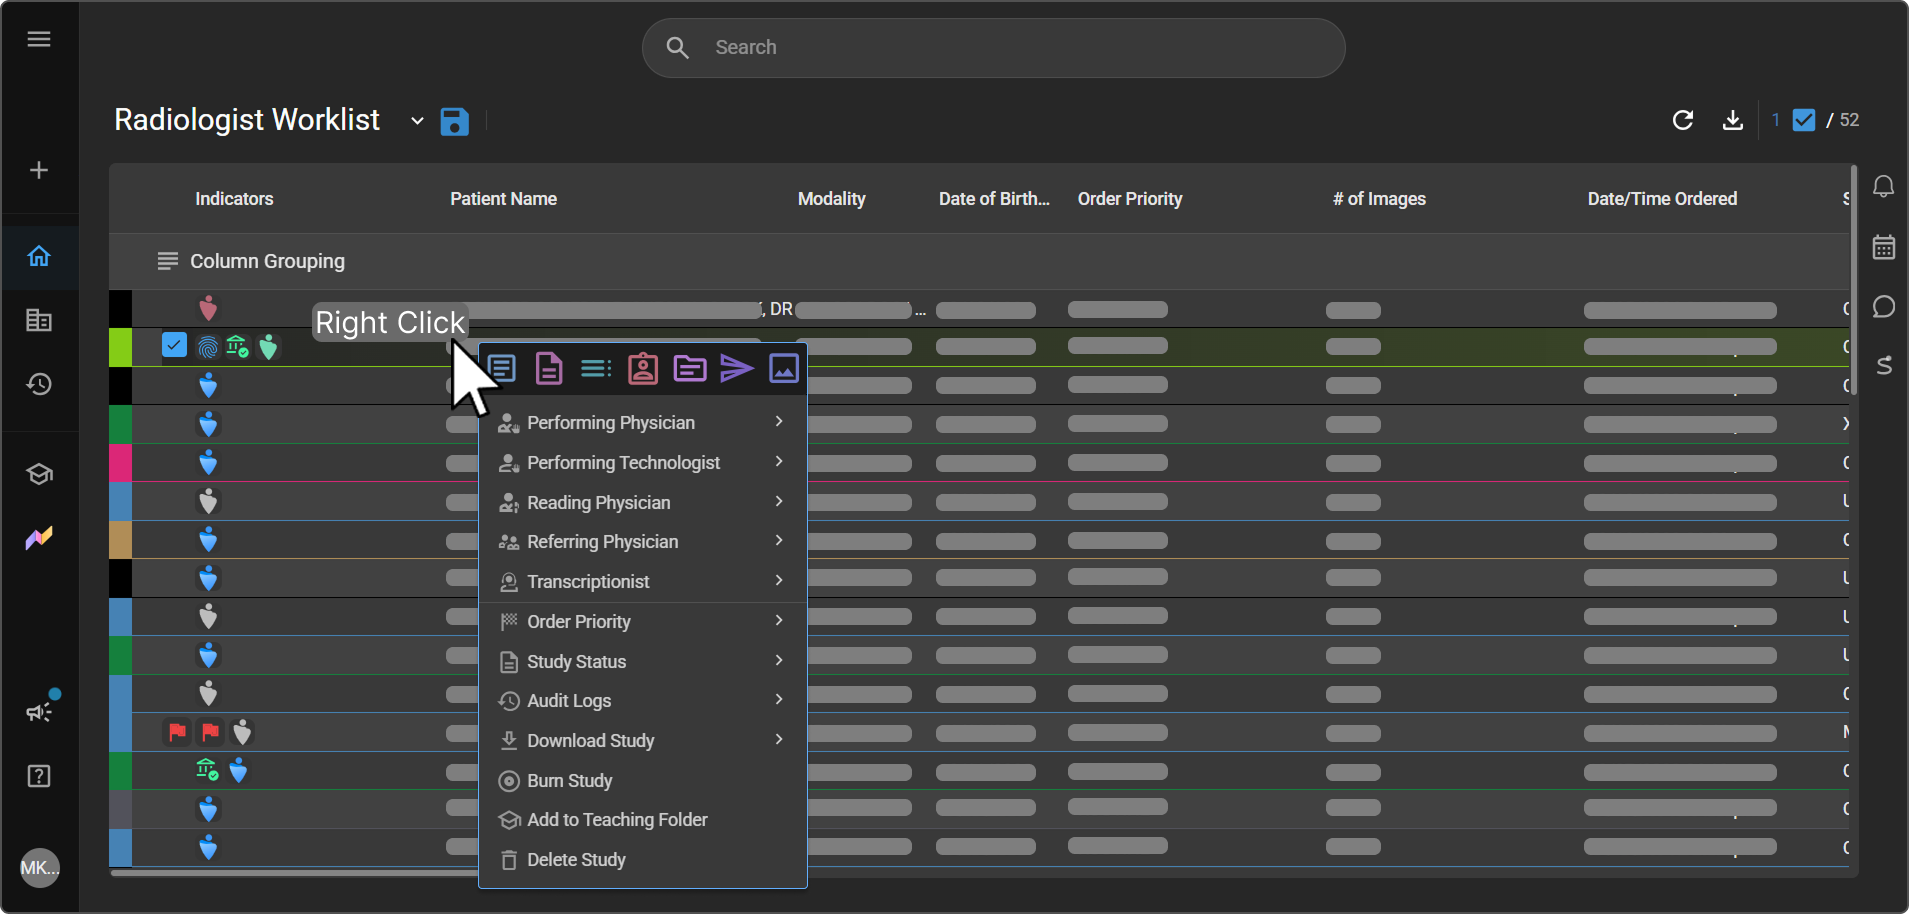
| Icon | Opens |
|---|---|
| Document Viewer | The study's documents. See Document Viewer. |
| Study | The study page. See the Study page. |
| Order | The order page. See the Order page. |
| Patient | The patient record. See Managing Patient Record. |
| Study History | The patient's study history. See Managing Patient Record: Study History. |
| Send | The Send panel, for transmitting the report or study elsewhere. See Sending Reports and Studies. |
| Image Viewer | The study's images. See Image Viewer. |
Available actions
Each action available from the right-click menu is described below.
Assign a role
Performing Physician, Performing Technologist, Reading Physician, Referring Physician, and Transcriptionist each open a search dropdown (labeled, for example,
|
|
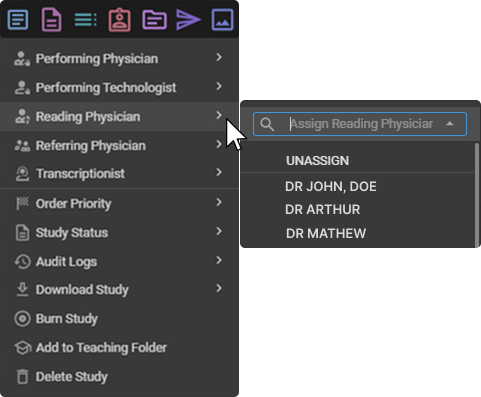
Expected result: The person you selected (or no one, if you chose UNASSIGN) is now shown as assigned to that role, and the corresponding column on the worklist updates to match.
View details about a person before assigning
If two or more people in the list share the same name, you can view each person's details to confirm you're assigning the right one. Details are available in all five role dropdowns.
-
In the role's search dropdown, hover over a name. An information icon (ⓘ) appears at the right of the row.
-
Hover over the information icon. A details card opens next to the list. The card opens only when you hover over the icon, not the rest of the row.
-
Review the details, then select the name to assign that person.
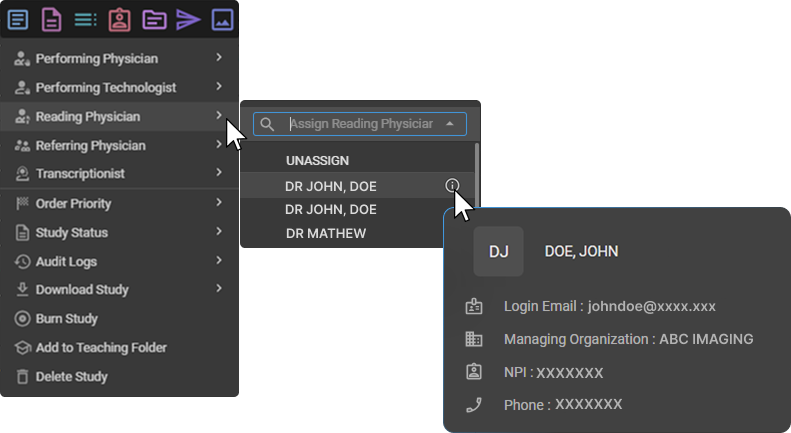
The details card shows:
| Field | Description |
|---|---|
| Name | The person's display name, with an avatar showing their initial. |
| Login Email | The email address the person uses to sign in to OmegaAI. |
| Managing Organization | The person's managing organization that matches the selected study. The card shows one managing organization only, even if the person belongs to more than one. |
| NPI | The person's National Provider Identifier (NPI). |
| Phone | The person's phone number. |
Note: If a detail isn't on file for that person, the card shows
N/Afor that field.
Tip: Use Login Email or NPI to tell apart people who share the same name. These values are unique to each person.
Change the order priority
Order Priority changes the study's priority. See View and change a study's priority, earlier in this article, for the available values and the full procedure.
Update the study status
Study Status updates the study's status directly from the worklist.
|
|
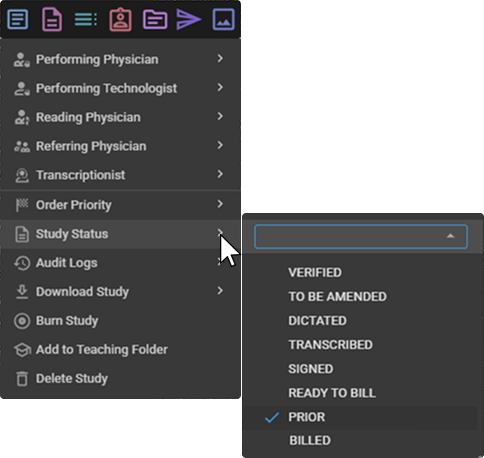
Expected result: The study's status updates immediately, and the color bar on that row changes to match. See Read the study status color bar, earlier in this article, for what each status looks like.
See Study Status on the OmegaAI help site for how administrators configure and customize statuses.
View audit logs
Audit Logs shows the history of changes made to the study. Only available when exactly one study is selected.
Hover over Audit Logs to open a submenu with two options:
|
|
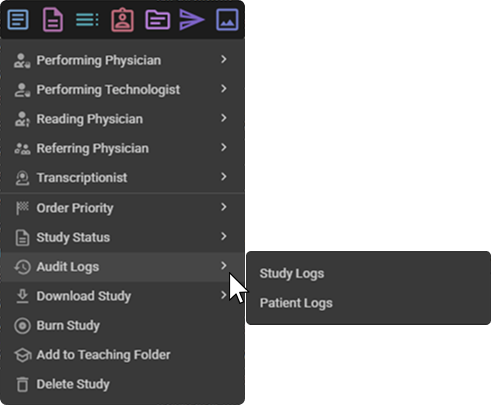
Note: What each option shows or opens once selected isn't confirmed yet — only that these are the two available options.
Download or burn the study
Download Study and Burn Study download or burn the study's files to disc. See Exporting Worklist Data and Study Files for full details, including anonymized/de-identified download options.
Link or merge patient records
Link & Merge appears only when exactly two studies are selected. It offers Merge Study, Merge Patient, or Link Patient, depending on whether the two studies share a patient. See Link and Merge Patient Workflow for the full process.
Add to a teaching folder
Add to Teaching Folder saves the study into a teaching collection for later reference. See Teaching Folder for details.
Delete a study
Delete Study permanently removes the study. It only appears if your role has the Delete Study permission. See Worklist Overview: Permissions and access.
Caution: Deleting a study cannot be undone from the worklist. Confirm you have the correct study selected before choosing Delete Study.
What's available by selection count
Two factors affect which actions appear in the right-click menu: how many studies you've selected, and whether those studies share the same managing organization.
| Factor | What it affects |
|---|---|
| Exactly one study selected | Every action is available, including Audit Logs, which only appears when a single study is selected. |
| More than one study selected | Audit Logs is not available. Role, priority, and status assignment actions stay available for any number of studies, as long as every selected study shares the same managing organization. These actions are hidden as soon as the selection spans more than one organization, regardless of how many studies are selected. |
| Exactly two studies selected | Link & Merge also appears (when eligible), offering Merge Study, Merge Patient, or Link Patient depending on whether the two studies share a patient. It does not appear for three or more studies. See Link and Merge Patient Workflow for exactly which organizations qualify for each option. |
Bulk-assign a field to multiple studies
As an alternative to the general right-click menu — useful when your selection spans more than one organization, or for a quicker single-field update — assign a role, priority, or status using the column-click shortcut instead:
- Right-click directly on the column you want to change — for example, the Reading Physician cell — instead of a blank part of the row.
- In the search box that opens, type a name, or choose a value for Priority or Status.
- Press
Enter.
Expected result: The field updates for every currently selected study at once.
Troubleshooting
| Symptom | Likely cause |
|---|---|
| The Audit Logs option is missing from the right-click menu. | Audit Logs is only available when exactly one study is selected. |
| Role, priority, or status options are missing. | Your selected studies don't all share the same managing organization. These options require every selected study to share one. |
| Link & Merge is missing. | Link & Merge only appears when exactly two studies are selected. For three or more studies, use Bulk-assign a field to multiple studies instead. |
| The Delete Study option is missing from the menu. | Your role doesn't have the Delete Study permission. See Worklist Overview: Permissions and access. |
Related articles
- Worklist Overview — User vs. Role Worklists, the Worklist Selector, and permissions
- Customizing a Worklist — columns, filters, and sorting
- Exporting Worklist Data and Study Files — downloading, burning, and de-identified exports
- Sending Reports and Studies — sending a report or study to a physician, organization, or external user
- Link and Merge Patient Workflow — consolidating or associating patient records
- Insurance Eligibility and Prior Authorization — the eligibility and prior authorization workflow beyond the worklist's Indicators column
- Post a Charge — posting a charge, which the Charge Posting indicator reflects
- Study Status — how administrators configure and customize study statuses
- Teaching Folder — managing the collections studies are saved into from the right-click menu
- Table of Worklist Fields — the full reference list of worklist fields, including the Eligibility field