Exporting Worklist Data and Study Files
This article covers getting a copy of worklist data or study files onto your own computer. For transmitting a report or study to someone else's system instead, see Sending Reports and Studies.
Before you begin
- You need an open worklist. See Worklist Overview for opening and switching worklists.
- Downloading or burning study files works from the right-click menu — you'll need at least one study selected.
Export worklist data
- Click the Download Data icon at the top right of the worklist, next to the refresh icon.
- Choose CSV or Excel.
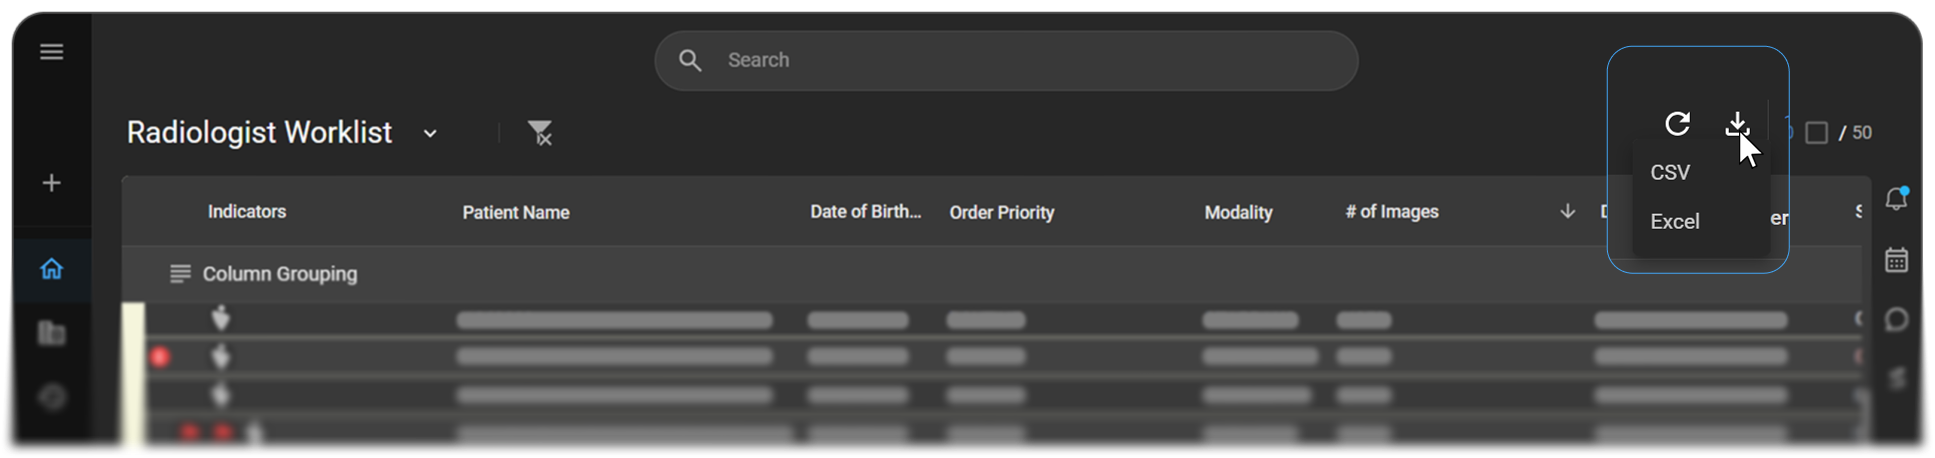
Expected result: The file downloads to your computer's Downloads folder, named "Worklist - [date]."
Important: Only the columns currently visible in your worklist are included, in the same left-to-right order they're displayed in — set up your columns the way you want them exported first. See Customizing a Worklist for adding, removing, and reordering columns.
Download or burn study files
For the study's Digital Imaging and Communications in Medicine (DICOM) images, final report, and related files, use Download Study or Burn Study from the right-click menu.
Download a study
Download Study expands into two options:
| Option | What's included |
|---|---|
| Download | DICOM image series, the final report, and any Key Object selections present on the study. Preliminary reports and study documents are excluded. |
| De-identified Download | Anonymized DICOM images only — the final report and any attached documents are excluded. Patient identifiers are removed from the DICOM metadata and any attached documents. |
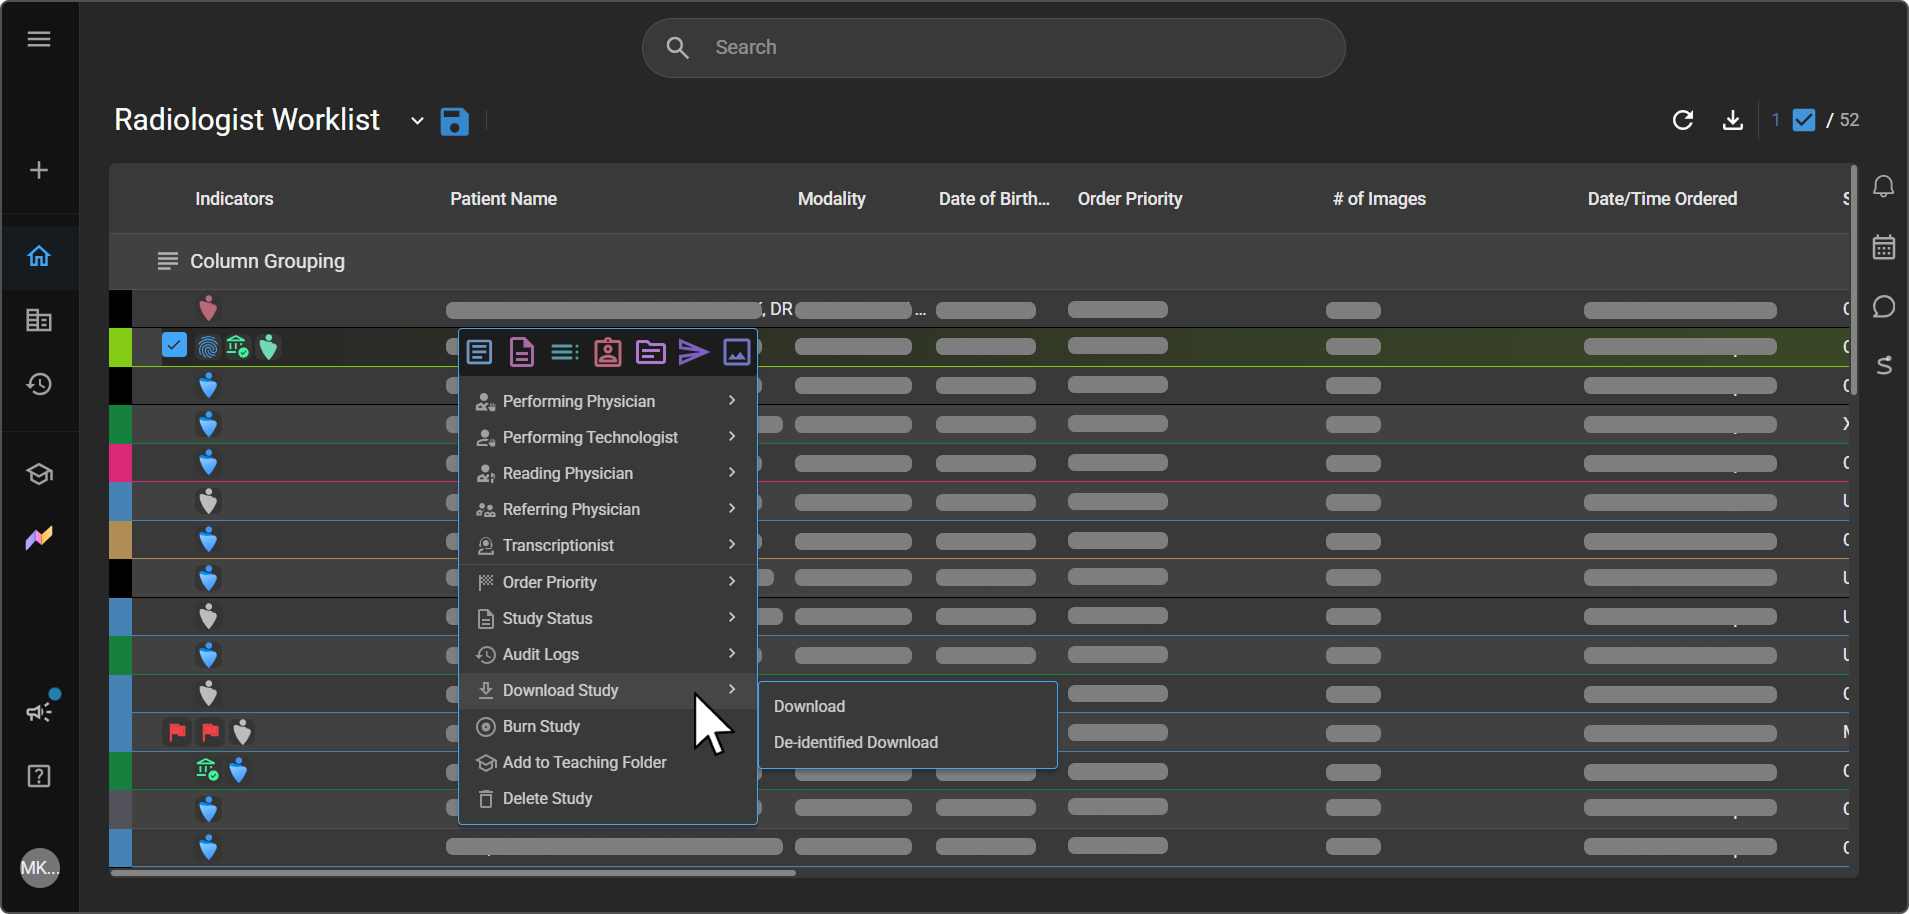
Expected result: A toast notification confirms the export — for example,
Exporting 1 studies. The download should start automatically within a few seconds.The count in the message matches however many studies you selected, and the download begins automatically once it's ready.
What's included in an export
Exports and disc burns package a consistent, clinically relevant subset of the study. The same rules apply whether you choose Download, Burn, or send a study through OmegaAI Link.
| Content | Included? | Notes |
|---|---|---|
| DICOM image series | Yes | All image series, including XA (angiography) images, render correctly in the export and on burned discs. In a De-identified Download the images are anonymized but still included. |
| Final report | Standard export only | The study's final report (a DICOM-encapsulated PDF) is included in a regular Download, Burn, or OmegaAI Link send. It is excluded from a De-identified Download. |
| Key Object (KO) selections | Yes, when present | If the study has key images, a Key Object Selection (KO) DICOM object is generated at the point of export (and when sending via OmegaAI Link), identifying the marked images. KO objects follow the DICOM C.17.6 Key Object Selection standard. |
| Preliminary reports | No | Only final reports are ever packaged. Preliminary (draft) reports are always excluded. |
| Study documents | No | Scanned referrals, insurance cards, and other attached study documents are excluded. A De-identified Download additionally excludes the final report and any DICOM-encapsulated PDFs. |
De-identified Download
When you choose De-identified Download (also labelled Download Anonymized), OmegaAI removes patient identifiers from the DICOM metadata of the exported images. In addition to the standard tag anonymization:
- Attached documents are excluded. The de-identified ZIP omits non-image content that could carry identifiable information — DICOM-encapsulated PDFs, diagnostic reports, structured reports, and document references. DICOM image series themselves remain in the export.
- A burned-in PHI warning is shown. When the de-identified download starts, a notification reminds you that anonymization removes identifiers from DICOM metadata and excludes attached documents, but does not redact patient information that is burned into the image pixels (for example, names visible on ultrasound or screen-capture images). Review the contents before sharing.
Caution: De-identification operates on DICOM tags and document content. It cannot remove text that is permanently burned into image pixels. Always review de-identified images visually before sharing them outside your organization.
Folder structure
Downloaded files follow standard DICOM folder structure:
- Top-level folder — named using the accession number followed by the Study UID.
- Second-level folders — named according to the Series UID.
- Third-level folders — each contains files named with their respective SOP UIDs, representing the DICOM image or object IDs.
See How to Access DICOM Files Exported from OmegaAI/Blume on the OmegaAI help site for how to open and view these files once downloaded.
Burn a study to disc
Burn Study is a single action — unlike Download Study, it doesn't expand into further options.
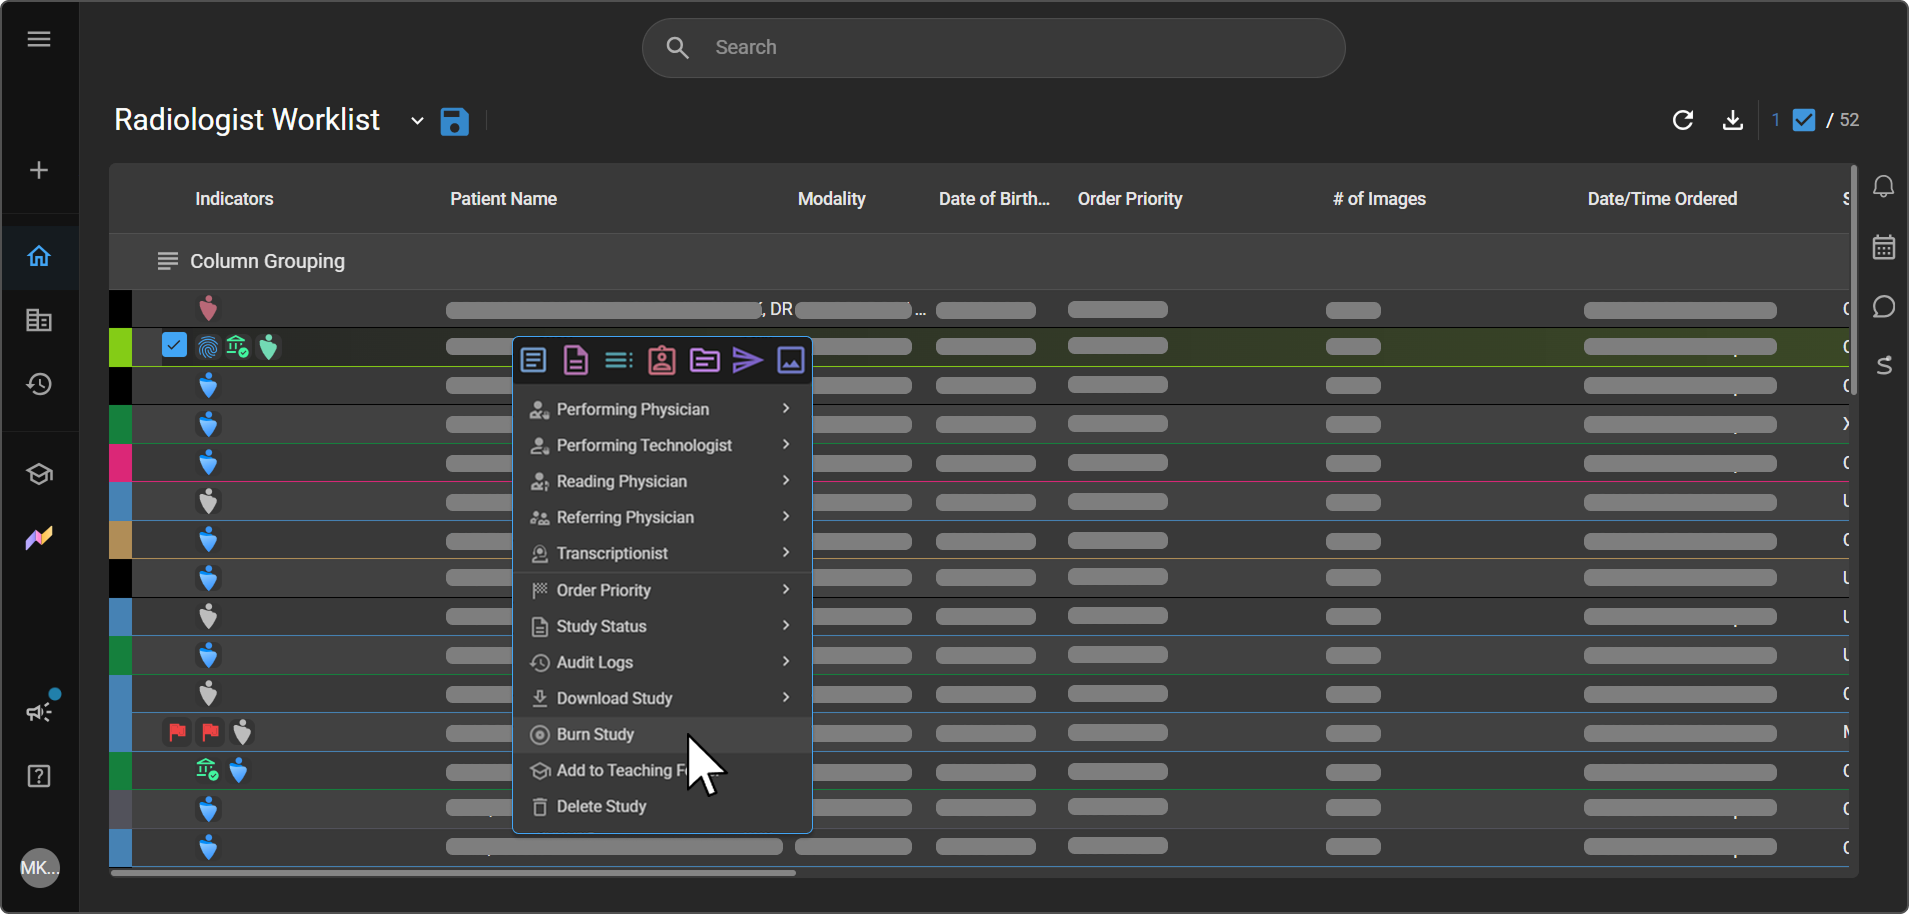
Burn conditions
Selecting Burn Study evaluates the contents of the selected study. The outcome depends on what's found:
| Condition | Outcome |
|---|---|
| Study contains images | The burn process starts successfully. |
| Study contains no images or final documents | An error appears in the bottom-left corner of the worklist: Error: Selected Study(s) do not contain any images or final documents. |
| No disc burner detected | The Windows Disc Image Burner reports that a burner wasn't found. Verify a burner is installed and that you have the appropriate permissions. |
Burn process
If the selected study contains valid images, the following happens automatically:
- A small executable file,
RamSoft.DiscImageBurner-<identifier>.exe, downloads to your computer. This file is required to carry out the disc-burning process. - Once you launch the executable, a command prompt window opens and begins preparing the burn, showing real-time progress — percentage complete, data transferred, and elapsed time.
- The Windows Disc Image Burner dialog opens. Select the appropriate disc burner from the dropdown, then click Burn to begin writing the study to the disc.
Expected result: A toast notification reads
We are in the process of preparing a CD for burning, and the download will commence shortly.
What's burned to the disc
A burned disc contains:
- The study's DICOM image series, including XA (angiography) images and their thumbnails.
- The study's final report, stored as a DICOM-encapsulated PDF.
- A Key Object Selection (KO) DICOM object, if the study has key images, marking them.
Preliminary reports and attached study documents are not burned to the disc.
Session management
These features help a burn session complete reliably, even on a slow or unstable connection:
| Feature | Details |
|---|---|
| Resumable Burns | If the connection is interrupted mid-burn, the session resumes automatically. You don't need to restart the process from the beginning. |
| Automatic Token Refresh | Authentication tokens refresh silently in the background during extended burn sessions, preventing failures caused by session expiry. |
See How to Access DICOM Files Exported from OmegaAI/Blume for how to open and view the files once burned.
Related articles
- Using the Worklist Screen — the right-click menu, including Download Study and Burn Study
- Sending Reports and Studies — transmitting a report or study, as opposed to downloading it
- Customizing a Worklist — choosing which columns appear before exporting
- Table of Worklist Fields — the full list of fields available as worklist columns, including the ones exported to CSV/Excel
- DICOM PS3.3 C.17.6 — Key Object Selection Module — the DICOM standard Key Object (KO) selections conform to
- How to Access DICOM Files Exported from OmegaAI/Blume — opening and viewing downloaded DICOM files
- Burn Study — additional detail on the Windows Disc Image Burner tool