Mastering Hanging Protocols
Overview
The Hanging Protocols Configuration Screen in OmegaAI is a comprehensive interface designed to help users configure and customize how medical imaging studies are displayed. It enables radiologists and technologists to create tailored viewing layouts that align with clinical workflows and preferences. The screen is organized into a top toolbar with tabs plus three workspace sections — Viewport Setup, View Codes and Modifiers, and Hanging Protocol Rules — each supporting a different part of the configuration process.
Refer Hanging Protocols in OmegaAI
Configuration Screen Layout
The Configuration Screen Layout provides a visual workspace where you define how images are arranged, assigned, and displayed within the viewer. This screen is divided into intuitive panels that guide you through setting up viewports, assigning view codes and modifiers, and managing rules for each viewport.

A persistent toolbar at the top of the screen surfaces the most common actions and a tab bar for switching between the parts of the configuration workflow. The workspace below the toolbar holds the layout designer on the left and the active tab's content on the right.
1. Toolbar and Tabs
Location: Top of the configuration screen, spanning the full width.
Purpose: Provides quick access to global protocol actions and switches the right-panel context.
The toolbar surfaces the following elements:
-
Protocol name — The name of the protocol currently loaded. New, unsaved protocols show a placeholder until you save.
-
Default badge — A small Default label appears next to the name when the active protocol is one of OmegaAI's built-in Default Hanging Protocols. Default protocols are read-only — clone them before editing.
-
Clone Current — Creates an editable copy of the active protocol. Use this to tailor a Default protocol or create a variant of a saved one.
-
Save Protocol — Opens the Save Protocol dialog (also available from the Matching Rules tab). The button is enabled when you have unsaved changes, are creating a new protocol, or are working on a clone, and disabled otherwise.

The tab bar immediately below the toolbar controls what the right panel displays:
| Tab | Right-panel content | When to use |
|---|---|---|
| All Protocols | Saved Protocols and Default Hanging Protocols lists, plus search | Browse, search, or open a protocol for editing |
| HP Rules | Rules editor for the currently selected viewport | Configure orientation, toggles, scaling, conditions, and window presets |
| Matching Rules | Save Protocol form (name, organizations, modality, body part, etc.) | Define how and where the protocol applies |

Tip: Selecting a viewport in the layout area automatically switches the right panel to the HP Rules tab, so you can edit rules without an extra click. If you open a stage that already has a layout, the first viewport is auto-selected so the rules panel is immediately useful.
Unsaved Changes Guard
If you switch protocols, clone, navigate away from the screen, or close the browser tab while you have unsaved edits, OmegaAI prompts you to confirm. The prompt offers:
-
Save — Save the current changes, then continue.
-
Skip — Discard the changes and continue.
-
Cancel — Stay where you are with your edits intact.

The toast reads "You have unsaved changes on this page. Are you sure you want to leave?" and only appears when there are real edits to lose — loading a protocol or moving between stages does not trigger it.
Searching the Protocol List
On the All Protocols tab, click the search icon at the top of the list to filter the Saved Protocols and Default Hanging Protocols by name, modality, or body part. The list updates as you type, making it quick to locate a specific protocol in a long list.

2. Viewport Setup
Location: Top-left panel
Purpose: Allows you to configure the structure and organization of viewports within the imaging viewer.
-
The Viewport Setup area displays the grid where you can define the number and arrangement of viewports (e.g., 1×1, 2×2, 3×1).
-
A single left-click on the Viewport Setup area opens the Select a layout option, where you can choose their preferred viewport grid.
- Click on the grid cells to assign active viewports (highlighted in blue).

Tip: When the layout area is empty, a LEFT CLICK TO SET LAYOUT hint appears to remind you how to begin.
Per-Viewport Quick Icons
Each configured viewport cell shows two always-visible icons at the bottom of the cell — no need to open a menu first:
- Tile Layout (grid icon) — Opens the layout picker to subdivide that viewport into a nested grid.
- Prior Selection (document icon) — Opens the study-matching dropdown to choose which study (Current or a preceding prior) loads into the viewport.
Hover over either icon to see its tooltip. On read-only Default protocols, these icons are not shown.
Multi-Monitor Background Guide
When your workstation is configured for multiple Image Viewer monitors, the Viewport Setup area shows a subtle background guide that mirrors your monitor layout. Each Image Viewer screen is marked with a low-opacity label (Monitor 1, Monitor 2, …) and separated by dashed dividers, so you can see how viewports will be distributed across your physical screens when the protocol is applied.
- The guide reflects only your Image Viewer (IV) screens and updates to match the number of monitors detected.
- It is a visual aid only — it sits behind the viewport cells and does not affect clicks or drag-and-drop.
- If multi-monitor is not enabled, or only one Image Viewer screen is configured, no guide is shown.
Resetting the Layout
-
To restore the default layout, click the Reset button located in the top-right corner of the Viewport Setup panel. The Reset button is available on both single-monitor and multi-monitor protocols.
-
From the dropdown, select Reset Viewport.
-
This action clears all assigned layouts and configurations and returns the workspace to the default single-viewport setup.
-
The dropdown also offers Monitor Layout, which builds a layout that matches the number of Image Viewer screens in your multi-monitor setup — a quick starting point for multi-monitor protocols.

Tip: When you open a stage that already has a layout, the first viewport is selected automatically and the right panel switches to the HP Rules tab — so you can start configuring rules without an extra click. The "Nothing Here Yet" message only appears for stages that have no layout yet.
3. View Codes and Modifiers Panel
Location: Bottom-left panel Purpose: Provides a searchable list of predefined View Codes and MG Modifiers used to accurately assign images to the correct viewports.
View Codes
View codes represent specific imaging orientations, projections, or series types. They help the system determine which images should be placed into each viewport when a hanging protocol is executed. By selecting the appropriate View Code, you ensure that the correct image type populates the corresponding viewport during the protocol setup.
Examples include:
-
AP (Anteroposterior)
-
PA (Posteroanterior)
-
LAT (Lateral)
-
OBLIQUE
-
CT: AXIAL
-
CT: CORONAL
-
ANY X-RAY

MG Modifiers
Modifiers provide additional descriptors specific to mammography, capturing variations in breast positioning, orientation, or specialized imaging techniques. These are essential for exams involving modified projections.
Examples include:
-
ID -- Implant Displaced
-
RM -- Right Mediolateral
-
RI -- Right Inferior
-
RS -- Right Superior
-
RL -- Right Lateral
-
NP -- Nipple in Profile

How View Codes and MG Modifiers Are Used
-
Users drag and drop View Codes or MG Modifiers into the desired viewport within the layout.
-
The system then uses these assignments to automatically load the correct image series or orientation when a study is opened.
-
This ensures consistent, accurate, and predictable image placement according to modality, orientation, and exam type.

Search Functionality
-
A search icon is available in the top-right corner of the View codes panel.
-
It allows you to quickly find specific View Codes or MG Modifiers by typing relevant keywords or abbreviations.

4. Hanging Protocol Rules Panel
Location: Right side of the configuration screen.
Purpose: Defines how each viewport behaves when a hanging protocol is applied.
The Hanging Protocol Rules Panel provides a comprehensive set of configuration options that control how images behave, appear, and are selected within each viewport when a hanging protocol is executed. These rules allow you to fine-tune the viewing experience, ensuring that images are displayed consistently and in alignment with clinical workflow requirements.
Each rule applies specifically to the selected viewport, and together they determine everything from visual behavior and image sizing to windowing, orientation, and metadata-driven image selection.
To configure rules, click on the desired viewport in the Viewport Setup area to select it (the selected viewport is highlighted in blue). The Rules Panel on the right will update to show the configuration sections for that viewport:
- a. Orientation
- b. Toggles
- c. Window Presets
- d. Scaling
- e. Conditions
There is no longer a "+" button or radial menu to add sections one at a time — every section is visible as soon as you select a viewport.
A Save button appears on the right side of the Selected Viewport [n] title bar, so you can save without leaving the panel. For an existing (already saved) protocol it writes your changes immediately; for a new (unsaved) protocol it opens the Save Protocol form first so you can provide the protocol name, organizations, and matching criteria. The button is disabled when there are no unsaved changes and shows a brief loading state while saving. On a read-only Default protocol, every section is shown in read-only mode and the Save button is hidden.
a. Orientation
The Orientation section allows you to control how images are flipped, rotated, or aligned within the selected viewport when the hanging protocol is applied. These settings ensure that images always appear in a consistent and clinically appropriate orientation.
You can configure:
|
|
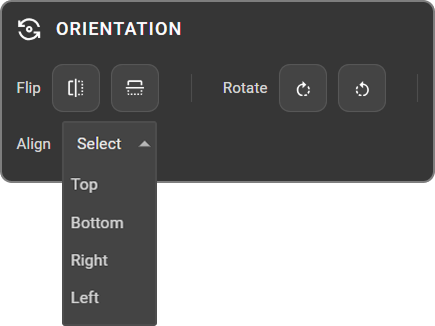
Orientation rules help standardize image presentation across different studies and modalities.
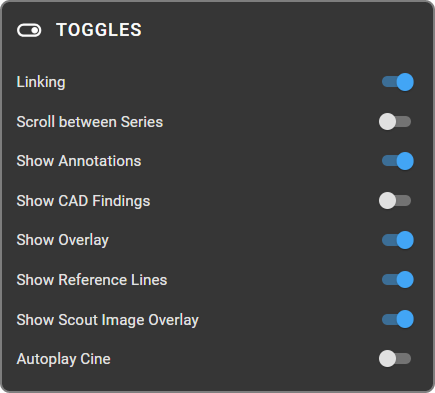
b. Toggles
The Toggles section allows you to enable or disable specific viewing features for the selected viewport. These settings define which tools, visual elements, and interaction behaviors are active when the hanging protocol loads.
Each toggle can be set to Active (blue) or Inactive, giving you complete control over what is displayed and how the viewport behaves.
Available toggles include:
|
|
c. Window Presets
The Window Presets section allows you to define the Window Level (WL) and Window Width (WW) that will be applied to the selected viewport when the hanging protocol is loaded. This ensures consistent brightness and contrast settings across studies.
You can either:
|
|
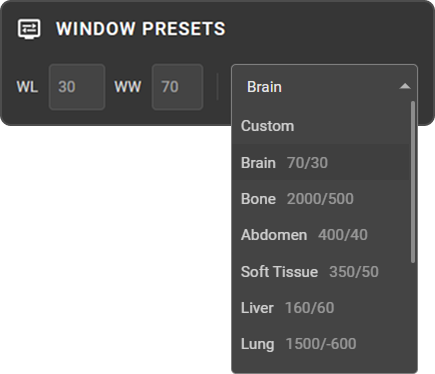
Window presets help standardize image appearance and streamline review across body regions and modalities.
Note: The Window Level Preset Sync feature in OmegaAI ensures any presets created using the Window Level Tool are automatically available for use in Hanging Protocols. Any hanging protocol saved with a specific window level configuration will also be listed under the available window presets, allowing for easy reuse and consistency across studies.
d. Scaling
The Scaling section defines how images are sized and displayed within the selected viewport when the hanging protocol is applied. These settings ensure consistent zoom behavior and image fit across different studies and series.
You can configure:
|
|
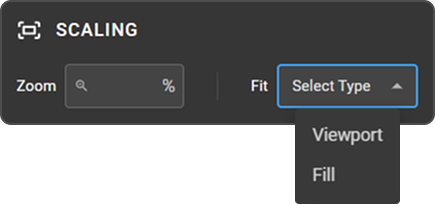
Use scaling settings to maintain a uniform viewing experience, particularly when comparing multiple series, modalities, or orientations.
e. Conditions
The Conditions section lets you set rules that determine when a viewport configuration should be applied. These rules are based on DICOM tags, enabling the system to match images using specific metadata.
Each condition includes:
|
|
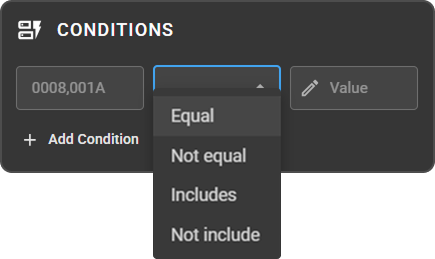
The section starts with a single condition row. Click + Add Condition to add additional matching rules to the viewport — up to 5 conditions — and remove any extra row with its delete icon.
Conditions help the system automatically select the correct images for each viewport based on modality, series description, body part, or any other DICOM header tag.
Hanging Protocol Stages Management
Hanging Protocol Stages Management allows you to organize and control how images are displayed across multiple stages within a hanging protocol. Each stage represents a specific viewing layout or configuration tailored for different parts of the interpretation workflow---such as localizer views, core series review, or comparison studies.
The Hanging Protocol Stages Management panel is located along the bottom border of the Hanging Protocol Configuration screen. It appears as a horizontal navigation bar below the Viewport Setup and View Codes sections.

Creating a Stage
-
Click the "+" (Add Stage) icon located at the bottom-left of the stage bar.
-
The new stage is created as a duplicate of the currently active stage — its monitors, view codes, layout, and rules are copied — so you can build a variation without reconfiguring everything from scratch. The copy is independent: editing it does not change the original. (If the active stage is empty, you simply get another empty stage.)
-
The newly created stage becomes the active stage automatically.
-
You can create as many stages as required, depending on your workflow or multi-step reading process.
-
Each stage is represented by a dot indicator on the bar, and each dot is labeled with a unique stage number.
-
Click on any dot indicator to review, configure, or switch between stages.
Deleting a Stage
-
Click on the stage indicator dot for the stage you want to delete.
-
A trash can icon will appear next to the selected stage.
-
Right-click and hold the trash icon to delete the stage.
-
The stage will be removed, and the remaining stages will automatically be renumbered.

Reordering Stages
You can change the order in which stages are presented during reading without recreating them.
-
Hover over a stage's indicator on the bar. A Move Left (
‹) arrow appears to its left and a Move Right (›) arrow to its right, alongside the delete icon. -
Click Move Left or Move Right to swap the stage with its neighbor. The active selection follows the stage as it moves, so the stage you moved stays selected.
-
The Move Left arrow is hidden on the first stage and the Move Right arrow on the last stage. Move arrows are not shown on read-only Default protocols or when the protocol has only one stage.
Stage Navigation in the Image Viewer
Stage navigation in the OmegaAI Image Viewer allows you to move between different stages defined within a Hanging Protocol. Each stage represents a unique layout or configuration designed to guide the reading workflow.
-
In a multi-stage protocol, use Page Up to move to the previous stage and Page Down to move to the next stage.
-
In a single-stage protocol, Page Up/Page Down will load the next series instead of switching stages.
-
Empty stages (stages with no matching images) are automatically skipped during navigation.
Prior Matching Model Configuration in OmegaAI
The Prior Matching Model Configuration in OmegaAI enables you to define how previous imaging studies are matched to the current study based on specific criteria, ensuring accurate and relevant prior retrieval for diagnostic review.
Accessing the Prior Matching Model
To access the Prior Matching Model Configuration:
-
Open the Configuration Drawer, which displays all created matching models, with the active model for the current hanging protocol highlighted.
-
Identify the Default Model
Indicates which matching model is automatically applied across all hanging protocols.
Creating and Managing Matching Models
Adding a New Model
- Create New Model Initiates the setup of a new matching model for prior study retrieval.


- Managing Existing Models
The three-dot menu beside each model provides quick management options.
-
Edit---Modify the existing model configuration.
-
Delete---Remove the model permanently.
-
Set as Default -- Assign the model as the default selection for future use.

Configuration Options
a. Model Name
- Purpose: Defines a unique and identifiable name for the matching model. Enter a clear and descriptive name in the Query model name field.
b. Body Part
-
Purpose: Ensures prior studies are selected based on the relevant anatomical region.
-
Default: Matches the body part of the current study.
-
Customization: Specify one or more body parts to broaden or refine the matching criteria.

c. Study Date
- Purpose: Filters prior studies based on how recent they are relative to the current exam. Enter the desired range in months (up to 360 months) to identify relevant prior studies.

d. Study Status
-
Purpose: Includes prior studies based on their workflow or completion status.
-
Default: Matches the status of the current study.
-
Custom Options: Select one or more statuses, such as "Completed" or "In Progress"

e. Modality
-
Purpose: Ensures matching is limited to relevant imaging modalities.
-
Default: Matches the modality of the current study.
-
Customization: Select one or more modalities to expand or restrict matching.

f. Laterality
-
Purpose: Matches prior studies based on the anatomical side being scanned.
-
Default: Matches the laterality of the current study.
-
Options: Left, Right, Both, Unpaired.

g. Procedure Code
-
Purpose: Matches prior studies using standardized procedure codes.
-
Default: Uses the current study's procedure code.
-
Expansion: Select additional procedure codes to ensure inclusion of relevant exams.

h. Study Description
- Purpose: Allows filtering of prior studies based on keywords or
phrases within the study description.
Supports text-based conditions such as "includes," "does not include," "equals," and "does not equal."

Saving the Matching Model
-
Review all configured criteria for accuracy.
-
Click Save to store the newly created or updated matching model.
-
The saved model will appear in the list and can be assigned to viewports during Hanging Protocol configuration.
Managing organizations in Hanging Protocols.
-
When saving a Hanging Protocol, organizations determine where the protocol will be available and who can use it. OmegaAI supports flexible organization selection using ancestor and descendant structures.
-
After configuring the desired layout, click the Star button in the top-right corner to open the Save Protocol dialog.
-
Under the Organization dropdown, you can assign the protocol to one or more organizational levels:

Organization Selection
Under the Organization dropdown, you can assign the protocol to one or more organizational levels:
You can select organizations in different ways based on your requirements:
-
Selecting an Ancestor Organization: Selecting an Ancestor (e.g., Ancestor A) automatically includes all its Descendants (e.g., Descendant 1, 2, 3). Example: Choosing Ancestor B will auto-select Descendant X, Y, Z.
-
Selecting Mixed Organizations: Selecting one ancestor (e.g., Ancestor A) and individual Descendants from another (e.g., Descendant X, Y under Ancestor B) will include all Descendants under Ancestor A plus the chosen Descendants from Ancestor B.
-
Selecting Only Descendants: You can manually select individual Descendant Organizations (e.g., Descendant 2, 3 from Ancestor A and Descendant X, Y from Ancestor B). When a Descendant is selected, its peer Descendants will also be displayed for multi-selection.
-
Selecting Only Ancestors: To select only an Ancestor Organization without its Descendants, check the Ancestor box and deselect its Descendants as needed.
Default Behavior: If no organization is selected, the organization of the study currently being viewed is automatically applied by default.
