Hanging Protocols in OmegaAI
Overview
Hanging Protocols help you control how medical images are arranged and displayed in the OmegaAI Image Viewer. By defining layout, sequence, and display behavior based on modality and study attributes, they ensure images are consistently presented the way you need them — every time a study is opened.
OmegaAI automatically adjusts Hanging Protocol layouts based on your monitor setup. On a single monitor, viewports are displayed on one screen. On multiple monitors, the layout expands across available screens for an optimized viewing experience.
This guide covers how to:
- Access Hanging Protocols in the Image Viewer
- Use default and saved protocol configurations
- Create and customize protocols to fit your reading workflow
Hanging Protocol Matching Criteria
When a study is opened, OmegaAI automatically matches and applies the most appropriate Hanging Protocol based on the following study attributes:
- Modality — The imaging modality of the study (e.g., CT, MR, XR).
- Body Part — The body part(s) present in the study.
Note: If multiple protocols match the same criteria, the protocol set as default will be applied automatically.
Accessing Hanging Protocols
There are two ways to quickly access and apply Hanging Protocols directly from the OmegaAI Image Viewer.
Method 1: Quick Access Strip
The Quick Access Strip is a horizontal bar rendered immediately below the main toolbar, spanning the full width of the viewer window. It provides one-click access to all Hanging Protocols available for the active study, without opening any menus or panels.

Each item in the strip displays:
- A miniature layout preview of the protocol's viewport configuration
- The protocol name, left-aligned and truncated to two lines if necessary — hover to see the full name in a tooltip
- A stage indicator showing the current and total stages (e.g., 2/3), with up/down chevron arrows to navigate between stages — hover over the arrows to see Page Up / Page Down tooltips. Single-stage protocols display "1" with no arrows.
- A blue background and blue text when the protocol is active
To use the strip:
- Apply a protocol — Click any item to instantly apply it to the active study.
- Switch protocols — Click a different item at any time to switch layouts without reloading the study.
- Navigate stages — Use the up/down chevron arrows to step through multi-stage protocols.
- Scroll through protocols — If the list exceeds the toolbar width, use the chevron arrows (< >) to access additional protocols.
- Hide the strip temporarily — Click the chevron-up button at the right end of the strip to collapse it. This hide is in-memory only — the strip reappears the next time you open a study, switch modality, or refresh the page. To hide the strip persistently, use the Hanging Protocols Bar toggle in the Layout Selector (see Method 2), which saves your choice per modality in this browser.
Note: If no protocol is active (e.g., a manual layout is in use), no item will appear highlighted. The strip is automatically filtered to show only protocols relevant to the active study's modality.
Tip: On multi-monitor setups, the chevron-up hide affects only the monitor where it was clicked. Each monitor session manages its own temporary hide state.
Method 2: Quick Access via Layout Panel
The Layout Panel provides a quick way to both select a viewport layout and apply or manage Hanging Protocols from within the viewer.
To open and use the panel:
-
Open the panel — Click the Change Layout (grid icon) in the top toolbar. A layout selector grid will appear.

-
Set a layout — Click the grid cells to define your preferred viewport layout — selected cells are highlighted in blue (e.g., selecting the top two cells sets a 1x2 layout).
-
Expand the panel — Click the Right Arrow (
>) to reveal available protocol tiles alongside the layout selector.
-
Apply a protocol — Click any protocol tile to instantly apply it to the active study.

-
Collapse the panel — Click the Left Arrow (
<) to return to the layout selector view only.
From the expanded panel, you can also:
-
Click the + icon to create a new Hanging Protocol from scratch.
-
Click the Save icon to save the current viewport layout as a new protocol.

Show or Hide the Hanging Protocols Bar by Modality
The Layout Selector also lets you control whether the Quick Access Strip appears at all for the modality you are currently reading.
-
At the top of the Layout Selector popover, locate the Hanging Protocols Bar row with an on/off switch.
-
Switch ON — The strip is visible whenever you open a study in that modality.
-
Switch OFF — The strip is hidden for that modality and stays hidden across sessions.

Note: The preference is saved per modality in your browser, so you can hide the strip for modalities where you rarely use protocols (e.g., XR) while keeping it visible for modalities where you rely on it (e.g., CT, MR). The setting also syncs across open browser tabs — toggling it in one tab updates the others immediately.
Tip: Use the chevron-up button on the strip itself (see Method 1) for a quick, one-session hide. Use the toggle here when you want the preference to persist.
Note: Protocol names are truncated in the panel — hover over a tile to see the full name. The currently active protocol is highlighted in blue.
Hanging Protocol Cycling Shortcuts
OmegaAI supports keyboard shortcuts for navigating between Hanging Protocols without interrupting the reading workflow.
Shortcuts
| Shortcut | Action |
|---|---|
Ctrl + Alt + N | Apply the next hanging protocol |
Ctrl + Alt + B | Apply the previous hanging protocol |
Ctrl + Alt + S | Apply the first (default) hanging protocol |
Behavior
- Cycle order — Protocols cycle in the same order as they appear in the UI, with wrap-around enabled at both ends.
- Instant application — The selected protocol is applied immediately, without requiring a study reload.
- Scoped list — Only protocols visible in the user's Hanging Protocol list for the current study are included in the cycling sequence.
- Index reset — The protocol index resets when a new study is loaded. If a custom layout is active, triggering a cycling shortcut resumes navigation from the last active protocol.
Stage Navigation in the Image Viewer
When working with multi-stage Hanging Protocols in the Image Viewer, use the following keyboard shortcuts to move between stages:
- Page Down — Move to the next stage
- Page Up — Move to the previous stage
Note: In a single-stage protocol, Page Up/Page Down will load the next or previous series instead of switching stages. Empty stages (stages with no matching images) are automatically skipped during navigation.
Hanging Protocol Configuration
The Hanging Protocol configuration screen is divided into three main areas:
- Top toolbar — Shows the active protocol name, a Default badge when applicable, and the Clone and Save Protocol actions. A tab bar below it switches between All Protocols, HP Rules, and Matching Rules.
- Left panel — Contains the Viewport Setup area where you design the layout, and the View Codes panel below it for assigning image orientations to viewports.
- Right panel — Displays the protocol list or the rules editor, depending on which tab is active.
Accessing Hanging Protocol Configuration via Settings
To manage, edit, or create Hanging Protocols outside of the reading workflow, access them through the Settings menu.
To open the configuration screen:
|
|

Toolbar and Tabs
A persistent toolbar at the top of the configuration screen surfaces the most common actions for the protocol you are working on. Use it to clone, save, and move between the different parts of the configuration workflow without leaving the screen.
The toolbar displays:
- Protocol name — The name of the protocol currently loaded. New, unsaved protocols show a placeholder name until you save.
- Default badge — A small Default label appears next to the name when the active protocol is one of OmegaAI's built-in Default Hanging Protocols. Default protocols are read-only; clone them before making changes.
- Clone Current — Creates an editable copy of the active protocol. Useful for tailoring a Default protocol or creating a variant of a saved one.
- Save Protocol — Opens the Save Protocol dialog. The button is enabled when you have unsaved changes, are creating a new protocol, or are working on a cloned copy, and disabled when no changes are pending or when viewing a read-only Default protocol.
Directly below the toolbar, three tabs control what the right panel shows:
| Tab | Shows | Use it to |
|---|---|---|
| All Protocols | The full list of Saved and Default protocols | Browse, search, or open a protocol for editing |
| HP Rules | The rules editor for the currently selected viewport | Configure orientation, toggles, scaling, conditions, and window presets |
| Matching Rules | The Save Protocol form fields (name, organizations, modality, body part, etc.) | Set how and where the protocol applies |

Tip: Selecting a viewport in the layout area automatically surfaces the HP Rules tab so you can configure that viewport without an extra click.
All Protocols Tab
The All Protocols tab displays every protocol available to you in a single scrollable list, grouped under two labeled sections — Saved Protocols and Default Hanging Protocols.
-
Saved Protocols — Protocols you or your organization have created and saved. Each protocol is displayed as a compact tile with a miniature layout preview and a name truncated to two lines.
-
Default Hanging Protocols — Pre-configured system protocols provided by OmegaAI, ready to use without any setup.

Actions available on this tab:
- + (Add New) — Click the + next to the panel title to create a new Hanging Protocol from scratch.
- Duplicate icon — Select an existing protocol tile and click the duplicate icon to create an editable copy.
- Search — Click the search icon at the top of the list to filter protocols by name, modality, or body part. The list updates as you type.
- Close (X) — Click to close the panel.
Note: Protocol names are truncated to two lines in the tile view — hover over a tile to see the full name.
Switching Protocols with Unsaved Changes
If you select a different protocol, clone, or navigate away while you have unsaved edits, OmegaAI displays a confirmation prompt so your work is not lost. You can choose:
- Save — Save the current changes, then continue with the new action.
- Skip — Discard the changes and continue.
- Cancel — Stay on the current protocol with your edits intact.
The same prompt appears if you try to close the browser tab or use the side navigation while a protocol has unsaved edits.
Learn more about the Configuration Screen Layout
Default Hanging Protocols
Default Hanging Protocols are pre-configured layouts built into OmegaAI, ready to use without any setup. They provide a reliable starting point for new users and a consistent baseline for experienced readers across standard diagnostic workflows.
Note: Default Hanging Protocols cannot be edited. To customize a default protocol, click the Clone button to create a copy, then modify and save it under a new name.
OmegaAI includes default protocols for the following modalities:
| Modality | Protocols |
|---|---|
| MG (Mammography) | 11 |
| XR (X-ray) | 7 |
| US (Ultrasound) | 2 |
| CT (Computed Tomography) | 7 |
| MR (Magnetic Resonance) | 5 |

Note: The list is automatically filtered to show only protocols relevant to the active study's modality.
Create a Hanging Protocol
Follow the steps below to create a new Hanging Protocol and define the desired image layout and display rules.
Step 1: Open the Configuration Screen
Access Hanging Protocol Configuration via Settings. Once open, click the + next to the panel title to start a new protocol.

Step 2: Select a Layout
-
Right-click inside the Viewport Setup area. An 8x8 layout selector grid will appear.
-
Click a cell to define the number and arrangement of viewports. Selected cells are highlighted in blue.

-
To further subdivide a viewport, right-click inside any selected viewport to define a nested layout within it.
-
Once confirmed, the grid closes and the selected viewports are rendered in the Viewport Setup area, ready for view codes to be assigned.
Note: Click the Reset Viewport icon in the top-right corner of the Viewport Setup area to reset the current viewport layout.
Learn more about Viewport Setup
Step 3: Assign View Codes
-
The View Codes panel below the Viewport Setup area displays available view codes and modifiers organized by modality. Use the search icon in the top-right corner to filter codes quickly.
-
Drag and drop a view code into an active viewport — a "+" indicator appears as you drag to confirm placement.
-
The assigned code defines which image orientation or series type will appear in that viewport.

Learn more about View Codes and Modifiers
Step 4: Configure Hanging Protocol Rules
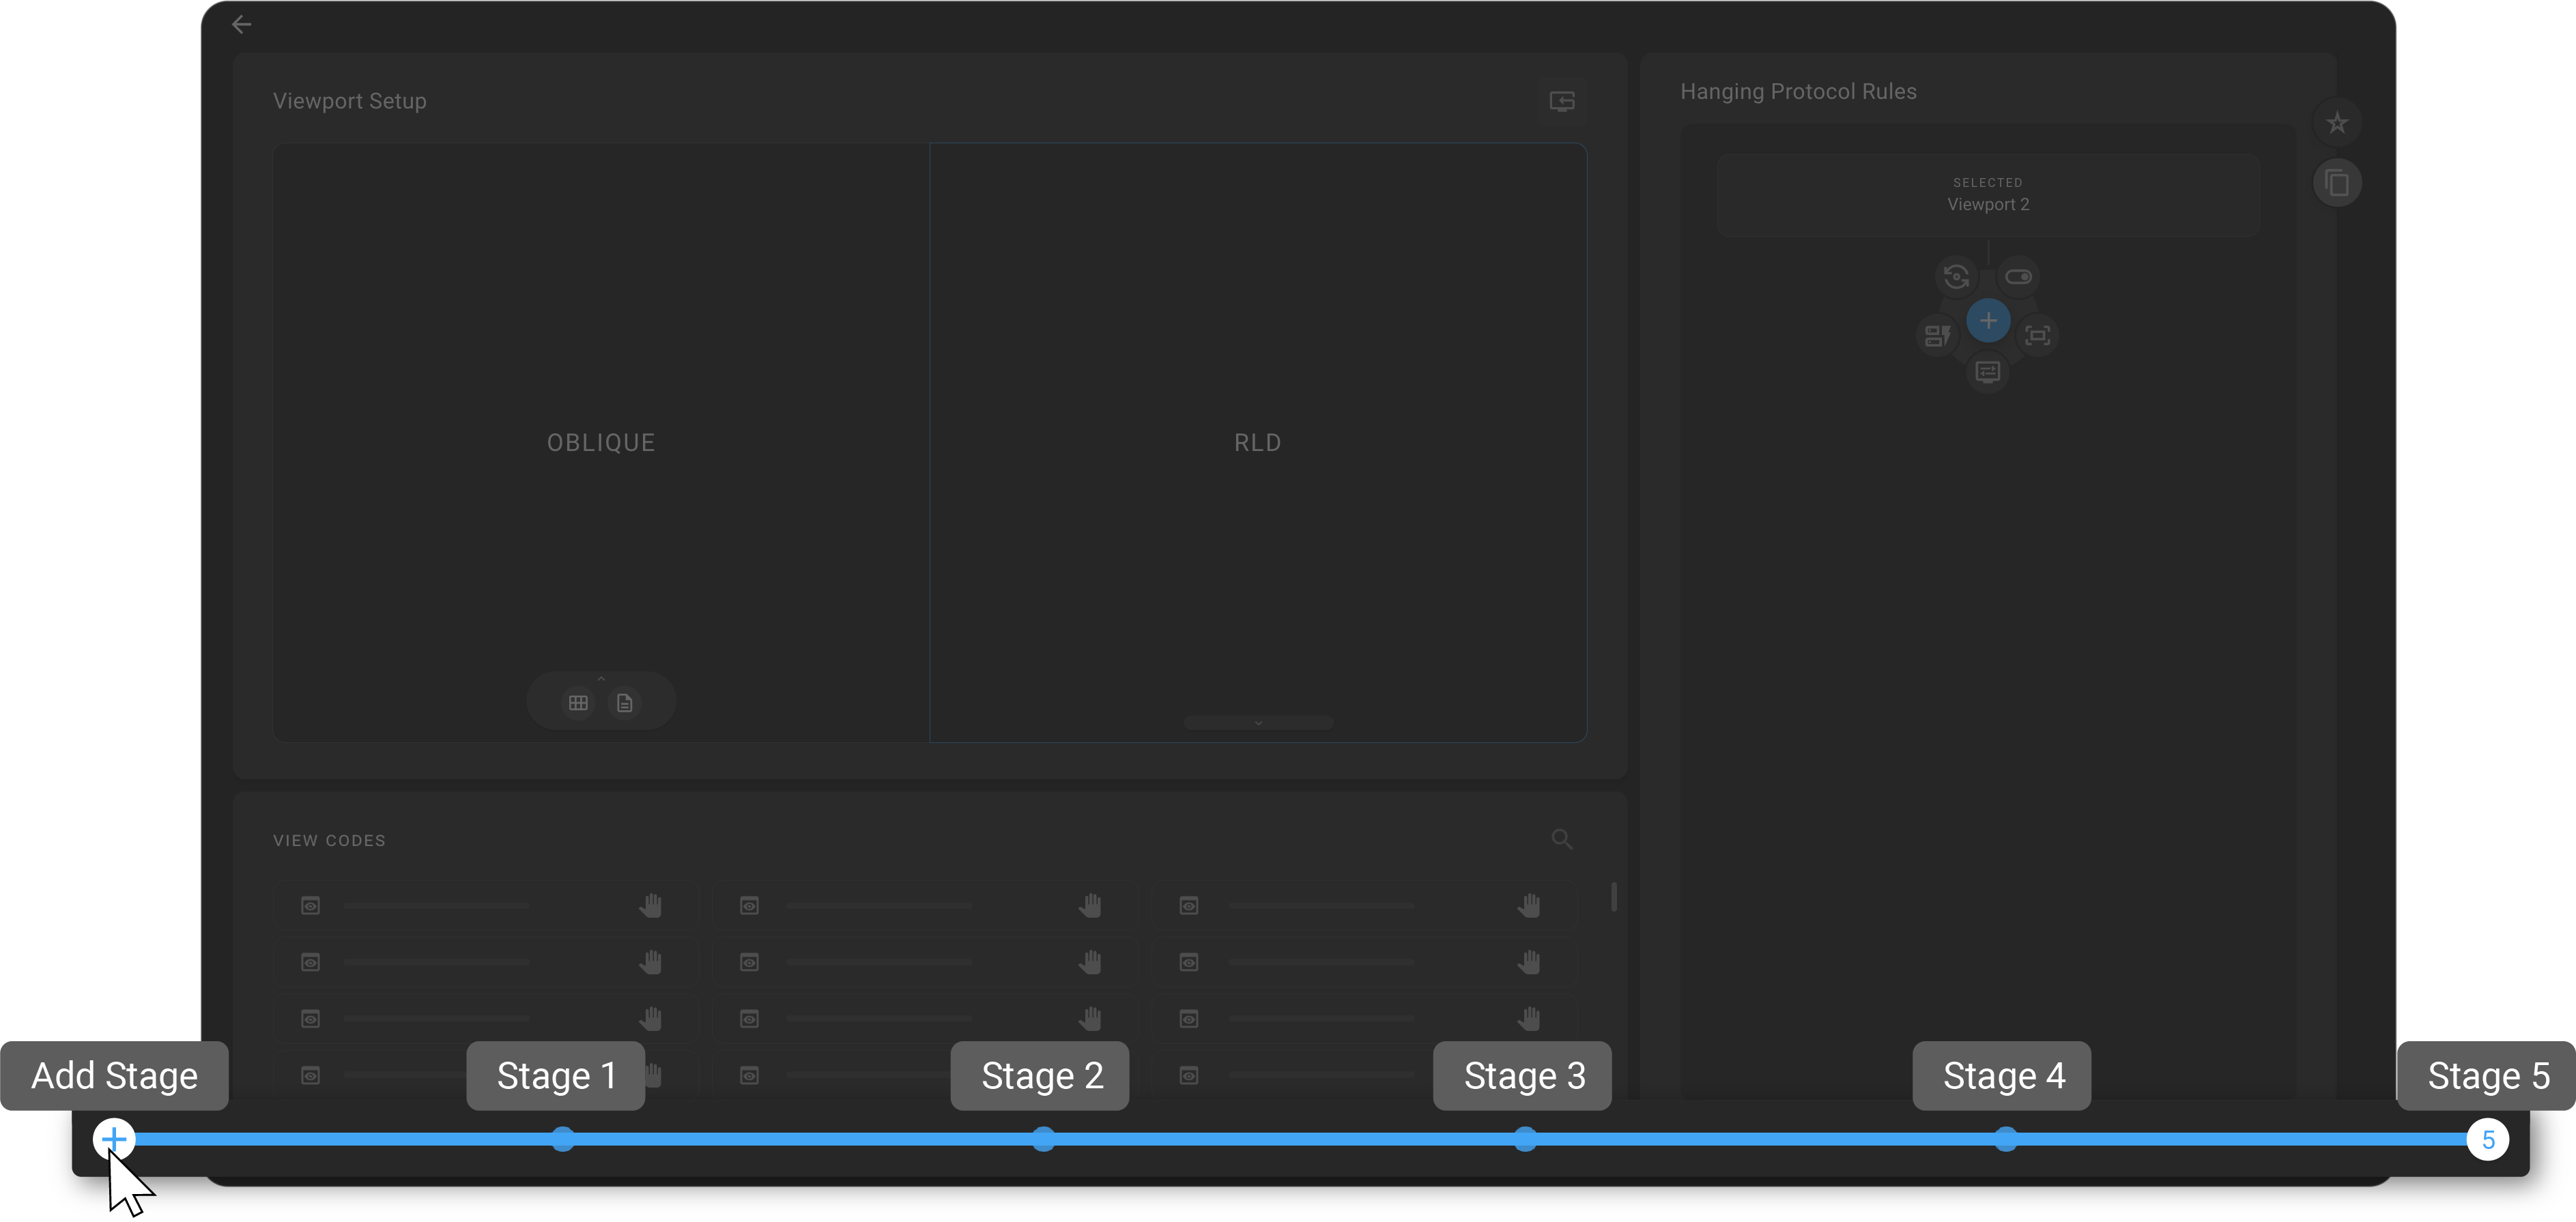
- Click a viewport to select it — a blue border indicates it is active. The right panel automatically switches to the HP Rules tab and shows "SELECTED: Viewport [n]".
Tip: When you open a stage that already has a layout, OmegaAI automatically selects the first viewport so you can start configuring rules right away. The "Nothing Here Yet" placeholder only appears for genuinely empty stages.

- All five rule sections appear at once, ready to edit — there is no longer a + button or radial menu to add them one at a time:
- Orientation — Flip, rotate, or align images
- Toggles — Turn viewer features on or off, each with its own switch (Linking, Scroll between Series, Show Annotations, Show CAD Findings, Show Overlay, Show Reference Lines, Show Scout Image Overlay, and Autoplay Cine)
- Window Presets — Apply WL/WW values
- Conditions — Set DICOM-based matching rules (add up to 5 conditions)
- Scaling — Control image fit or zoom level
- Edit any section directly. To save without leaving the panel, click Save on the right side of the Selected Viewport [n] header — for an existing protocol it saves immediately, and for a new protocol it opens the Save Protocol form.
Learn more about Hanging Protocol Rules
Step 5: Select a Prior Matching Model
This setting controls which study (current or prior) is loaded into the selected viewport based on the assigned view code.
-
Click a viewport to select it — a blue border indicates it is active.
-
At the bottom of each viewport cell, two icons are always visible:
- Tile Layout (grid icon, left) — viewport layout options
- Prior Selection (document icon, right) — study matching options
-
Click the Prior Selection (document) icon to open the prior matching dropdown and select one of the following — Current is selected by default:
- Current — Loads the active study
- 1st Preceding Prior — The most recent prior matching the view code
- 2nd Preceding Prior — The prior before the 1st matching prior
- 3rd Preceding Prior — The prior before the 2nd matching prior
- Set Matching Model — Advanced prior selection based on criteria such as body part, modality, study date, or procedure code

Learn more about Prior Matching Model Configuration
Step 6: Add Additional Stages
-
A horizontal timeline bar at the bottom of the screen displays all stages, with each stage represented by a dot indicator.
-
Click the "+" circle on the left of the timeline to add a new stage. The new stage is a duplicate of the active stage — its layout, view codes, and rules are copied — giving you a quick starting point for a variation. Editing the copy does not affect the original.
-
Each stage can have its own layout and rules, supporting multi-step reading workflows.
-
Reorder stages — Hover over a stage's dot to reveal Move Left (
‹) and Move Right (›) arrows, then click to swap it with its neighbor. The arrows are hidden at the ends of the timeline, on read-only protocols, and when only one stage exists. -
To delete a stage, click its dot indicator on the timeline — a trash can icon will appear. Click and hold the icon to confirm deletion.
Learn more about Hanging Protocol Stages Management
Step 7: Save the Protocol
- Click Save Protocol in the top toolbar (or open the Matching Rules tab) to display the Save Protocol form.
- Fill in the following fields:
- Protocol Name (required) — Enter a name for the protocol.
- Organizations (required) — Select one or more organizations this protocol belongs to.
- Modality (optional) — Select a modality from the dropdown.
- Procedure Code (optional) — Search and select a procedure code to narrow matching criteria.
- Body Part (optional) — Select a body part to refine matching.
- Laterality (optional) — Select a laterality (e.g., Right, Left).
- Level (optional) — Select the scope of the protocol (e.g., Site).
- Enable Set as default for Modality Name if this protocol should apply automatically when matching criteria are met.
- Click Save to store the protocol, or Cancel to discard.
Note: The Save Protocol button is disabled until you make a change worth saving — for example, after creating a new protocol, cloning a Default protocol, or editing an existing protocol's rules or matching criteria.

Learn more about Managing Organizations in Hanging Protocols
For advanced configuration topics, see Mastering Hanging Protocols.