Pular para o conteúdo principal

8 postagens marcadas com "image-viewer"

Ver todas os Marcadores

Coming Soon: Hanging Protocols – Advanced Viewports & Smarter Series Matching

· Leitura de 4 minutos

Overview​

Hanging Protocols in the OmegaAI Image Viewer now go well beyond flat 2D stacks. This release adds MPR, rotating PET MIP, and PET-CT fusion viewports; smarter, metadata-driven series matching; and four new default protocols built around them.

What's New​

1. MPR, Rotating PET MIP & PET-CT Fusion Viewports​

What changed:​

Hanging Protocol viewports are no longer limited to a flat 2D stack. Seven new view codes let a viewport open directly into an advanced view as soon as a study loads, with no manual setup:

  • CT: MPR Axial / Coronal / Sagittal — builds a multiplanar reconstruction from the thinnest axial CT series in the chosen plane. Even an axial-only CT can open as coronal or sagittal.
  • PT: PET 3D MIP — a rotating whole-body PET projection, built automatically from the attenuation-corrected PET series.
  • PET-CT: Fusion Axial / Sagittal / Coronal — PET overlaid on CT in the chosen plane, using the PET display preset's colormap.

Slab thickness and projection (Maximum, Average, or Minimum Intensity) can be saved for each MPR and fusion viewport, so the viewport opens exactly as configured. If a study can't support one of these views, the viewport shows the best available 2D series instead of going blank — for fusion, it shows CT alone with a "Fusion unavailable" indicator.

Benefit:​

Radiologists land on the right multiplanar or fused view automatically — no manual reconstruction or series hunting required.


2. Display Presets for Every Modality​

What changed:​

Each viewport's rules now include a single Display Preset picker, listing the presets available for that viewport's modality — CT, MR, US, PT, NM, and more, not just PET as before. Selecting a preset applies its window level and, where configured, its colormap and auto-windowing behavior together.

Benefit:​

Consistent, clinically correct windowing and colormaps on open, authored once and reused across every protocol.


3. Smarter, Metadata-Driven Series Matching​

What changed:​

Viewport matching rules can now weigh study details beyond modality and body part — slice thickness, study description, and dozens of other fields — with numeric and multi-value comparisons. Each rule can be a strict requirement or just a preference, so OmegaAI still hangs the best available series rather than leaving a viewport empty.

Benefit:​

Protocols can express real clinical preferences — like favoring a primary-read series over a thin reconstruction — without ever risking a blank viewport.


4. Four New Default Hanging Protocols for PET, PET-CT, and MPR​

What changed:​

OmegaAI's Default Hanging Protocol catalog adds four new protocols: PET Default, PET-CT Default, PET-CT Quick Read, and MPR Default, each built around the new viewport types above. PET and PET-CT cells apply a clinically standard SUV-scaled colormap, and fall back safely with a clear indicator when a study's data can't support SUV scaling.

Benefit:​

PET, PET-CT, and MPR-heavy workflows get a clinically reviewed, ready-to-use starting protocol out of the box.


Important Notes​

  • Backward compatible: Existing protocols behave exactly as before, with no impact on studies that don't use the new viewport types.
  • Series matching: A condition on a metadata field that doesn't apply to the bound series simply never matches — it doesn't cause an error.
  • SUV safety fallback: A "SUV unavailable" indicator with hidden SUV stats is expected behavior when a study's DICOM metadata can't support SUV calculation — it isn't an error.

Where to Find It​

  • MPR, PET 3D MIP & Fusion view codes: Hanging Protocol Configuration → View Codes panel → drag CT: MPR Axial/Coronal/Sagittal, PT: PET 3D MIP, or PET-CT: Fusion Axial/Sagittal/Coronal onto a viewport
  • Display Presets & series matching: Hanging Protocol Configuration → select a viewport → HP Rules tab
  • New Default protocols: Image Viewer → Quick Access Strip or Layout Panel → PET Default / PET-CT Default / PET-CT Quick Read / MPR Default
Coming Soon: PET/CT SUV Tools – Volumetric SUV & Fusion ROI Fix

· Leitura de 2 minutos

Overview​

PET/CT SUV measurement gets a dedicated Volumetric SUV tool with a full-view region overlay and adjustable thresholds, plus a fix so every ROI tool reports SUV correctly on fused viewports.

What's New​

1. Volumetric SUV Becomes Its Own Tool​

What changed:​

The Probe tool is back to reporting a plain point SUV value on PET data, just as it does on any other modality. Lesion segmentation now lives in its own Volumetric SUV tool, available from the toolbar, the Image Control Wheel, or a custom hotkey. Clicking a lesion automatically segments the region, reports SUV max/mean/peak and volume, overlays the boundary across every plane and the whole-body MIP, and lets you adjust the segmentation threshold or SUV normalization on the fly.

Benefit:​

A quick point SUV check with Probe, and a dedicated tool with visual confirmation and adjustable thresholds when you need volumetric measurement.


2. PET/CT Fusion ROI Tools Now Report SUV, Not HU​

What changed:​

Rectangle, Elliptical, Circle, and Freehand ROI tools drawn on a fused PET/CT viewport now report SUV statistics instead of Hounsfield Units, matching what the same tool reports on a PET-only viewport.

Benefit:​

SUV measurement is now consistent across every ROI tool in Fusion Mode — no more switching viewports just to get a valid SUV reading.


Important Notes​

  • Volumetric SUV Tool: A newer capability that may not yet be enabled in every environment — reach out to your OmegaAI representative if it doesn't appear in your toolbar. Measurements created by the Probe tool before this change remain labeled as Probe entries.
  • SUV safety fallback: A "SUV unavailable" indicator with hidden SUV stats is expected behavior when a study's DICOM metadata can't support SUV calculation — it isn't an error.

Where to Find It​

  • Volumetric SUV Tool: Image Viewer → Probe toolbar group (Fusion Mode) → Volumetric SUV; also available via the Image Control Wheel and Hotkey Customization
  • Fusion ROI SUV: PET/CT Fusion Mode → draw any ROI tool on the fused viewport

Coming Soon: Modality-Aware Window Level Presets

· Leitura de 2 minutos

Overview​

Window Level presets in the OmegaAI Image Viewer are now tailored to the modality you're actually viewing, replacing the old CT-centric preset list that used to appear on every study type regardless of modality.

What's New​

1. Presets Filtered by Modality​

What changed:​

The Window Level preset list is now filtered to the modality being viewed — CT, MR, US, PT, NM, and more each get their own relevant list, instead of a single generic CT-centric list showing up everywhere.

Benefit:​

Every modality gets presets that are actually clinically relevant to it, so you're never scrolling past irrelevant CT presets on an MR or ultrasound study.


2. Corrected CT Presets & Auto-Windowing for Other Modalities​

What changed:​

CT presets like Brain, Stroke, Mediastinum, Soft Tissue, and Abdomen now use corrected clinical values, with a new Subdural preset added. Modalities where a fixed window doesn't make sense — MR, US, CR/DX, and NM — now default to auto-windowing strategies instead, calculated from the image data itself.

Benefit:​

Presets reflect current clinical standards, and modalities that never suited fixed numeric values now window correctly by default.


3. Compound Presets for PET & Nuclear Medicine, Mammography Support​

What changed:​

PET and Nuclear Medicine presets now apply window level and color map together in a single selection (Hot Iron, Hot Metal Blue, PET Rainbow, Cool, Inverted Gray), with correct SUV-unit windowing. Mammography gains sigmoid VOI LUT support, with correct handling of "For Presentation" vs. "For Processing" images.

Benefit:​

One click gets you the correct look for PET/NM studies, and mammography windowing now matches how those images are meant to be displayed.


4. Three-Tier Preset Configuration​

What changed:​

Presets now resolve through three tiers — System defaults, Organization overrides, and User overrides — so administrators and individual radiologists can customize presets without losing the underlying system defaults.

Benefit:​

Organizations and individual readers can fine-tune presets to their own preferences without breaking the baseline for everyone else.


Important Notes​

  • Backward compatible: All original CT preset names are preserved, so existing Hanging Protocols referencing them by name continue to work unchanged.

Where to Find It​

  • Window Level Presets: Image Viewer → Window Level tool → preset dropdown (filtered to the active viewport's modality)

Product: Image Viewer & Mobile Image Viewer Enhancements

· Leitura de 3 minutos

Overview​

This release brings a set of improvements across the OmegaAI Image Viewer, Hanging Protocols, and the Mobile Image Viewer — including a new stage-navigation option for Hanging Protocols, modality-aware display presets, persistent Cine playback preferences, a refined viewport scrollbar, and improved landscape mode on mobile.

Product: Image Viewer Enhancements & Blume Mobile Image Viewer

· Leitura de 5 minutos

Overview​

This release introduces the Blume Mobile Image Viewer, a new M-Mode measurement tool for ultrasound, and enhancements to the OmegaAI Image Viewer.

What's New​

1. Blume Mobile Image Viewer​

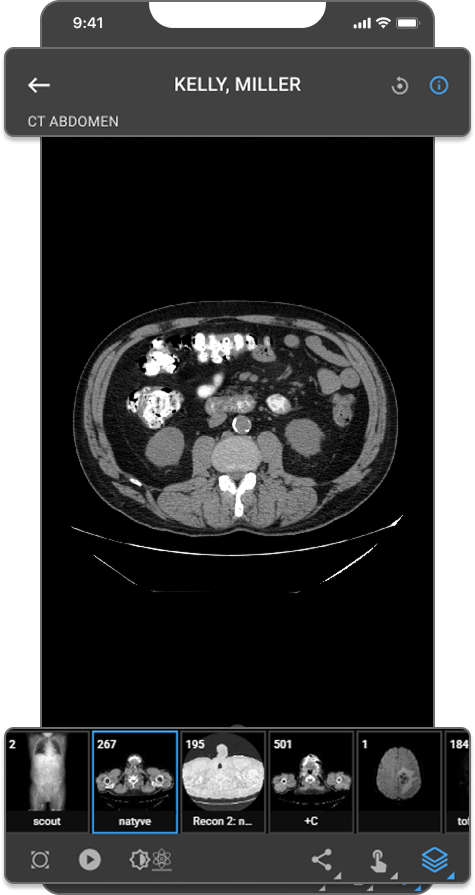
What changed:​

The Blume Mobile Image Viewer is now available in the Blume Patient Portal app on iOS and Android. Patients can view DICOM studies on any touchscreen device with support for stack scroll, Cine playback, window leveling, measurements, Drag Probe, image orientation controls, landscape mode, and JPEG sharing via the native share sheet.

Benefit:​

Patients can securely review their imaging studies from a mobile device with tools consistent with the desktop Image Viewer experience.

Mobile IV


2. M-Mode Measurement Tools for Ultrasound​

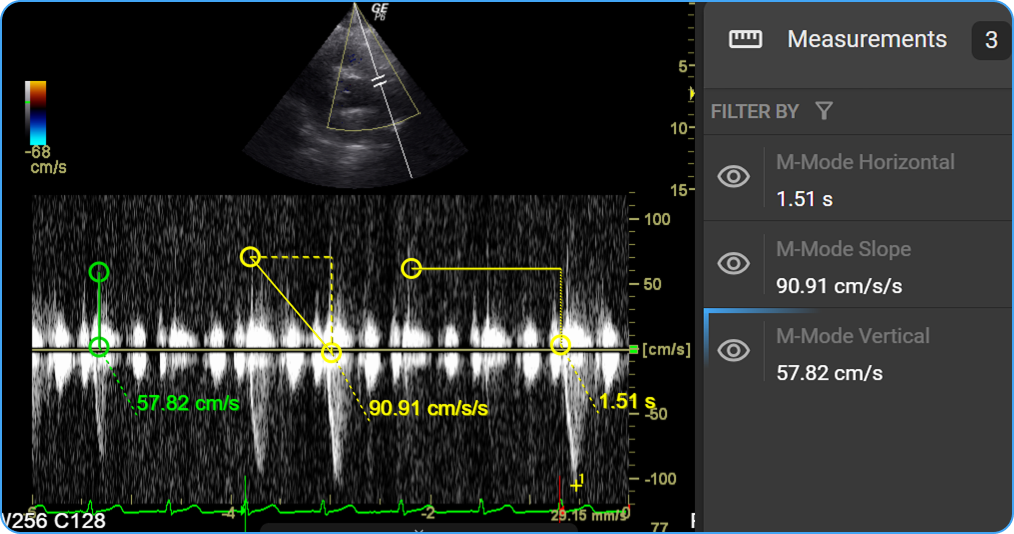
What changed:​

Three measurement tools are now available when an M-Mode ultrasound series is active — auto-detected on load. Slope (cm/s), Horizontal (s), and Vertical (cm/s) measurements are placed by click and drag, calibrated to DICOM metadata, and saved as annotations for structured reporting.

Benefit:​

Precise in-viewer cardiac quantification on M-Mode ultrasound without switching tools or workflows.

Mobile IV


3. New Cine Tool on Viewport​

What changed:​

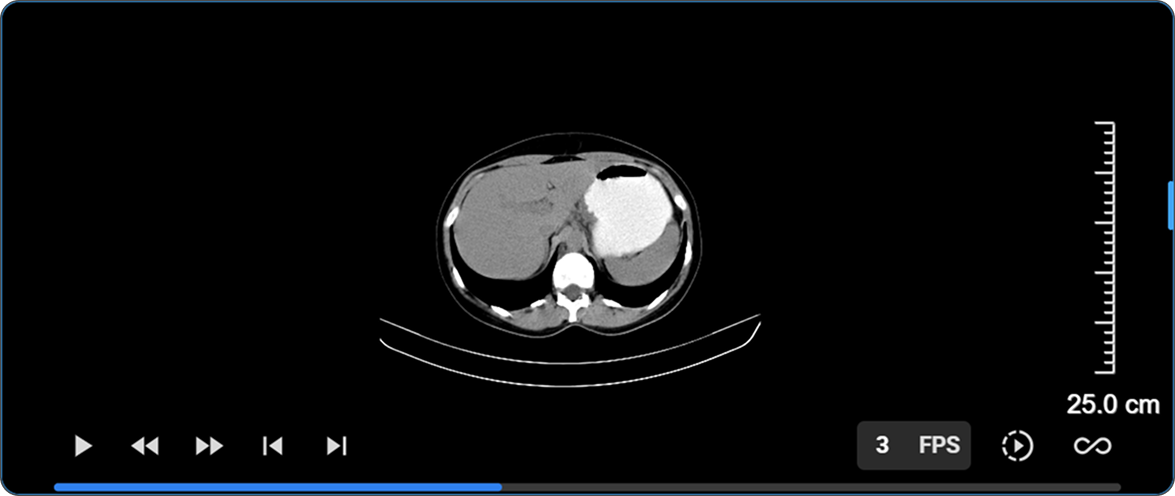
The Cine playback toolbar has been redesigned with a full-width progress bar at the bottom of the viewport. Left-side controls include play/pause, first frame, last frame, previous frame, and next frame. Right-side controls include an FPS display, playback speed, and playback method.

Benefit:​

Full frame-level control over cine playback directly within the viewport.

Mobile IV


4. Hotkey Customization​

What changed:​

All configurable Image Viewer key bindings are now surfaced in a dedicated Hotkey Customization panel within the User Settings page. The panel is also accessible directly from the Image Viewer via Settings → Customize Hotkeys, with a Back to IV button to return without losing context.

Benefit:​

Radiologists can tailor keyboard shortcuts to match their reading preferences, with changes persisted to their profile and applied consistently across all organizations they have access to.


5. Browser-Locale Date & Time Format in Overlay Annotations​

What changed:​

Date and time values in Image Viewer overlay annotations — including study, series, acquisition, and content date/time, and date of birth — now automatically follow the user's browser locale (navigator.language).

Benefit:​

Date and time stamps display in the format most familiar to each user with no manual configuration required.


6. Annotations Included in Export (Download, Print, Copy to Clipboard)​

What changed:​

Visible annotations and measurements are now included when downloading, printing, or copying an image to clipboard — the export captures the viewport exactly as displayed.

Benefit:​

Toggle annotation visibility before exporting to control what is included — no extra steps required.


7. CAD Toggle for Mammography Studies​

What changed:​

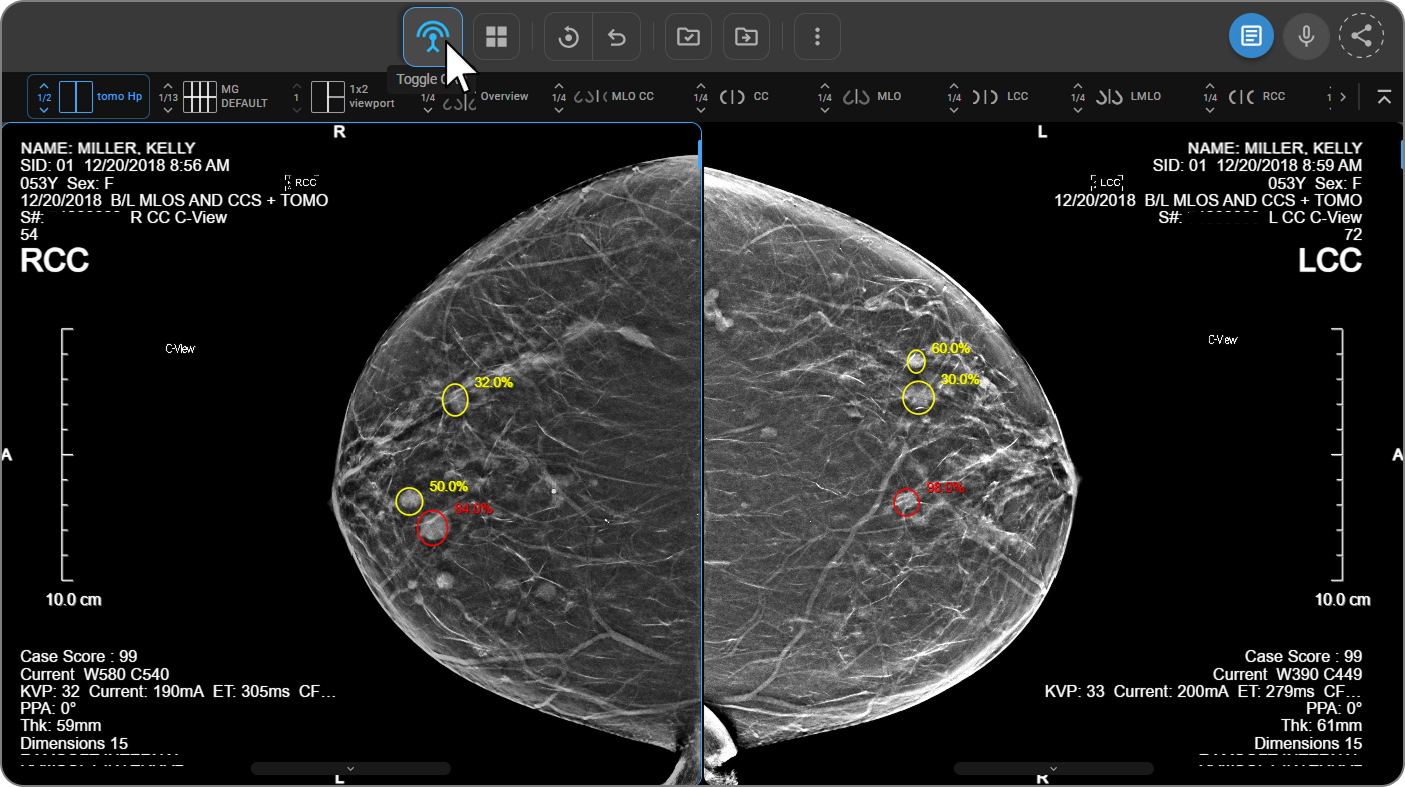
A Toggle CAD button now appears in the toolbar when a mammography study with CAD SR objects is loaded, globally showing or hiding all CAD markers across every viewport in one click. When active, the viewport overlay displays the iCAD case score and, for Tomo series, clickable slice hyperlinks that navigate directly to flagged frames.

Benefit:​

Instantly compare images with and without CAD overlays and jump to flagged slices without disrupting the reading workflow.

Mobile IV


Important Notes​

  • Blume Mobile Image Viewer: For non-diagnostic patient review only.
  • M-Mode Tools: Only available when an M-Mode ultrasound series is active in the viewport.
  • Cine Controls: Progress bar is only visible when Cine mode is active. FPS is adjusted by hovering over the FPS display and swiping left or right.
  • Hotkey Customization: Mouse buttons and scroll wheel are not valid inputs. System-reserved keys cannot be reassigned. The Back button is hidden during Edit Mode.
  • Time Format: Automatic — no configuration required.
  • Export with Annotations: Only currently visible annotations are captured; hidden annotations are excluded.
  • CAD Toggle: Only appears on mammography studies with CADSR objects. Does not affect user-drawn annotations. Default state is off unless a preference is saved.

Where to Find It​

  • Blume Mobile Image Viewer: Blume app → Completed → View Results → View Images
  • M-Mode Tools: Image Viewer → Customize Toolbar → M-Mode → load an M-Mode ultrasound series
  • Cine Controls: Image Viewer → activate Cine mode → progress bar appears at viewport bottom
  • Hotkey Customization: User Profile → User Settings → keyboard icon; or Image Viewer → More options (⋮) → Customize Hotkeys
  • Time Format: Automatic — no action required
  • Export with Annotations: Image Viewer → toggle annotation visibility → Download / Print / Copy to Clipboard
  • CAD Toggle: Image Viewer → Tools menu → CAD icon (leftmost); mammography studies with CAD objects only

Updated Help Articles​

Product: Hanging Protocols — Configuration Screen & Quick Access Strip

· Leitura de 3 minutos

Overview​

This release introduces updates to Hanging Protocols in OmegaAI, focused on improving usability, efficiency, and control across the HP Configuration screen and the Quick Access Strip in the Image Viewer.

What's New​

1. Redesigned HP Configuration Screen​

What changed:​

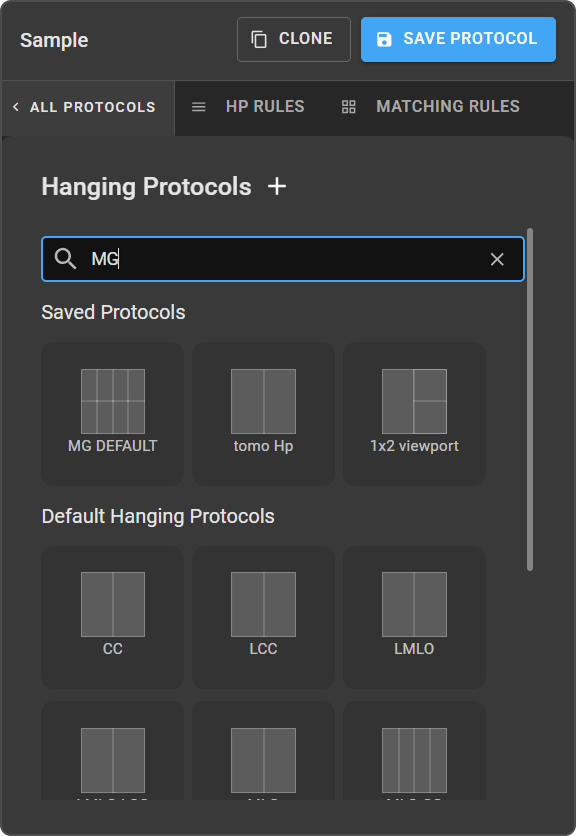
The HP Configuration screen now includes a persistent top toolbar, a three-tab layout (All Protocols / HP Rules / Matching Rules), and a protocol search field. The toolbar displays the active protocol name, a Default badge for system protocols, and dedicated Clone Current and Save Protocol buttons.

Benefit:​

Makes it easier to navigate, find, and manage hanging protocols without losing context — especially when working across multiple protocols or configurations.

hp

2. Unsaved Changes Navigation Guard​

What changed:​

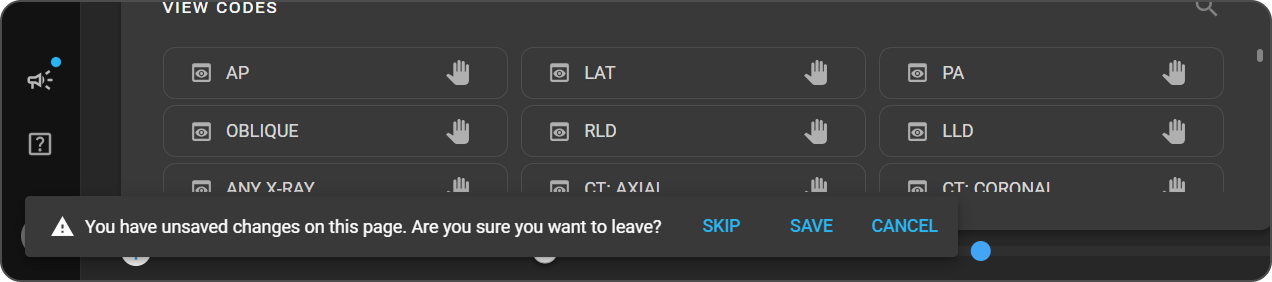
Navigating away from an unsaved protocol now triggers a prompt with Save, Skip, and Cancel options. The guard applies when switching protocols, cloning, using side-nav, or closing the browser.

Benefit:​

Prevents accidental loss of work during protocol configuration, giving users full control over whether to save or discard changes before leaving.

hp

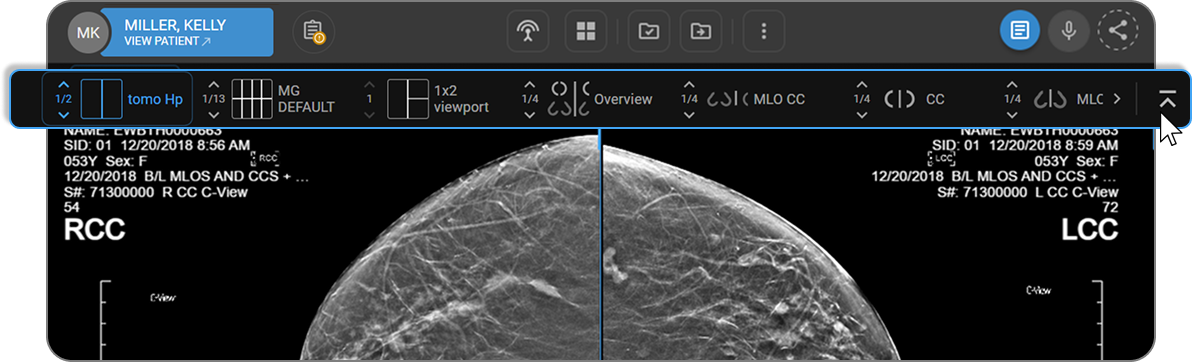
3. HP Quick Access Strip — Hide Button​

What changed:​

A new chevron-up button on the Quick Access Strip lets you collapse the strip with one click. The hide is in-memory only — the strip reappears when you open a new study, switch modality, or refresh the page.

Benefit:​

Gives users more screen space in the Image Viewer when the strip is not needed, without affecting any persistent settings.

hp

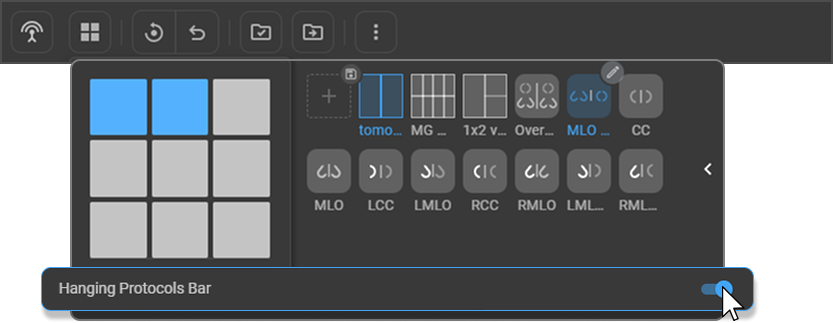
4. Persistent "Hanging Protocols Bar" Toggle by Modality​

What changed:​

A new toggle in the Layout Selector lets you show or hide the Quick Access Strip per modality (e.g. CT, MR). The preference saves in your browser and syncs across open tabs.

Benefit:​

Users who work across multiple modalities can customise strip visibility per modality, with the preference persisting across sessions in the same browser.

hp

Important Notes​

  • The strip hide (chevron-up) is in-memory only — it resets on study change, modality change, or page refresh.

  • The modality toggle is saved per browser, not per user account. Clearing browser data or logging in on a different machine will reset the preference.

  • On multi-monitor setups, strip visibility is independent per monitor.

Where to Find It​

Navigation path in the application: Image Viewer → Hanging Protocol Settings

Updated Help Articles​

Product: Hotkey Customization

· Leitura de 3 minutos

Overview​

This release introduces updates to User Profile – Hotkey Customization in OmegaAI, focused on improving usability, efficiency, and system reliability. The Hotkey Customization feature allows each user to personalize the keyboard shortcuts in the Image Viewer. All configurable Image Viewer functions are surfaced in a single panel, enabling users to remap any key binding to their preferred combination. Customizations are saved to the individual user’s profile and apply across all organizations the user has access to.

What’s New​

1. Centralized Hotkey Customization Panel​

What changed:​

A dedicated Hotkey Customization panel has been added to the User Settings page, listing all 44 configurable Image Viewer functions alongside their currently assigned hotkeys in a two-column table. Functions without an assigned key are shown with a dash (—).

Benefit:​

Users can view and manage all keyboard shortcuts from a single location, eliminating the need to search across menus.

2. Dual Entry Points for Quick Access​

What changed:​

The Hotkey Customization panel can be accessed from two locations: the User Profile navigation bar (User Settings → keyboard icon) and directly from the Image Viewer (Settings → Customize Hotkeys). When accessed from the Image Viewer, a Back button appears at the top-left of the page header, enabling a seamless return to the Image Viewer.

Benefit:​

Radiologists and technicians can access and adjust hotkeys without leaving their workflow, reducing context switching during diagnostic sessions.

3. Live Conflict Detection & Resolution​

What changed:​

When a user assigns a key combination already in use, the conflicting row is immediately highlighted in red with a yellow warning icon (⚠). Saving is blocked until the conflict is resolved by reassigning or clearing one of the duplicate bindings.

Benefit:​

Prevents accidental overrides and ensures every function has a unique, valid key binding, reducing errors during diagnostic workflows.

4. Instant Effect & Reset to Defaults​

What changed:​

Saved hotkey changes take effect immediately across all open Image Viewer sessions without a page refresh. A Reset to Defaults button, located next to the Edit button at the top-right of the panel, restores all bindings to system defaults after a confirmation prompt.

Benefit:​

Users experience real-time feedback on their changes and can quickly recover from unintended configurations without disrupting their session.

Important Notes​

  • User-specific scope: Hotkey customizations apply per user, not per organization. Changes made by one user do not affect other users in the same organization.
  • Restricted keys: Certain system-reserved keys cannot be reassigned. An inline error is displayed: “This key is reserved and cannot be reassigned.”
  • Mouse inputs not accepted: Standard mouse buttons (left, right, middle) and the scroll wheel are not valid inputs in the hotkey capture field.
  • Back button behavior: The Back button is hidden while the panel is in Edit Mode and reappears once changes are saved or cancelled.
  • Clearing bindings: To clear a single hotkey, press Escape while the cell is focused. To reset all bindings at once, use Reset to Defaults (confirmation required).

Where to Find It​

Navigation path in the application: User Profile → User Settings → Keyboard Icon

Or from the Image Viewer: Image Viewer → Settings (three-dot menu) → Customize Hotkeys

Updated Help Articles​

HotKeyCustomization