Pular para o conteúdo principal

Product: Hanging Protocols — Configuration Screen & Quick Access Strip

· Leitura de 3 minutos

Overview​

This release introduces updates to Hanging Protocols in OmegaAI, focused on improving usability, efficiency, and control across the HP Configuration screen and the Quick Access Strip in the Image Viewer.

What's New​

1. Redesigned HP Configuration Screen​

What changed:​

The HP Configuration screen now includes a persistent top toolbar, a three-tab layout (All Protocols / HP Rules / Matching Rules), and a protocol search field. The toolbar displays the active protocol name, a Default badge for system protocols, and dedicated Clone Current and Save Protocol buttons.

Benefit:​

Makes it easier to navigate, find, and manage hanging protocols without losing context — especially when working across multiple protocols or configurations.
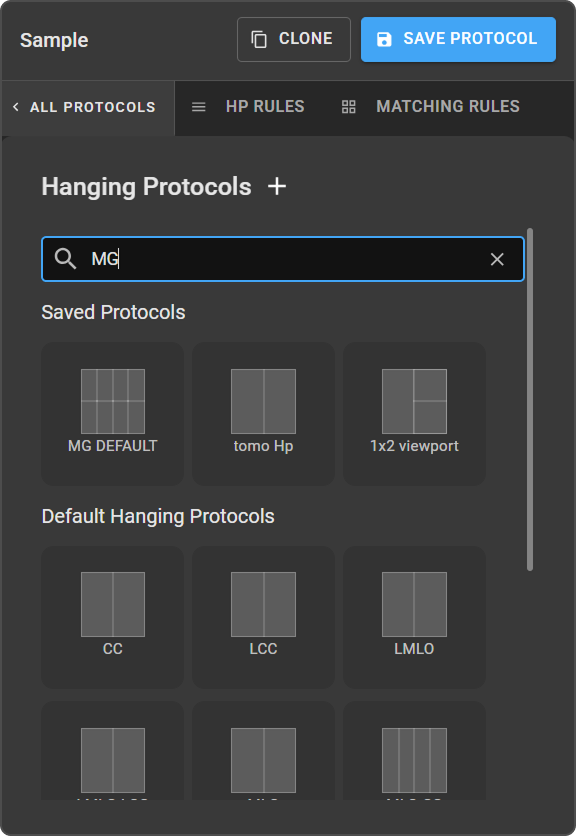
hp

2. Unsaved Changes Navigation Guard​

What changed:​

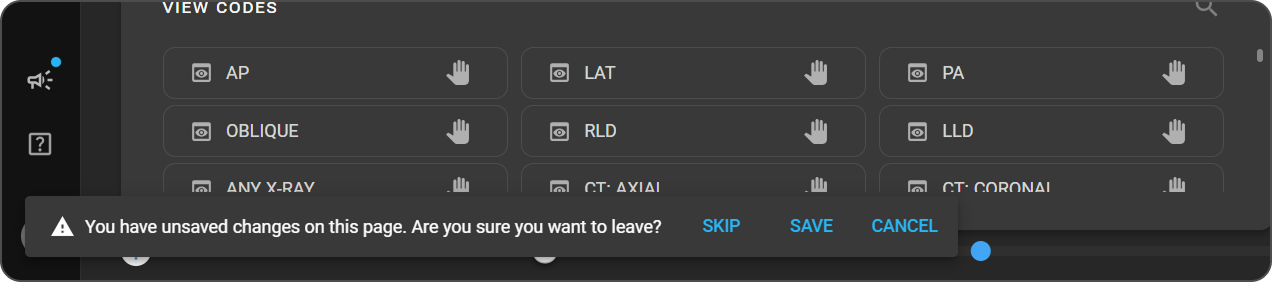
Navigating away from an unsaved protocol now triggers a prompt with Save, Skip, and Cancel options. The guard applies when switching protocols, cloning, using side-nav, or closing the browser.

Benefit:​

Prevents accidental loss of work during protocol configuration, giving users full control over whether to save or discard changes before leaving.
hp

3. HP Quick Access Strip — Hide Button​

What changed:​

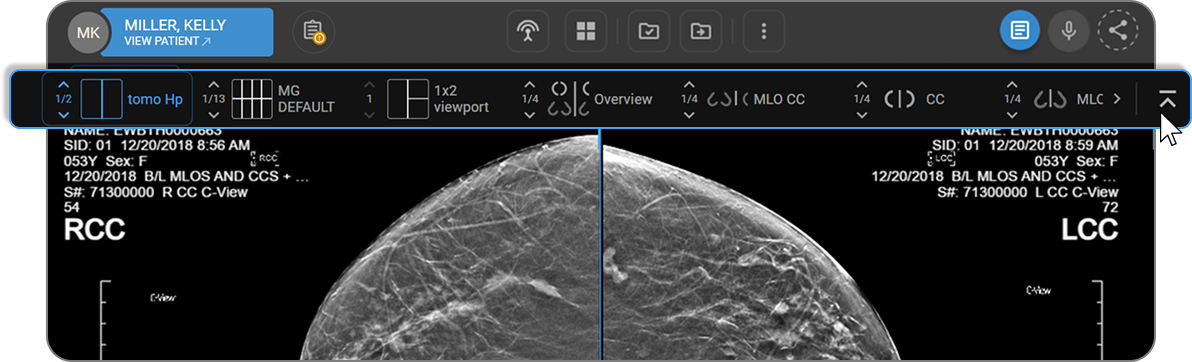
A new chevron-up button on the Quick Access Strip lets you collapse the strip with one click. The hide is in-memory only — the strip reappears when you open a new study, switch modality, or refresh the page.

Benefit:​

Gives users more screen space in the Image Viewer when the strip is not needed, without affecting any persistent settings.
hp

4. Persistent "Hanging Protocols Bar" Toggle by Modality​

What changed:​

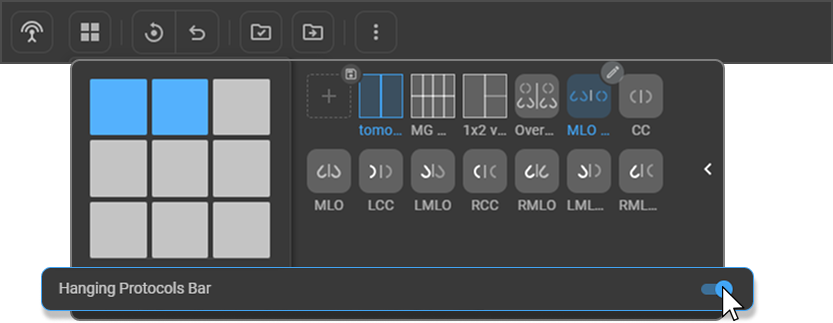
A new toggle in the Layout Selector lets you show or hide the Quick Access Strip per modality (e.g. CT, MR). The preference saves in your browser and syncs across open tabs.

Benefit:​

Users who work across multiple modalities can customise strip visibility per modality, with the preference persisting across sessions in the same browser.
hp

Important Notes​

  • The strip hide (chevron-up) is in-memory only — it resets on study change, modality change, or page refresh.

  • The modality toggle is saved per browser, not per user account. Clearing browser data or logging in on a different machine will reset the preference.

  • On multi-monitor setups, strip visibility is independent per monitor.

Where to Find It​

Navigation path in the application: Image Viewer → Hanging Protocol Settings

Updated Help Articles​

Product: Hotkey Customization

· Leitura de 3 minutos

Overview​

This release introduces updates to User Profile – Hotkey Customization in OmegaAI, focused on improving usability, efficiency, and system reliability. The Hotkey Customization feature allows each user to personalize the keyboard shortcuts in the Image Viewer. All configurable Image Viewer functions are surfaced in a single panel, enabling users to remap any key binding to their preferred combination. Customizations are saved to the individual user’s profile and apply across all organizations the user has access to.

What’s New​

1. Centralized Hotkey Customization Panel​

What changed:​

A dedicated Hotkey Customization panel has been added to the User Settings page, listing all 44 configurable Image Viewer functions alongside their currently assigned hotkeys in a two-column table. Functions without an assigned key are shown with a dash (—).

Benefit:​

Users can view and manage all keyboard shortcuts from a single location, eliminating the need to search across menus.

2. Dual Entry Points for Quick Access​

What changed:​

The Hotkey Customization panel can be accessed from two locations: the User Profile navigation bar (User Settings → keyboard icon) and directly from the Image Viewer (Settings → Customize Hotkeys). When accessed from the Image Viewer, a Back button appears at the top-left of the page header, enabling a seamless return to the Image Viewer.

Benefit:​

Radiologists and technicians can access and adjust hotkeys without leaving their workflow, reducing context switching during diagnostic sessions.

3. Live Conflict Detection & Resolution​

What changed:​

When a user assigns a key combination already in use, the conflicting row is immediately highlighted in red with a yellow warning icon (⚠). Saving is blocked until the conflict is resolved by reassigning or clearing one of the duplicate bindings.

Benefit:​

Prevents accidental overrides and ensures every function has a unique, valid key binding, reducing errors during diagnostic workflows.

4. Instant Effect & Reset to Defaults​

What changed:​

Saved hotkey changes take effect immediately across all open Image Viewer sessions without a page refresh. A Reset to Defaults button, located next to the Edit button at the top-right of the panel, restores all bindings to system defaults after a confirmation prompt.

Benefit:​

Users experience real-time feedback on their changes and can quickly recover from unintended configurations without disrupting their session.

Important Notes​

  • User-specific scope: Hotkey customizations apply per user, not per organization. Changes made by one user do not affect other users in the same organization.
  • Restricted keys: Certain system-reserved keys cannot be reassigned. An inline error is displayed: “This key is reserved and cannot be reassigned.”
  • Mouse inputs not accepted: Standard mouse buttons (left, right, middle) and the scroll wheel are not valid inputs in the hotkey capture field.
  • Back button behavior: The Back button is hidden while the panel is in Edit Mode and reappears once changes are saved or cancelled.
  • Clearing bindings: To clear a single hotkey, press Escape while the cell is focused. To reset all bindings at once, use Reset to Defaults (confirmation required).

Where to Find It​

Navigation path in the application: User Profile → User Settings → Keyboard Icon

Or from the Image Viewer: Image Viewer → Settings (three-dot menu) → Customize Hotkeys

Updated Help Articles​

HotKeyCustomization

Product: Blume & OAI Appointment Status Sync

· Leitura de 3 minutos

Overview​

This release ensures that appointment statuses in Blume are fully synchronised with OmegaAI (OAI) appointment and study statuses. Any action performed in OAI is automatically reflected in Blume in near real time, providing patients with an accurate and consistent view of their appointment at every stage.

What's New​

1. Blume Appointment Statuses Now in Sync with OmegaAI​

What changed:​
  • Blume appointment statuses now map directly to their corresponding OAI statuses. The following statuses are in sync across both platforms:

    • Scheduled — Appointment has been booked and is on the calendar. (OAI: SCHEDULED)

    • Confirmed — Appointment is confirmed and will proceed as planned. (OAI: CONFIRMED)

    • Requested — A reschedule or modification request has been submitted and is under review. (OAI: REQUESTED)

    • Cancelled — The appointment has been cancelled and will not take place. (OAI: CANCELLED)

    • Completed — The scan or appointment has been completed. (OAI: COMPLETED)

    • No Show — The appointment was missed and did not take place. (OAI: NO SHOW)

Benefit:​
  • Eliminates status mismatches between Blume and OAI, giving both clinic staff and patients a consistent, real-time view of appointment progress.

2. Clear Patient-Facing Status Descriptions in Blume​

What changed:​
  • Each appointment status in Blume now displays a plain-language description of what the status means for the patient:

    • Scheduled: Your appointment has been booked and scheduled.

    • Confirmed: Your appointment is confirmed and will proceed as planned.

    • Requested: A request to reschedule or modify your appointment has been submitted and is being reviewed.

    • Cancelled: Your appointment has been cancelled and will not take place.

    • Completed: Your scan or appointment has been completed.

    • No Show: Your appointment was missed and did not take place.

Benefit: Patients can clearly understand their appointment status without needing to interpret clinical or system terminology.

Important Notes​

  • Blume statuses are fully system-driven — they always reflect the latest OAI appointment state and cannot be set independently within Blume.
  • Actions initiated in Blume (e.g. rescheduling or cancellation) are pushed to OAI and reflected consistently across both platforms.
  • The Completed status may appear with a short delay, as it can depend on downstream study updates being finalised in OAI.
  • No Show and Cancelled are distinct statuses — they are explicitly differentiated in Blume to avoid confusion.
  • OmegaAI remains the single source of truth for all appointment lifecycle events.

Where to Find It​

Blume: Appointment status is visible to patients under Appointments in the Blume patient portal.

OmegaAI: Corresponding statuses are reflected in the Worklist under the Appointment Status column.

Updated Help Articles​

Product: Study Downloads & CD/Disc Burner

· Leitura de 2 minutos

Overview​

This release introduces significant updates to Study Downloads and CD/Disc Burner in OmegaAI, focused on improving speed, reliability, and resilience during large study exports.

What's New​

1. Faster Study Downloads​

What changed:​

Large study exports are now dramatically faster due to connection reuse optimization. A 1.3 GB study that previously took ~30 minutes now completes in ~6 minutes.

Benefit:​

Clinicians and staff spend less time waiting for large imaging studies to download, improving turnaround time for patient care.

2. Automatic Download Resume​

What changed:​

Study downloads now use the browser's native download system with range request support. If a network connection drops mid-download, the browser automatically resumes from exactly where it left off.

Benefit:​

Users no longer need to restart large downloads from scratch after a connection interruption — especially critical for large MRI and CT studies.

3. CD/Disc Burner — Resumable Burns & Token Refresh​

What changed:​

CD/Disc burn sessions now automatically resume if the connection is interrupted mid-burn. Additionally, authentication tokens are refreshed automatically in the background during long burn sessions, preventing silent failures.

Benefit:​

Long burn sessions complete reliably without requiring users to restart or re-authenticate, even on slow or unstable connections.

Important Notes​

  • These improvements apply to all study sizes, but are most impactful for large studies (500+ images / 1 GB+).
  • Download progress is now shown accurately in real time within the Downloads drawer.
  • The CD Burner improvements are included in this same release.

Where to Find It​

Study Downloads: Worklist → Study → Download CD/Disc Burner: Worklist → Study → Burn to CD

Updated Help Articles​

OmegaAI Export Features – https://help.omegaai.com/docs/Worklist/worklist_omegaai_export

Product: Biometric Authentication

· Leitura de 2 minutos

Overview​

This release introduces Biometric Authentication in the mobile application, adding a layer of security for user access. Along with a new 15-minute session timeout, users are now required to re-authenticate using their device’s configured security method (such as fingerprint, PIN, or face recognition) after periods of inactivity. This enhancement improves data protection while maintaining a seamless and quick re-entry experience.

What’s New​

1. Biometric Authentication for App Access​

What changed:​

Users can now enable biometric or device-based authentication (fingerprint, PIN, pattern, or face recognition) to unlock the application after login.

Benefit:​

Provides a faster and more secure way to access the app without repeatedly entering login credentials.

2. Optional Enable/Disable from Profile​

What changed:​

Users can choose to enable or disable biometric authentication from the Profile section at any time.

Benefit:​

Gives users flexibility and control over their preferred authentication method.

3. 15-Minute Idle Session Timeout​

What changed:​

The application now automatically locks after 15 minutes of inactivity and prompts the user for authentication.

Benefit:​

Enhances security by preventing unauthorized access when the app is left unattended.

4. Device-Based Authentication Handling​

What changed:​

The authentication method displayed depends on the device’s configured security settings (e.g., fingerprint, PIN, pattern, or face recognition).

Benefit:​

Ensures compatibility with a wide range of devices without requiring additional configuration.

5. Fallback to Login on Failed Attempts​

What changed:​

After three unsuccessful authentication attempts, users are redirected to the login screen and must complete a full login (Email, Password, OTP).

Benefit:​

Maintains security by preventing repeated unauthorized access attempts.

Important Notes​

  • This feature is available only on the mobile application (Android/IOS) and is not supported on the web
  • Biometric authentication is introduced after the first successful login
  • The session timeout is triggered after 15 minutes of inactivity, including when the app is in the background
  • Any user interaction resets the idle timer
  • If the application is closed, normal login behaviour applies
  • Authentication method depends entirely on the device’s configured security settings

Where to Find It​

Navigation path: Profile → Biometric and Screen Lock

Updated Help Articles​

Biometric Authentication | Blume User Guide

Product: PHI Access Consent Acknowledgement

· Leitura de 4 minutos

Overview​

This release introduces the PHI Access Consent Acknowledgement experience in OmegaAI, designed to strengthen privacy, compliance, and auditability across the platform. All non-federated users — including local users and social Identity Provider (IDP) users — are now required to explicitly acknowledge a mandatory compliance disclaimer before accessing any Protected Health Information (PHI) within OmegaAI.

How to Acknowledge the Disclaimer​

What’s New​

1. Mandatory PHI Access Disclaimer on Login​

What changed:​

Upon login, all non-federated users (local and social IDP users) will now be presented with a full-screen Protected Health Information (PHI) Access and Use Disclaimer. The disclaimer must be acknowledged before any PHI, or application functionality becomes accessible.

Benefit:​

Ensures that every user explicitly confirms their authorization and legal basis to access PHI, supporting HIPAA and HITECH compliance obligations while reducing the risk of unauthorized PHI exposure.

What changed:​

When a user selects Agree, their consent is securely captured via an API call and stored in the backend (EXT.JSON structure). Each consent event is logged with the user action (Agree/Disagree), timestamp, geographic location, and time zone.

Benefit:​

Provides a complete, tamper-evident audit trail for both acceptance and rejection events, supporting regulatory audits and internal compliance investigations.

3. Access Control Enforcement​

What changed:​

PHI access and all application functionalities are fully blocked until the user provides a recorded response to the disclaimer. The disclaimer cannot be dismissed, bypassed, or closed without consequence. If the window is closed without a response, the disclaimer will reappear on the next login.

Benefit:​

Guarantees that no user can access PHI without explicit prior consent, eliminating any possibility of accidental or unauthorized access at the point of authentication.

4. Disagree Flow – Immediate Logout and PHI Block​

What changed:​

If a user selects Disagree, they are immediately logged out and redirected to the login screen. No consent data is written, and PHI access remains blocked.

Benefit:​

Preserves the integrity of the consent process and ensures that users who do not agree to the disclaimer are prevented from interacting with any PHI-sensitive workflows.

5. Multi-Language Support​

What changed:​

The PHI Access and Use Disclaimer is available across all supported OmegaAI language translations.

Benefit:​

Ensures that all users, regardless of their preferred language, can clearly understand the compliance requirements before accessing PHI.

Important Notes​

  • Applies to all non-federated users only (local users and social IDP users). Federated users authenticated via external enterprise identity providers are not affected.
  • PHI access and all application functionalities are fully blocked until consent is recorded — there is no workaround.
  • The disclaimer cannot be bypassed, dismissed, or skipped. Closing the window without responding will cause it to reappear on the next login.
  • Once a user accepts the disclaimer, it will not appear again for that user.
  • A full audit trail is captured for both acceptance and rejection events, including timestamp, user location, and time zone.
  • The disclaimer is compliant with HIPAA, HITECH, and applicable state or regional privacy laws and is available in all supported OmegaAI language translations.

Where to Find It​

The PHI Access and Use Disclaimer is automatically presented during the login flow. No manual navigation is required.

Login Page → PHI Access and Use Disclaimer (auto-triggered post-authentication)

Updated Help Articles​

Login Process and MFA – Login Process and MFA | OmegaAI User Guide

Product: Quick Guides Feature

· Leitura de 4 minutos

Overview​

This release introduces the new Quick Guides feature in Blume, the patient-facing portal for OmegaAI. Users can now access contextual help articles directly within the platform — covering key workflows from scheduling appointments to sharing reports — without leaving their current session. Quick Guides are available across both the Blume mobile app and the web portal, ensuring consistent in-context support regardless of how users access Blume.

What's New​

A new Quick Guides navigation section is now accessible within the Blume. The following help topics are available in-app for patients:

Getting Started with Blume App (Mobile & Web)​

What changed:​

A setup and navigation guide is now available for first-time users across both the mobile app and web portal.

Benefit:​

Provides a smoother onboarding experience, helping users quickly understand navigation and get started regardless of the platform they use.

Your Appointments: Scheduled / Completed​

What changed:​

A dedicated guide is now available in-app to help users view and manage upcoming and past appointments.

Benefit:​

Patients can quickly understand how to navigate their appointment history without contacting support.

Viewing and Downloading Images​

What changed:​

Users can access a step-by-step guide for previewing and downloading medical images directly from their studies.

Benefit:​

Reduces confusion around image access, especially for first-time users.

Viewing and Downloading Reports​

What changed:​

An in-app guide walks users through accessing, previewing, and downloading their radiology and other reports.

Benefit:​

Empowers patients to independently retrieve their health documents at any time.

Share Images / Reports via Email​

What changed:​

A consolidated guide covers how to share images or reports with others via email, including how to open a study that has been shared with you — available for both mobile and web.

Benefit:​

Streamlines the sharing workflow and helps recipients understand how to access shared studies.

Download Complete Results​

What changed:​

Users now have guidance on how to download all study results in a single package.

Benefit:​

Simplifies bulk downloading for patients managing multiple studies.

Profile​

What changed:​

An in-app guide covers how to view and manage account settings within the Profile section.

Benefit:​

Helps users independently manage their personal information and preferences.

Important Notes

  • Quick Guides are read-only help content and do not affect patient data or study records.

  • The Share Images/Reports guide includes a sub-section: How to Open a Study Shared with You, covering both mobile and web workflows.

  • All guides are accessible without requiring additional permissions or account tiers.

  • Guide content may be updated periodically to reflect product changes; users will always see the latest version when accessed in-app.

  • Quick Guides are flexible by design — content can be updated or revised at any time without requiring a product release or deployment. This means guide material can be kept current or overhauled independently, even if the underlying feature undergoes a revamp.

Where to Find It

The Quick Guides are accessible directly from the left-hand sidebar of the Blume web portal. A “Need any help?” widget is displayed at the bottom-left of every page, with a prompt to “View our latest curated articles.” Clicking this widget opens the Quick Guides panel where users can browse and select any available guide.

Web Portal:

Left Sidebar → “Need any help? View our latest curated articles” widget → Select a guide

Mobile App:

Menu → Blume User Guide → Select a guide

Updated Help Articles

Product: Client-Facing UI – Apps Removal

· Leitura de 2 minutos

Overview​

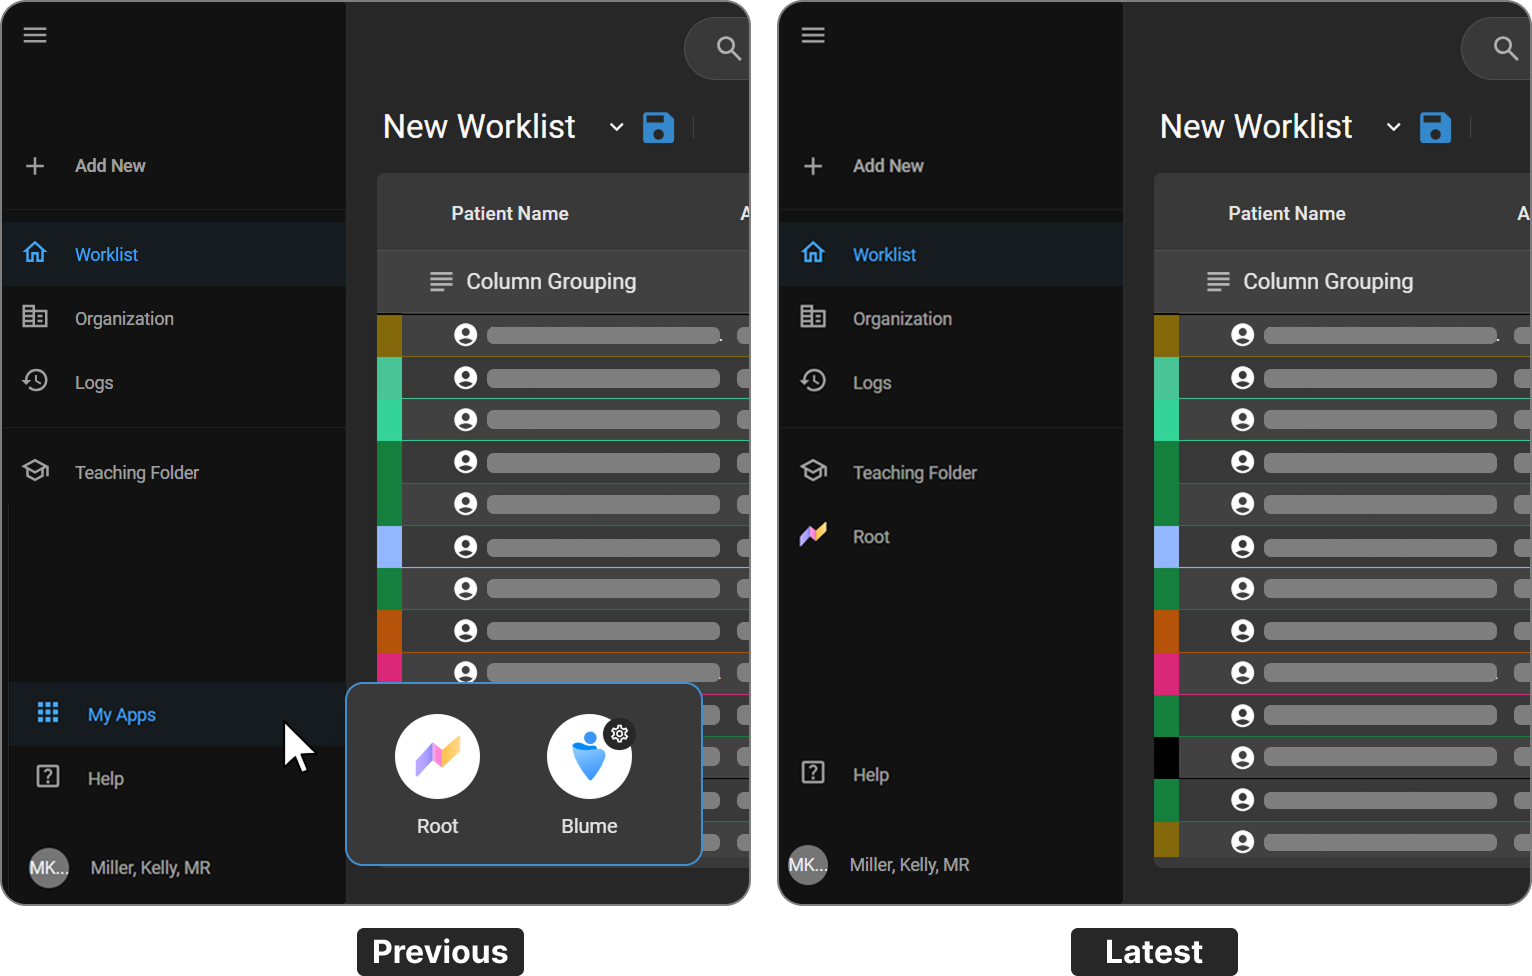
This release introduces a streamlined navigation experience by removing the My Apps application switcher. Previously, users accessed Root analytics and Blume forms through a separate app-selection interface. These are now directly integrated into the main navigation, reducing clicks and improving workflow efficiency.

What's New​

1. Removal of the My Apps Switcher​

What changed:​

The My Apps menu — which previously required users to select between the Root and Blume app tiles — has been removed from the interface.

Benefit:​

Eliminates an extra navigation step, giving users faster and more direct access to key areas of the application.

apps removal


2. Root Added as a Direct Navigation Item​

What changed:​

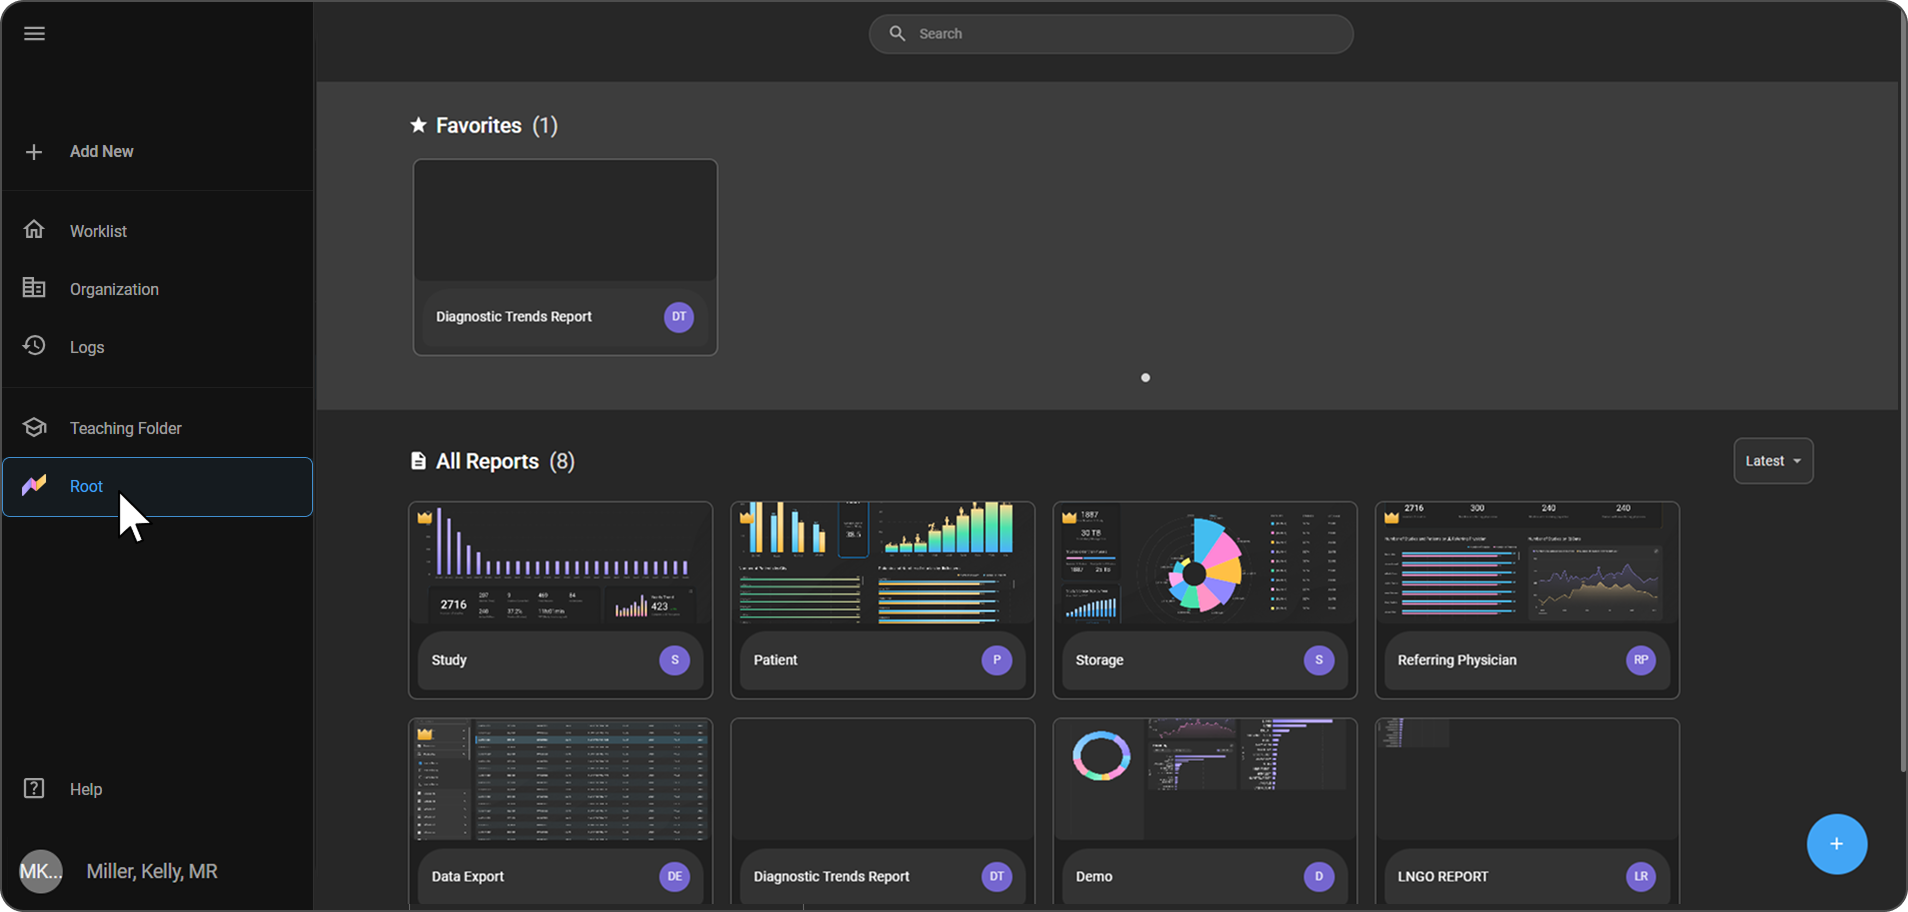
Root is now accessible as a dedicated item in the left sidebar navigation, alongside Worklist, Organization, Logs, and Teaching Folder.

Benefit:​

Users can navigate directly to Root analytics without going through an intermediate app-selection screen.

apps removal


3. Blume Forms Accessed via Organization​

What changed:​

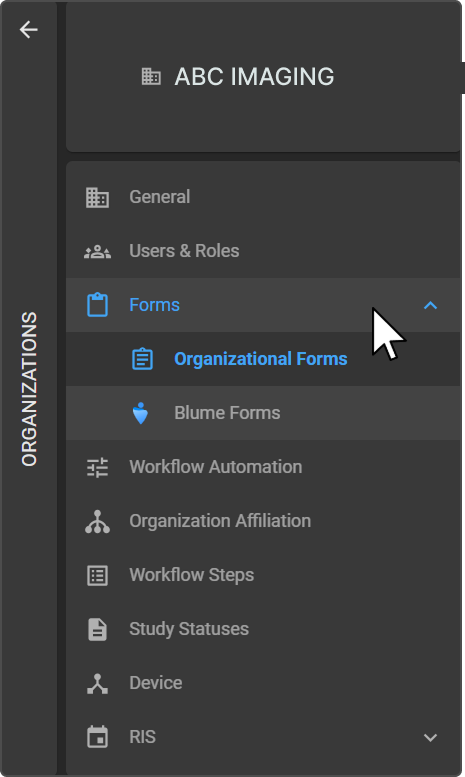
Blume Forms configuration is now accessed through the Organization settings panel under Forms → Blume Forms, rather than through a separate Blume app tile.

Benefit:​

Centralizes Blume configuration within the Organization settings, making it easier to manage alongside other organizational settings.

apps removal


Important Notes​

  • The My Apps app switcher is no longer available in the interface.
  • Users previously accessing Root analytics via the app tile should now use the Root item in the left sidebar.
  • Blume Forms configuration options remain fully available under Organization → Forms → Blume Forms.

Where to Find It​

FeatureNew Navigation Path
Root AnalyticsLeft Sidebar → Root
Blume FormsLeft Sidebar → Organization → Forms → Blume Forms

Updated Help Articles​

Product: Connect Account (Email & Mobile)

· Leitura de 2 minutos

Overview​

This release enhances the Connect Account feature in Blume by introducing mobile number–based account linking, alongside the existing email-based connection. The update improves accessibility, flexibility, and overall user experience while maintaining secure account verification.

What’s New​

1. Account Connection via Mobile Number (New)​

What changed:​

Users can now connect their account using a registered mobile number with OTP-based verification (supported in the United States and Canada).

Benefit:​

Provides a quick, secure way to link accounts with mobile authentication.

2. Account Connection via Email (Existing)​

What changed:​

Users can continue to connect their account using an email address, with verification via a code or a link.

Benefit:​

Offers a flexible connection option that is not restricted by geography.

3. Automatic Contact Information Sync​

What changed:​

Once an account is connected, the system automatically syncs associated mobile numbers and email addresses across the account.

Benefit:​

Ensures consistent and up-to-date contact information without manual updates.

4. Improved Access to Connect Account Option​

What changed:​

The Connect Account option is available when no studies exist and remains accessible via the Patient Profile even after studies are associated.

Benefit:​

Allows users to connect accounts at different stages of their journey.

Important Notes​

  • Mobile number-based connection is currently supported only in the United States and Canada
  • Email-based connection continues to be available globally
  • The mobile number or email must match the details registered with the facility
  • The Connect Account option is hidden from the main interface once studies are associated, but remains available in the Patient Profile
  • Data synchronization may take a short time after account connection

Where to Find It​

Navigation path in the application: Blume App → Patient Profile → Connect Account

Updated Help Articles​

https://blumehelp.omegaai.com/docs/Profile/Connectemail

Product: Workflow Automation Email Templates (Blume)

· Leitura de 2 minutos

Overview​

We’re pleased to announce enhancements to the Email Template feature in Workflow Automation (WFA) for Blume. These updates are designed to simplify template management, improve usability, and provide greater flexibility in patient communications.

What's New​

1. Enhanced User Experience​

What changed:​

The Email Template interface has been redesigned with a structured grid-based layout, replacing the earlier tile view.

Benefit:​

Templates are easier to browse, compare, and manage within workflows.

2. Improved Template Management​

What changed:​

Users can now seamlessly create, edit, activate, deactivate, and reuse email templates directly within a workflow.

Benefit:​

Templates support common patient communication scenarios such as appointment confirmations, cancellations, invitations, and notifications — all within a single workflow.

3. Flexible Customization & Branding​

What changed:​

Email content is fully customizable using an enhanced editor, allowing organizations to format text and adjust layouts.

Benefit:​

Organizations can align emails with their branding and communication standards for a consistent patient experience.

4. Reply-To Email Configuration​

What changed:​

A configurable Reply-To option allows organizations to route patient responses to a preferred email address.

Benefit:​

When disabled, system-managed footer messaging clearly indicates that the email is auto-generated, ensuring transparent patient communication.

Important Notes​

  • Templates can be activated or deactivated but cannot be permanently deleted once in use within a workflow.
  • The Reply-To configuration is optional; when not set, the system auto-generated disclaimer appears in the email footer.
  • Email Templates are specific to the Blume platform within Workflow Automation and are not shared across other OmegaAI modules.

Where to Find It​

Navigation path in the application:

Workflow Automation → Email Templates

Updated Help Articles​

Email Templates in Workflow Automation (Blume)