
Product Update: Avoid Concurrent Reporting (Report access indicator)

Β· 2 min read

Overview​

This release introduces the Avoid Concurrent Reporting feature in OmegaAI, designed to improve visibility and coordination among radiologists and clinicians by providing real-time insight into report access and activity. The Report Access Indicator shows when a report is actively being viewed or edited, helping reduce conflicts, confusion, and duplicate efforts when multiple users access the same report.

Avoid Concurrent Reporting

What's New​

1. Real-Time Report Access Indicator​

What changed:​

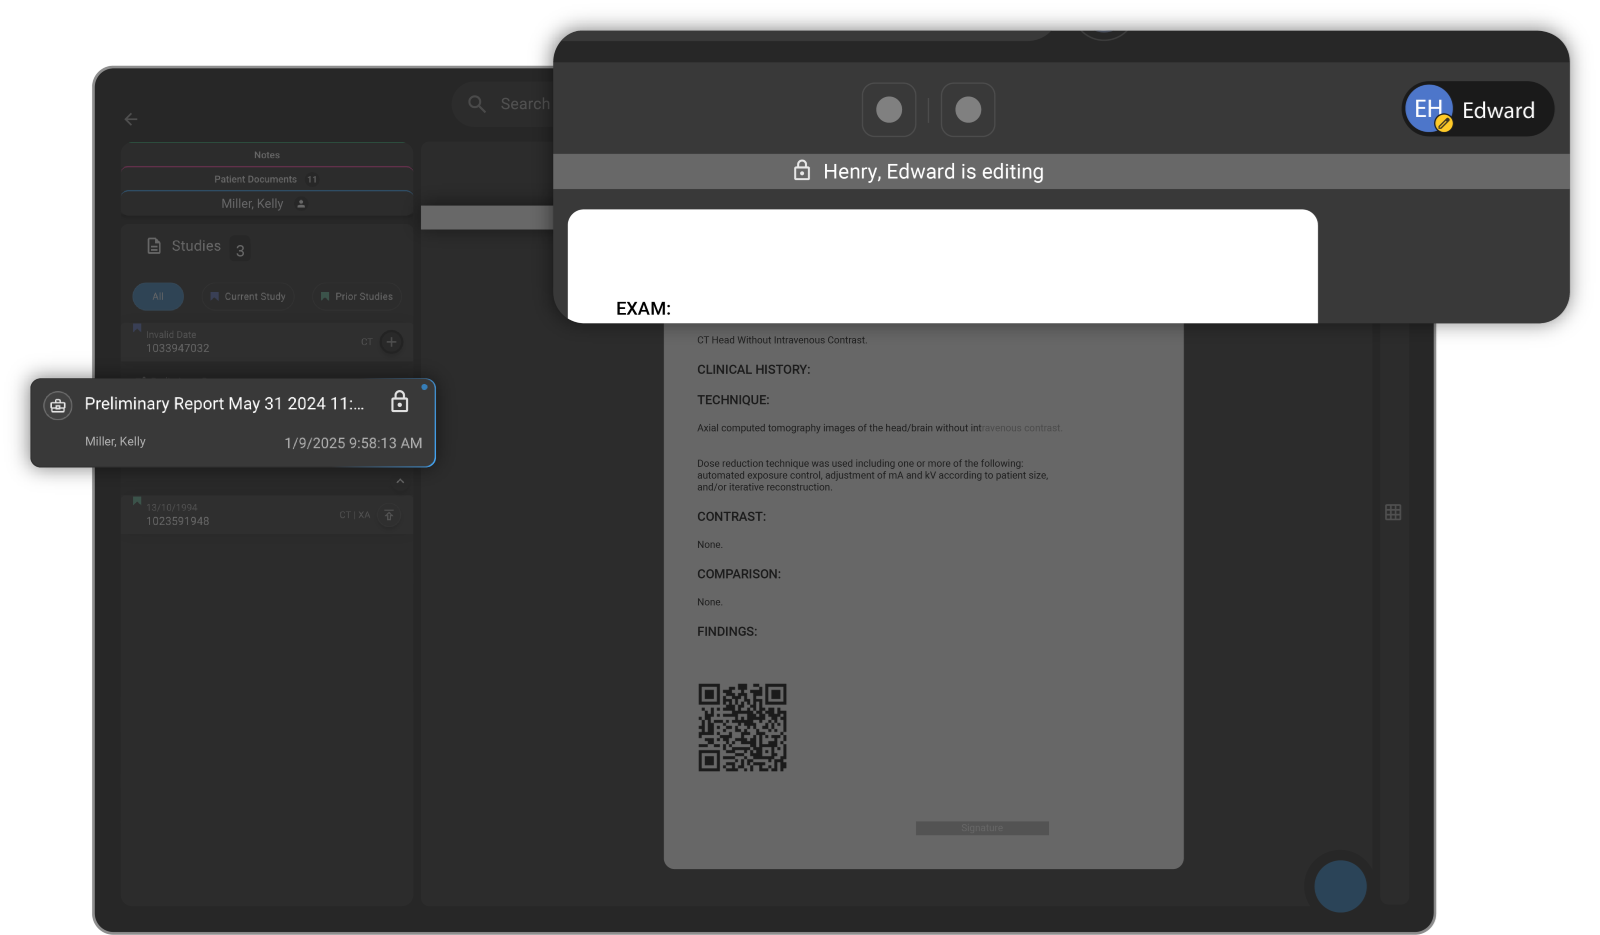
A Report Access Indicator is now displayed to show when a report is actively being viewed or edited by another user.

Benefit:​

Improves visibility into report access, helping users avoid conflicts and duplicate work.

2. Improved Collaboration and Handoff​

What changed:​

Users can now see who is currently accessing a report in real time.

Benefit:​

Prevents accidental overwrites and enables smoother coordination between radiologists and clinicians.

3. Enhanced Workflow Efficiency​

What changed:​

Real-time visibility reduces the need for manual checks or communication to determine report availability.

Benefit:​

Streamlines workflows by minimizing delays and uncertainty around report status.

Important Notes​

  • The indicator reflects real-time access and may change dynamically as users open or close reports

  • Visibility of user activity depends on system permissions and access levels

  • This feature does not restrict access but provides awareness to avoid concurrent edits

Where to Find It​

Navigation path in the application: Image Viewer β†’ Embedded Document Viewer (EDV) β†’ Document Explorer

The Report Access Indicator is displayed alongside reports to show active viewing or editing status.

Updated Help Articles​

Report access indicator

Product Update: Self-Scheduling with Order Set Selection

Β· 2 min read

Overview​

This release introduces updates to Self-Scheduling in Blume to improve usability, efficiency, and system reliability. Patients can now directly book appointments from Blume using integrated Order Set Selection.

What’s New​

1. Self-Scheduling with Order Set Selection​

What changed:​

Patients can now book appointments by selecting the appropriate Order Set directly within Blume, aligning with the existing self-scheduling workflow.

Benefit:​

Simplifies the booking process and ensures patients select the correct procedures, improving scheduling accuracy and reducing manual intervention.

Step 1:

Self Scheduling Orderset Selection

Step 2:

Document Upload and Integrated Forms

2. Customizable Order Sets for Imaging Centres​

What changed:​

Imaging centers can fully customize order sets, defining available healthcare resources, specific naming conventions, and self-scheduling capabilities tailored to their individual practice needs.

Benefit:​

Provides flexibility to tailor scheduling workflows based on organizational needs, improving control and operational efficiency.

3. Organization Auto-Fill for Returning Patients​

What changed:​

If a patient has previously booked an appointment, the associated organization details are automatically pre-filled during scheduling.

Benefit:​

Reduces repetitive data entry and speeds up the appointment booking process for returning patients.

Important Notes​

  • Order Set availability for self-scheduling depends on the configuration by the imaging centre
  • Patients can only select from configured and enabled Order Sets
  • Patient Document Upload: Patients can continue to upload required documents (e.g., physician orders) within Blume; these remain accessible to imaging centres for review
  • Integrated Patient Forms: Imaging centres can continue to enable forms for patients during the appointment request process to ensure complete and accurate information collection

Where to Find It​

Navigation path in the application: Blume Patient Portal β†’ Search Imaging Procedure β†’ Request New Appointment

Updated Help Articles​

Search Imaging Procedure & Requesting New Appointment.

Product Update: Patient chart

Β· 2 min read

Overview​

This release introduces the Patient Chart feature in OmegaAI, focused on improving access to patient information and documents while enhancing workflow efficiency.

We are excited to announce the new Patient Chart feature, designed to streamline patient information and provide quick, centralized access to patient documents.

Patient chart

What’s New​

1. Patient Card​

What changed:​

Displays high-level patient details and vital statistics for quick reference.

Benefit:​

Provides immediate access to key patient information, reducing navigation time.

2. Patient Documents Management​

What changed:​

Users can view all uploaded documents (from patients or technicians) and upload new documents directly. The patient’s registration form is also accessible without additional navigation.

Benefit:​

Centralizes document access and simplifies document management workflows.

3. Split View for Documents​

What changed:​

Users can view patient documents side by side within a split view interface.

Benefit:​

Enhances efficiency by enabling simultaneous document review.

Important Notes​

  • Patient documents include uploads from both patients and technicians.
  • Registration forms are accessible directly within the Patient Chart.
  • Split view is available for improved document comparison and review.

Where to Find It​

You can access the Patient Chart from the Patient module in OmegaAI.

Navigation path in the application: Patient β†’ Patient Chart

Updated Help Articles

Patient chart

Product Update: Voice Command Search Enhancement

Β· 2 min read

Overview​

This release introduces updates to Voice Commands in OmegaAI to improve usability, efficiency, and system reliability.

Voice Commands Search

What's New​

1. Voice Command Search Functionality​

What changed:​

Users can now search for specific voice commands instead of manually browsing through the full list.

Benefit:​

Reduces time spent locating commands and improves efficiency by enabling quick access to required actions. Enhances command discoverability and streamlines workflow efficiency through search-enabled navigation.

2. Direct Command Editing​

What changed:​

Users can edit voice commands directly after locating them through search.

Benefit:​

Provides greater flexibility and control, allowing quick updates without navigating through multiple steps.

3. Improved Accessibility and Navigation​

What changed:​

Enhancements to the voice command interface improve accessibility and ease of use.

Benefit:​

Enables faster interaction with tools and commands, resulting in a more seamless and intuitive workflow.

Important Notes​

  • Search results are limited to available configured voice commands

  • Editing permissions may depend on user roles and system configuration

Where to Find It​

Navigation path in the application:

Image Viewer β†’ Embedded Document Viewer (EDV) β†’ 3-dot menu / Voice Command option

Voice Commands can be accessed within the Document Viewer toolbar/menu, where users can view, search, and manage configured voice commands.

Updated Help Articles​

Voice Recognition and Voice Command Features

Product Update: 'Signed Report' Trigger in Workflow Automation (WFA)

Β· 2 min read

Overview​

We are pleased to announce the Signed Report Trigger under the Operations Trigger Type in Workflow Automation (WFA). This new trigger automates post-report actions (e.g., distribution, notifications) immediately after a diagnostic report is finalized, effectively eliminating delays caused by asynchronous DICOM processing. This mainly improves support for customers who are using external reporting solutions, while adding more granular control over other report creation scenarios.

Signed Trigger

What's New​

Trigger Activation Scenarios​

What changed:​

The Signed Report Trigger could be activated when any of the following occurs:

  1. A diagnostic report is uploaded as a final report via the Document Viewer (DV) GUI.
  2. A report is received in OmegaAI through HL7 or FHIR integrations.
  3. A Structured Report is ingested via DICOM ingestion through OmegaAI Link.
  4. A final report (DICOM encapsulated) imported using the Import Feature.
  5. A final report is created or saved in OmegaAI’s Document Viewer (DV), including Signed Amendments.

Note: Ensure that you add the appropriate conditions after the trigger to prevent the final sign-off from being activated when not required.

Benefit:​

Workflow Automation allows you to automate processes and tasks, increasing efficiency and reducing manual intervention. With the Signed Report Trigger, we’re taking another step toward streamlining your reporting workflow.

Important Notes​

β€’ It is recommended to configure appropriate conditions with the trigger to avoid unintended execution β€’ Original workflow execution depends on report finalization events across supported ingestion methods β€’ Particularly beneficial for environments using external reporting solutions β€’ Ensure conditions are configured to prevent unnecessary trigger activation

Where to Find It​

Navigation path in the application:

Organization β†’ Details β†’ Workflow Automation β†’ Create/Edit Workflow β†’ Trigger Type: Operations β†’ Signed Report

Updated Help Articles​

Workflow Automation.

Welcome

Β· 3 min read

Dear OmegaAI Users,

We are thrilled to announce the launch of our brand-new OmegaAI User Guide! This comprehensive resource is designed to help you navigate and maximize the powerful features of OmegaAI, our cutting-edge cloud-based SaaS solution for medical imaging practices and enterprise healthcare organizations.

Why a New User Guide?​

At OmegaAI, we are committed to providing our users with the best possible experience. Our new user guide reflects this commitment by offering a more structured, detailed, and user-friendly resource to support you in your daily operations. Whether you are a new user or a seasoned professional, our guide is here to assist you every step of the way.

What's Inside?​

The OmegaAI User Guide is a one-stop resource that covers all aspects of our platform. Here are some of the key sections you will find:

Getting Started​

For new users, this section provides a step-by-step introduction to OmegaAI. From setting up your account to navigating the dashboard, you’ll find everything you need to get up and running quickly.

Document Management and Diagnostic Reporting​

Explore in-depth guides on managing documents and generating diagnostic reports. This section includes detailed instructions, screenshots, and tips to help you make the most of these features.

Image Viewer​

Learn how to use our zero-footprint diagnostic image viewer, which allows you to view and analyze medical images efficiently and effectively.

Discover how to use OmegaAI's all-in-one search module, including remote DICOM search capabilities, to find the information you need quickly.

Communication and Organization Tools​

Optimize your workflows with our communication and organization tools, which include logs and organization configurations.

Workflow Automation​

Understand how to use OmegaAI’s visual workflow automation designer to streamline your processes and improve efficiency.

info

How to Access the User Guide?

Accessing the new OmegaAI User Guide is simple. You can directly visit the URL https://help.omegaai.com or click on the β€˜Help’ option located in the lower part of the left navigation bar in your OmegaAI account.

Thank You!​

We want to extend our sincere gratitude to all our users for your continued support and feedback. It is your dedication and insights that drive us to innovate and improve. We are excited for you to explore the new OmegaAI User Guide and look forward to hearing your feedback.

Thank you for being a part of the OmegaAI community!