Product: Page Breaks in Reports Release Note

· 2 min read

Overview​

This release introduces the Page Break feature in OmegaAI, enabling administrators and reporting users to insert explicit page breaks at any point within report templates. When reports are generated as PDFs—whether in Preview or as Final reports—all content following a page break marker begins on a new page. This feature is available across all sections of a report template and provides greater control over report layout and presentation.

What's New​

1. Insert Page Breaks in Report Templates​

What changed:​

Administrators can now place the cursor at any position in a report template and insert a page break marker using the Page Break button in the Document Viewer text editor toolbar. A horizontal line visually indicates the page break location within the editor.

Benefit:​

This allows administrators to control how report content is distributed across pages in PDF output, improving readability and customizing report presentation without manual post-processing.

2. Consistent PDF Output Behavior​

What changed:​

Page breaks function consistently across both PDF Preview and Final report versions. Content following a page break marker automatically begins on a new page in both output formats.

Benefit:​

Administrators can preview exactly how reports will appear in their final PDF format, ensuring layout consistency and eliminating surprises in finalized reports.

3. Template-Wide Availability​

What changed:​

The Page Break feature is now available in both the report template and the Document Viewer editor, across all sections, and is not restricted to specific content types or specific areas.

Benefit:​

Administrators have full flexibility to structure reports according to organizational standards and reporting requirements, regardless of which template section they're working in.

Important Notes​

  • The page break marker displays as a horizontal rule within the editor interface. This marker is for reference only and does not affect visual layout within the editor itself.
  • Page breaks are applied only when the report is rendered as a PDF; they do not impact the editor's display.
  • This feature is not restricted to specific content types or report sections.

Where to Find It​

Navigation path in the application:

User Guide → Document Viewer → Page Breaks in Reports

Updated Help Articles​

PageBreak

Product: DICOM Receive Completed Trigger for Workflow Automation

· 2 min read

Overview​

OmegaAI now introduces the DICOM Receive Completed trigger for Workflow Automation (WFA), enabling workflows to start automatically once a DICOM ingestion operation has successfully completed.

What's New​

1. New DICOM Receive Completed Trigger​

What changed:​

A new Workflow Automation trigger is now available that executes after a DICOM ingestion session has been completed successfully.

The trigger fires when:

  • A new study is received.
  • Additional DICOM series or instances are added to an existing study.
  • The configured Receive Timeout (default: 60 seconds) expires after the last received object.
  • All study, series, instance, and ingestion metadata has been finalized and is available for workflow evaluation.
Benefits:​

Supported Across All DICOM Ingestion Methods
The trigger works consistently regardless of how DICOM data enters OmegaAI, providing a unified automation experience across supported ingestion methods.

Asynchronous Workflow Execution Workflow Automation runs asynchronously after ingestion completes, ensuring image reception and ingestion performance are not delayed or interrupted.

DICOM Receive Completed vs. Study Status Triggers

DICOM Receive CompletedStudy Status Trigger
Fires after DICOM ingestion completesFires when a study status changes
Does not require a study status changeRequires a study status change
Supports new studies and incremental arrivalsExecutes only when the study status changes
Ensures ingestion is complete before automation beginsBased solely on lifecycle transitions
Best for ingestion-driven workflowsBest for lifecycle-based workflows

Important Notes​

The DICOM Receive Completed trigger enables organizations to automate workflows immediately after DICOM ingestion, even when no study status change occurs.

This is valuable for:

  • Automatically routing newly received studies.
  • Triggering downstream integrations.
  • Sending notifications after image reception.
  • Processing incremental arrivals of additional series or instances.
  • Building ingestion-driven workflows without relying on study lifecycle events.

Where to Find It​

Navigation path in the application:

User Guide → Workflow Automation → Understanding Triggers → DICOM Receive Completed Trigger

Updated Help Articles​

Understanding Triggers; DICOM Receive Completed Trigger

Product: Patient Context Validation at Report Signing

· 2 min read

Overview​

This release introduces automatic validation during report signing in Document Viewer. When a radiologist signs a report using Done or Done & Next, OmegaAI validates that the report is associated with the currently loaded patient study and verifies the presence of required report header and footer content. If a validation issue is detected, the user is prompted to review the report before signing can proceed. The validation is enabled by default and requires no configuration.

What's New​

1. Automatic Validation During Signing​

What changed:​

The system automatically validates patient and study context when a report is signed using Done or Done & Next.

Benefit:​

Provides an additional verification step before report finalization when report context may no longer match the currently loaded patient study.

What changed:​

The signing workflow now verifies that required report header and footer content is present before signing completes.

Benefit:​

Helps ensure that signed reports contain required report components before finalization.

3. Pre-Sign Review Notice​

What changed:​

When a validation issue is detected, a pre-sign notice is displayed. Users can choose to reload the study using current patient information or cancel the signing action.

Benefit:​

Allows users to review and address validation issues before completing report signing.

Important Notes​

  • Validation runs automatically whenever a report is signed using Done or Done & Next. No manual action is required.
  • The feature is enabled by default and requires no configuration.
  • If all validation checks pass, signing proceeds normally without interruption.
  • The validation notice does not identify which specific validation check triggered the warning.
  • Selecting Reload refreshes the study with the most current patient data before signing proceeds.
  • Selecting Cancel stops the signing process and returns the user to the report without making changes.
  • The system does not automatically modify, reassign, or correct patient information.
  • Validation confirms that the patient loaded in the study matches the patient associated with the report and verifies the presence of report header and footer content.

Where to Find It​

Navigation path in the application:

Document Viewer → Open Report → Done / Done & Next

Updated Help Articles​

Patient Context Validation

Product: Address & Contact -Switch from Tab to Section

· One min read

Overview​

This release introduces updates to Contact & Address Layout in OmegaAI, focused on improving usability and consistency across create/edit forms.

What's New​

Contact and Address Details Now Shown Together​

What changed:​

On add/edit forms for Patient, Member, Guarantor, Payer, Employer, Physician, and Organization, Contact and Address details were previously under separate tabs. Users had to click a tab to see one set of fields, like Address, while the other stayed hidden. This has been updated — both sections (Contact and Address) now appear directly on the page, one after the other, so everything is visible without having to click anything else.

Benefit:​

Users will be able to see and fill in all the contact and address details in one place, ensuring easier and faster completion of these forms.

Important Notes​

  • On the Physician form, fields are now adjusted for a better appearance and consistency.

  • On the Payer form, the section previously labeled "Contact Details" is now "Contact", in sync with the naming used elsewhere.

Where to Find It​

Navigation path in the application: [Module] → [Section] → [Page — please fill in]

Product: Labels - Financial Class & Kind

· 2 min read

Overview​

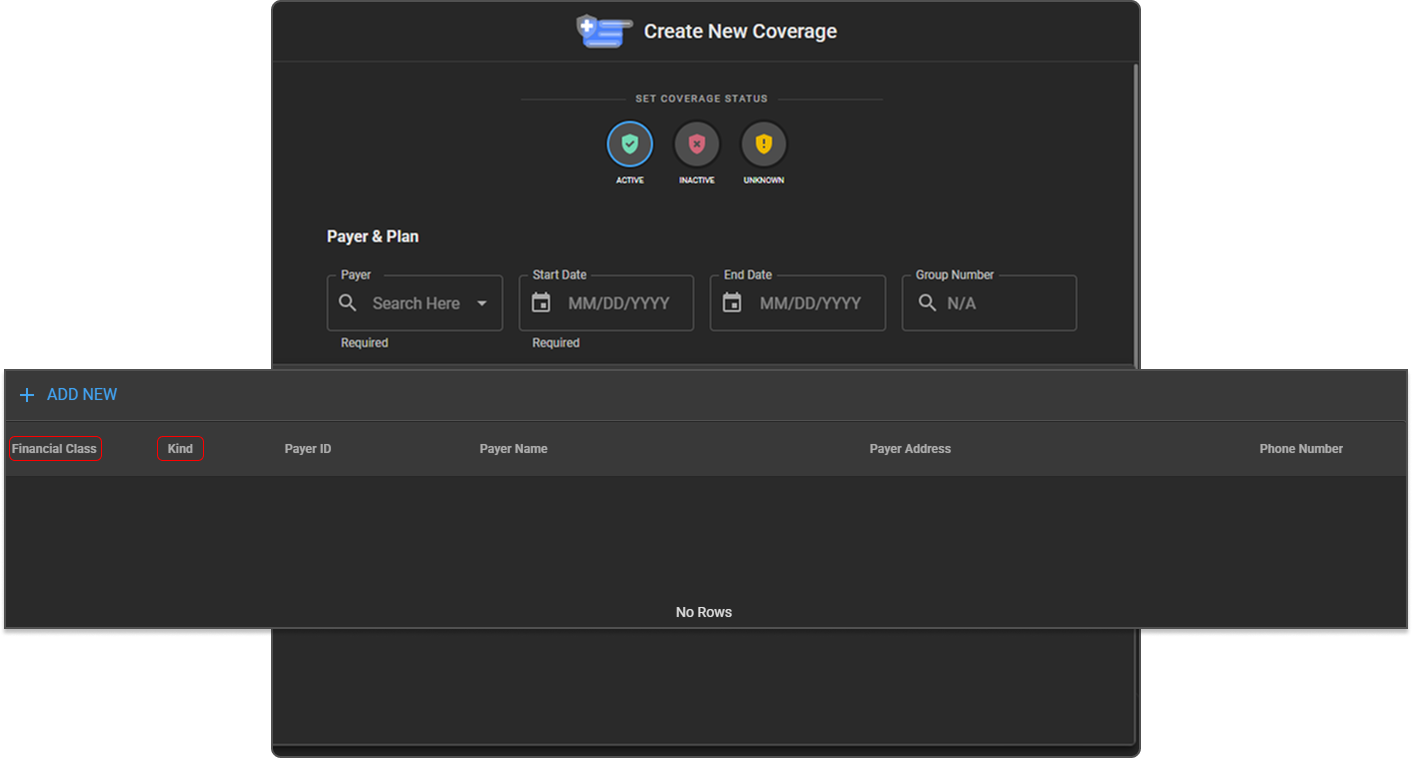
To align OmegaAI with standard billing and insurance terminology, two field labels on the Insurance Payer and Coverage screens have been renamed. This is a display-only change: field behavior, stored data, and reporting are unaffected, so no re-entry or re-training is required.

What's New​

1. "Financial Type" is now called "Financial Class"​

What changed:​

Wherever "Financial Type" used to appear — on the Insurance Payer screen, the Financial Type list, and on Coverage details — it now reads "Financial Class."

Benefit:​

Reduces the gap between the term seen on screen and the term used in billing conversations, patient statements, and payer contracts — cutting down on mix-ups during training and day-to-day work.

2. "Payer Type" is now called "Kind"​

What changed:​

The "Payer Type" field on the Insurance Payer screen is now labeled "Kind." It still works exactly the same way — for example, marking a payer as self-pay or insurance is unchanged.

Benefit:​

Removes a source of confusion where "type" was used for two different concepts (Financial Type and Payer Type) on the same screen.

Financial Class and Kind labels

Important Notes​

  • Display-only change: Field IDs, stored values, and FHIR mappings are unchanged. Existing payer and coverage records, reports, and integrations continue to work without modification.
  • No migration or downtime: The new labels take effect automatically the next time the affected screens are loaded.

Where to Find It​

  • Financial Class: Organization → RIS → Financial Class
  • Kind: Organization → RIS → Payers (also shown when adding or editing a payer, and on the Coverage screen)

Product: Requesting Appointment

· 3 min read

Overview​

This release introduces updates to the Request Appointment feature in OmegaAI’s Blume patient portal, focused on improving usability, accessibility, and appointment workflow consistency across mobile and web platforms

What’s New​

1. Request Appointment Button on Study Cards (Web)​

What changed:​

On web, the Request Appointment button appears directly on individual completed study cards. It is only shown for studies where the imaging organization has enabled the feature.

Benefit:​

Placing the button at the study level makes the action contextually relevant, reducing confusion and preventing patients from initiating a request without a specific study in mind.

2. New Referring Physician Field​

What changed:​

A Referring Physician field has been added to the appointment request form on both mobile and web. Users can add referring physician from the dropdown. The field is optional and can be left blank.

Benefit:​

Allows patients to provide referring physician details upfront, giving imaging organizations richer context when reviewing appointment requests.

3. Improved Appointment Slot Availability View​

What changed:​

The date selection screen now uses a week view (seven days at a time). Dates with available slots are visually highlighted, and the nearest available date is auto selected by default. A calendar icon allows patients to browse all highlighted available dates across the month.

Benefit:​

Patients no longer need to check each day manually. The view makes it immediately clear when slots are available, speeding up the booking process.

4. Confirm Details Preview Screen​

What changed:​

A Confirm Details preview screen has been added as the final step before submission on both mobile and web. Patients can review their full appointment summary, attach additional supporting documents, and navigate back to correct any details before confirming.

Benefit:​

Gives patients a final opportunity to verify all information before submission, reducing errors and unnecessary follow-up with imaging staff.

Important Notes​

  • The Request Appointment button only appears on completed study cards. It is not shown on in-progress or other study types.
  • Visibility of the button depends on the imaging organization having enabled the ‘Allow Patients to Request Appointments’ setting. If the button is not visible, patients should contact their imaging provider.
  • The Exam Centre field is pre-filled with the organization’s facility and is disabled — it cannot be changed by the patient.
  • The Notes field is not available on the Confirm Details screen.
  • Submitted appointment requests are reviewed by the imaging organization before confirmation. Once confirmed, the appointment appears in the Schedule tab of the patient’s Blume portal.

Where to Find It​

Navigation path in the application:

Mobile: Blume Portal → Completed Study Card → Request Appointment

Web: Blume Portal → Completed Study Card → Request Appointment

Updated Help Articles​

Requesting Appointment

Product: Countdown to the New Worklist

· 2 min read

Overview​

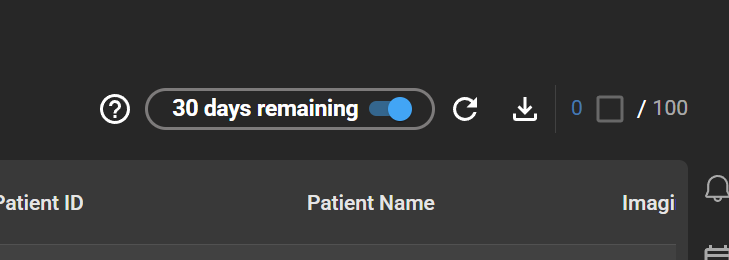
OmegaAI is sunsetting the legacy worklist and moving all users to the new worklist. To make the transition clear and predictable, the "Try New Worklist" toggle in the worklist header has been replaced with a live countdown timer showing how many days remain until cutover. On the cutover date, the toggle is removed entirely and all users are served the new worklist by default.

This update is informational — no action is required to continue using OmegaAI. We recommend switching to the new worklist now and getting comfortable before the timer reaches zero.

What's New​

1. Live Countdown in the Worklist Header​

hp

What changed:​

The previous "Try New Worklist" toggle has been replaced with a countdown label that updates each day.

The toggle remains fully functional throughout the countdown — you can switch between the legacy and new worklist as often as you like.

2. Automatic Cutover to the New Worklist​

What changed:​

When the countdown reaches zero, the toggle is removed from the worklist header and all users are automatically served the new worklist, regardless of which one they had selected previously. After cutover, the legacy worklist is no longer accessible.

Important Notes​

  • Toggle still works during the countdown. You can switch back to the legacy worklist at any time before the cutover date if you need to.
  • No opt-out after cutover. Once the countdown reaches zero, the legacy worklist is no longer available. We recommend transitioning early and reporting any blockers before the cutover date.
  • Your worklist layouts carry over. Saved worklist layouts, columns, filters, and groupings are already shared between the legacy and new worklist — no migration needed.

Where to Find It​

Worklist → Header — look for the countdown label where the "Try New Worklist" toggle used to be.

Preparing for the Cutover​

  • Switch to the new worklist now and use it as your default day-to-day worklist
  • Review your saved layouts and confirm they look correct in the new worklist
  • Explore the new-worklist features — column-aware right-click assignment, grouped-column filters, multi-column sort, and the new grids in Study History and Teaching Folder
  • Report any blockers or unexpected behavior to your RamSoft contact so we can address them before cutover

Product: Image Viewer Enhancements & Blume Mobile Image Viewer

· 5 min read

Overview​

This release introduces the Blume Mobile Image Viewer, a new M-Mode measurement tool for ultrasound, and enhancements to the OmegaAI Image Viewer.

What's New​

1. Blume Mobile Image Viewer​

What changed:​

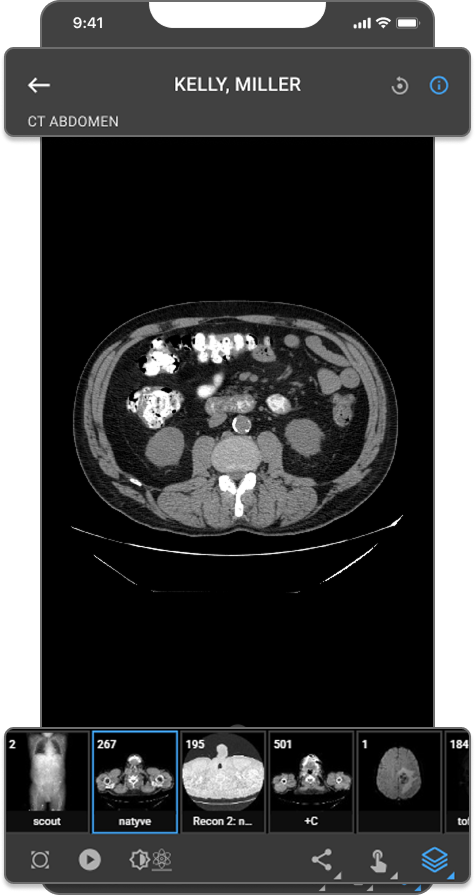
The Blume Mobile Image Viewer is now available in the Blume Patient Portal app on iOS and Android. Patients can view DICOM studies on any touchscreen device with support for stack scroll, Cine playback, window leveling, measurements, Drag Probe, image orientation controls, landscape mode, and JPEG sharing via the native share sheet.

Benefit:​

Patients can securely review their imaging studies from a mobile device with tools consistent with the desktop Image Viewer experience.
Mobile IV


2. M-Mode Measurement Tools for Ultrasound​

What changed:​

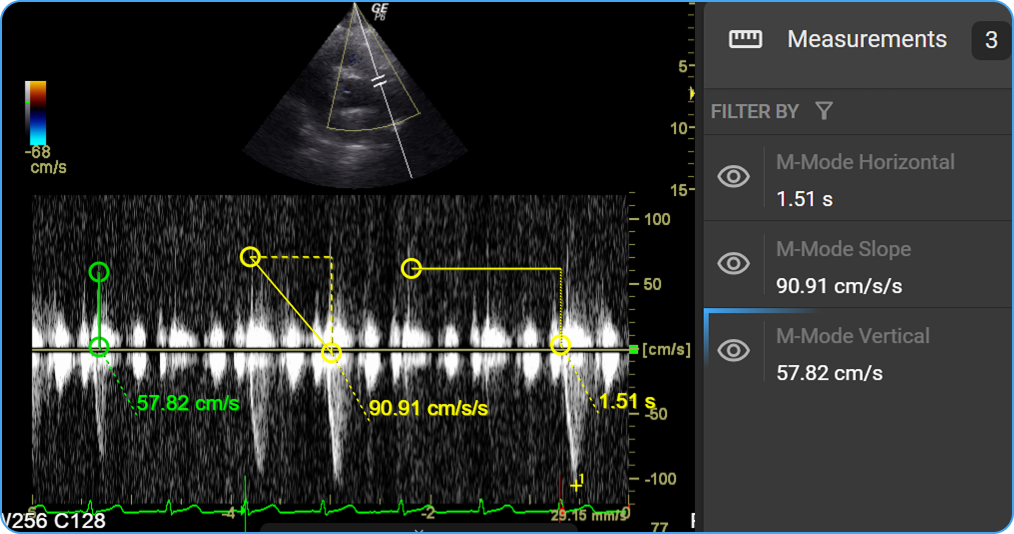
Three measurement tools are now available when an M-Mode ultrasound series is active — auto-detected on load. Slope (cm/s), Horizontal (s), and Vertical (cm/s) measurements are placed by click and drag, calibrated to DICOM metadata, and saved as annotations for structured reporting.

Benefit:​

Precise in-viewer cardiac quantification on M-Mode ultrasound without switching tools or workflows.
Mobile IV


3. New Cine Tool on Viewport​

What changed:​

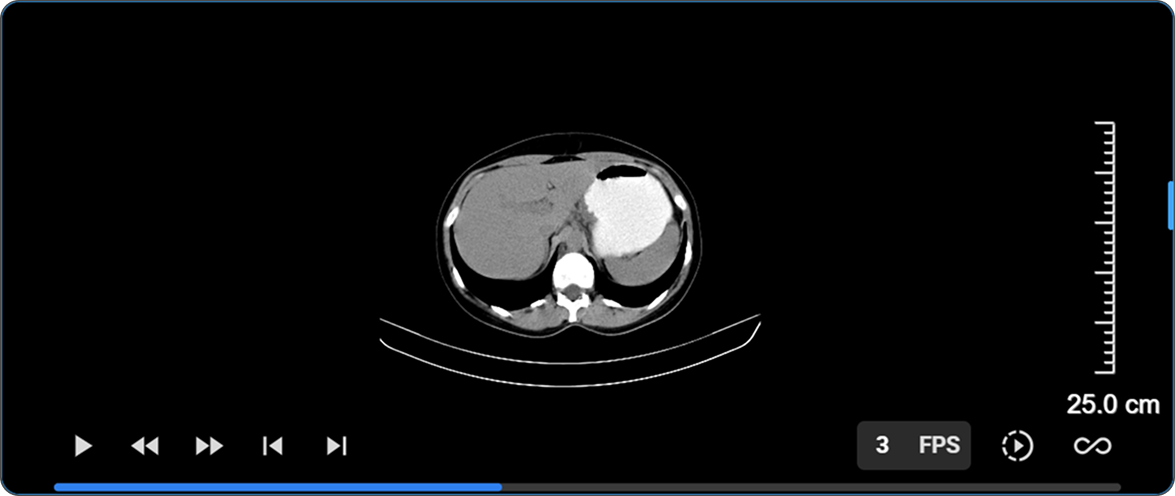
The Cine playback toolbar has been redesigned with a full-width progress bar at the bottom of the viewport. Left-side controls include play/pause, first frame, last frame, previous frame, and next frame. Right-side controls include an FPS display, playback speed, and playback method.

Benefit:​

Full frame-level control over cine playback directly within the viewport.
Mobile IV


4. Hotkey Customization​

What changed:​

All configurable Image Viewer key bindings are now surfaced in a dedicated Hotkey Customization panel within the User Settings page. The panel is also accessible directly from the Image Viewer via Settings → Customize Hotkeys, with a Back to IV button to return without losing context.

Benefit:​

Radiologists can tailor keyboard shortcuts to match their reading preferences, with changes persisted to their profile and applied consistently across all organizations they have access to.


5. Browser-Locale Date & Time Format in Overlay Annotations​

What changed:​

Date and time values in Image Viewer overlay annotations — including study, series, acquisition, and content date/time, and date of birth — now automatically follow the user's browser locale (navigator.language).

Benefit:​

Date and time stamps display in the format most familiar to each user with no manual configuration required.


6. Annotations Included in Export (Download, Print, Copy to Clipboard)​

What changed:​

Visible annotations and measurements are now included when downloading, printing, or copying an image to clipboard — the export captures the viewport exactly as displayed.

Benefit:​

Toggle annotation visibility before exporting to control what is included — no extra steps required.


7. CAD Toggle for Mammography Studies​

What changed:​

A Toggle CAD button now appears in the toolbar when a mammography study with CAD SR objects is loaded, globally showing or hiding all CAD markers across every viewport in one click. When active, the viewport overlay displays the iCAD case score and, for Tomo series, clickable slice hyperlinks that navigate directly to flagged frames.

Benefit:​

Instantly compare images with and without CAD overlays and jump to flagged slices without disrupting the reading workflow.
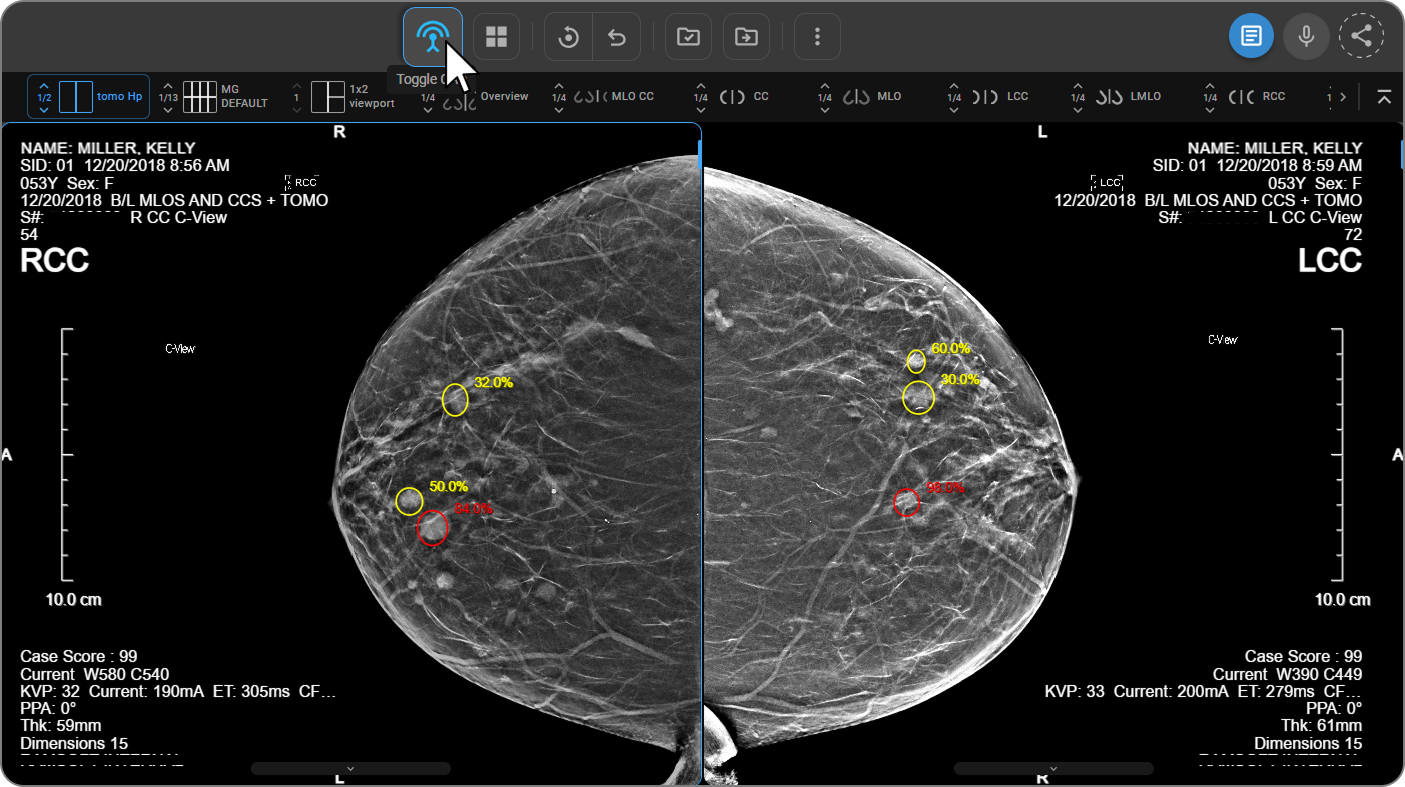
Mobile IV


Important Notes​

  • Blume Mobile Image Viewer: For non-diagnostic patient review only.
  • M-Mode Tools: Only available when an M-Mode ultrasound series is active in the viewport.
  • Cine Controls: Progress bar is only visible when Cine mode is active. FPS is adjusted by hovering over the FPS display and swiping left or right.
  • Hotkey Customization: Mouse buttons and scroll wheel are not valid inputs. System-reserved keys cannot be reassigned. The Back button is hidden during Edit Mode.
  • Time Format: Automatic — no configuration required.
  • Export with Annotations: Only currently visible annotations are captured; hidden annotations are excluded.
  • CAD Toggle: Only appears on mammography studies with CADSR objects. Does not affect user-drawn annotations. Default state is off unless a preference is saved.

Where to Find It​

  • Blume Mobile Image Viewer: Blume app → Completed → View Results → View Images
  • M-Mode Tools: Image Viewer → Customize Toolbar → M-Mode → load an M-Mode ultrasound series
  • Cine Controls: Image Viewer → activate Cine mode → progress bar appears at viewport bottom
  • Hotkey Customization: User Profile → User Settings → keyboard icon; or Image Viewer → More options (⋮) → Customize Hotkeys
  • Time Format: Automatic — no action required
  • Export with Annotations: Image Viewer → toggle annotation visibility → Download / Print / Copy to Clipboard
  • CAD Toggle: Image Viewer → Tools menu → CAD icon (leftmost); mammography studies with CAD objects only

Updated Help Articles​

Product: Worklist Assign, Grouping & Grid Enhancements

· 4 min read

Overview​

This release brings a set of usability improvements to the OmegaAI Worklist, focused on cutting clicks out of high-frequency tasks — assigning roles to studies, filtering grouped columns, and standardizing on the modern worklist grid. Study History and the Teaching Folder also move off the legacy grid and action wheel onto the new worklist grid component, so the worklist experience is now consistent across the application.

What's New​

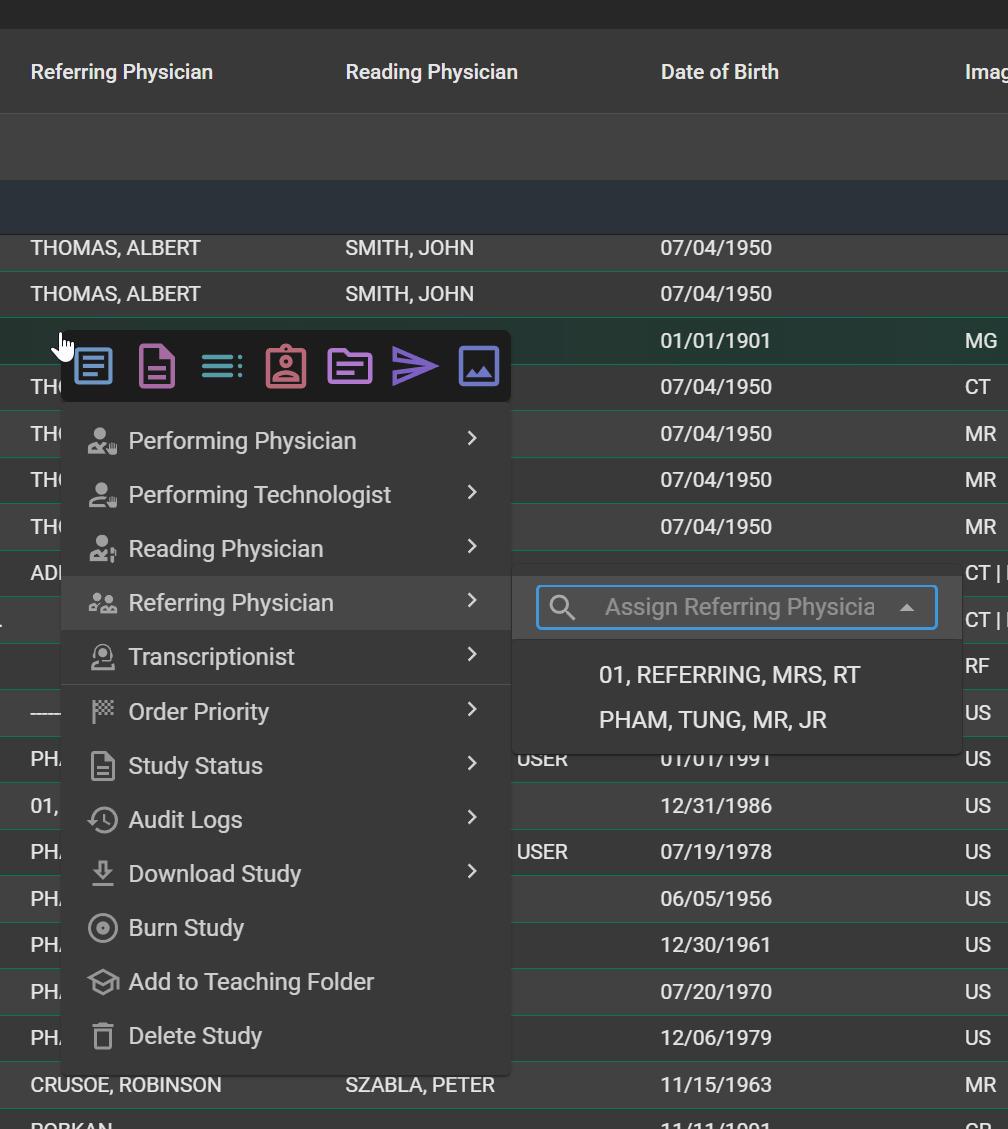
1. Column-Aware Right-Click Assignment​

hp

What changed:​

Right-clicking on a role cell in the worklist — Performing Physician, Performing Technologist, Reading Physician, Referring Physician, Transcriptionist, Status, or Priority — now opens the right-click menu with that role already selected and the search input focused. Type a name fragment, use ArrowUp / ArrowDown to navigate matches, and press Enter to assign. Esc closes the menu without assigning. When multiple studies are selected, the same flow assigns the chosen person to all of them at once. Right-clicking outside of a role column preserves the existing default menu behavior.

Benefit:​

Radiologists and worklist coordinators can complete an assignment in a single interaction — right-click, type, Enter — instead of the previous two-step process of picking the role first and then the person. The impact compounds on high-volume worklists where assignments happen dozens of times per shift.

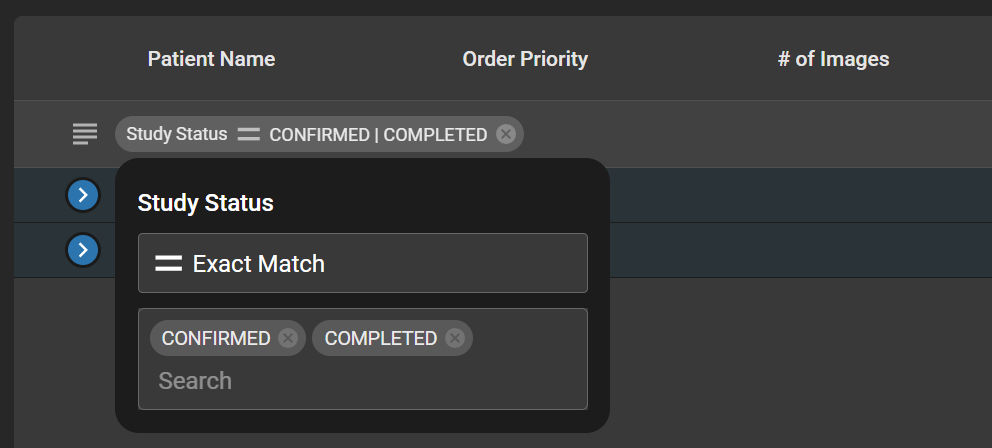
2. Filters on Grouped Columns​

hp

What changed:​

When a column is dragged into the grouping section, the column can now be filtered directly from its group bubble. Clicking the bubble exposes a filter input, and the active filter indicator stays inside the bubble — not as a separate pill at the top of the worklist. If a column is already filtered when it is grouped, the existing filter pill automatically moves into the group bubble. Filters on grouped columns can be cleared independently without removing the grouping itself.

Benefit:​

Users no longer have to apply a filter before grouping, and there is no longer any ambiguity about which filter belongs to which group. Complex grouped views — for example, grouping by Modality and then narrowing to CT and MR — are now intuitive and self-describing.

3. New Grid in Study History and Teaching Folder​

hp

What changed:​

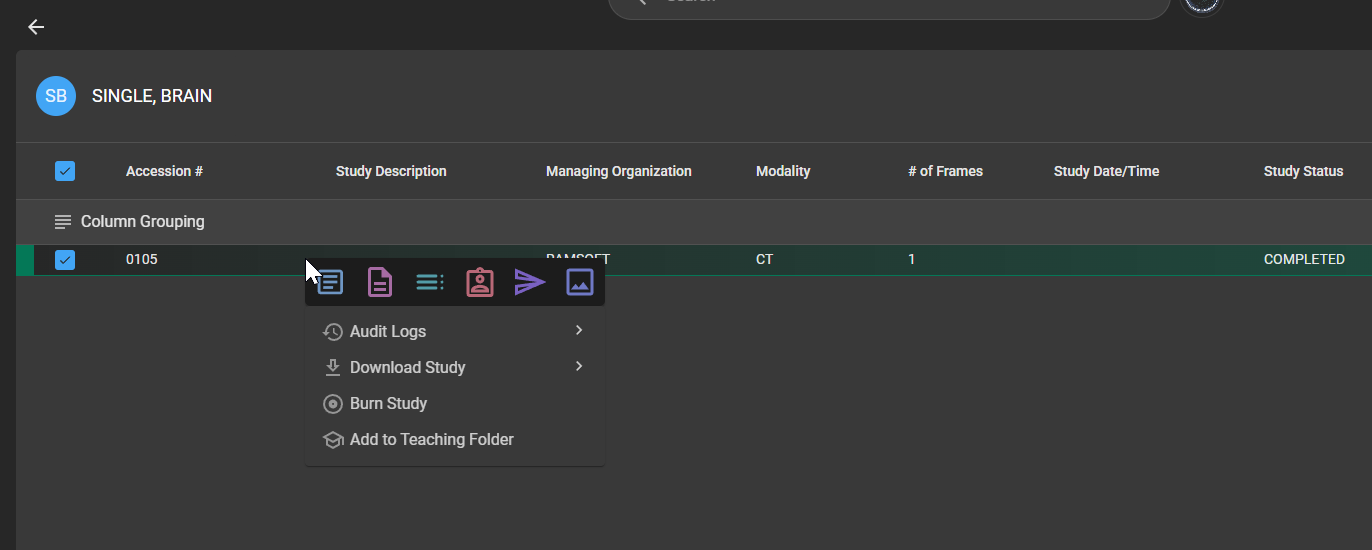
Study History and the Teaching Folder have been migrated off the legacy grid and action wheel onto the new worklist grid component. Both areas now use the standard worklist right-click context menu, including study navigation items such as Document Viewer, Image Viewer, and Study History, plus supports the advanced features such as search-as-you-type filter that already exists in the main worklist.

Benefit:​

The look and feel of these screens is now consistent with the rest of the OmegaAI worklist, so users don't have to learn a separate interaction model for Study History or the Teaching Folder. Power-user features like multi-column sort and the advanced filter become available where they previously weren't.

Important Notes​

  • UAC respected on assignment: The role is only pre-selected in the right-click menu if the current user has permission to assign that role. If not, the menu falls back to its default behavior.
  • Grouped-column filter scope: Clearing a group-level filter removes only the filter — the grouping remains intact. Removing the grouping itself clears the group, the associated filter remains intact and shown as a new filter pill.
  • Legacy grid retirement: The legacy grid and action wheel are no longer available in Study History or the Teaching Folder. All existing UAC and entitlements are preserved on the new grid.

Where to Find It​

  • Column-aware assignment: Worklist → Right-click on any role column cell (Performing Physician, Reading Physician, etc.)
  • Grouped column filters: Worklist → Drag a column into the grouping section → Click the group bubble
  • Study History grid: Patient or Study context → Study History tab
  • Teaching Folder grid: Worklist → Teaching Folder